Author Archives: zxl123

Clone hard drive without Windows OS

Windows may be unbootable due to different kinds of factors, such as mistaken operation, virus attack, and hardware damage. At this time, reinstalling system would be a solution, but our personal data saved on desktop or in My Documents and My Videos may be lost due to reinstallation. Therefore, it is very necessary to transfer needed data out. In addition, even if you plan to ask others for help to fix the system rather than reinstall it, you’d better make a backup for your important files in case of accidents. And to copy hard drive can help complete the transfer or backup in easy operations. Well then, how to clone hard drive without running Windows OS?


There is free bootable drive clone software that can help start computer directly and then clone either the entire hard disk or a single partition to both local and external hard disk. If you do not know which program to download, try using MiniTool Partition Wizard Bootable CD, which is free for all Windows non-server users. For server support, you may need to purchase the server edition. Next, let’s see how to transfer data out without starting Windows by using this program.


Steps to Clone Hard Drive without Windows OS


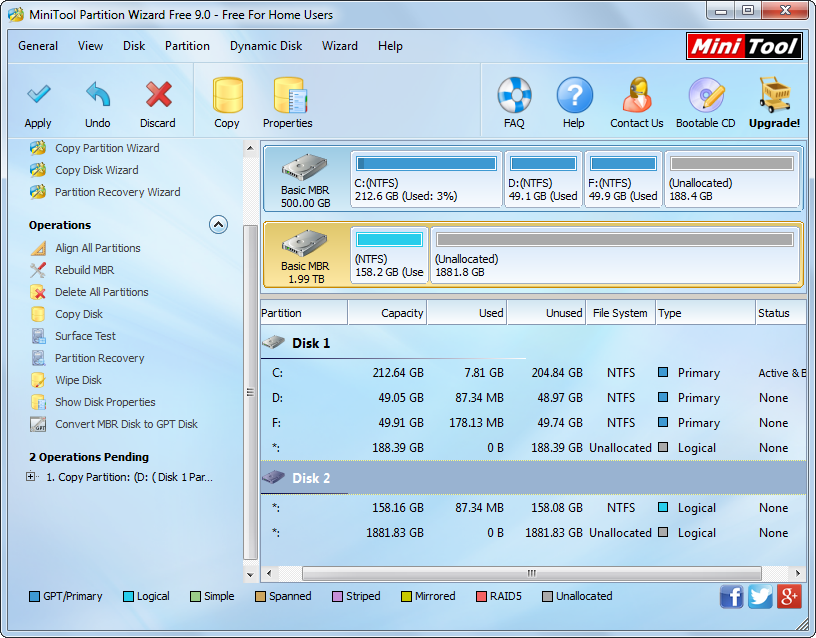
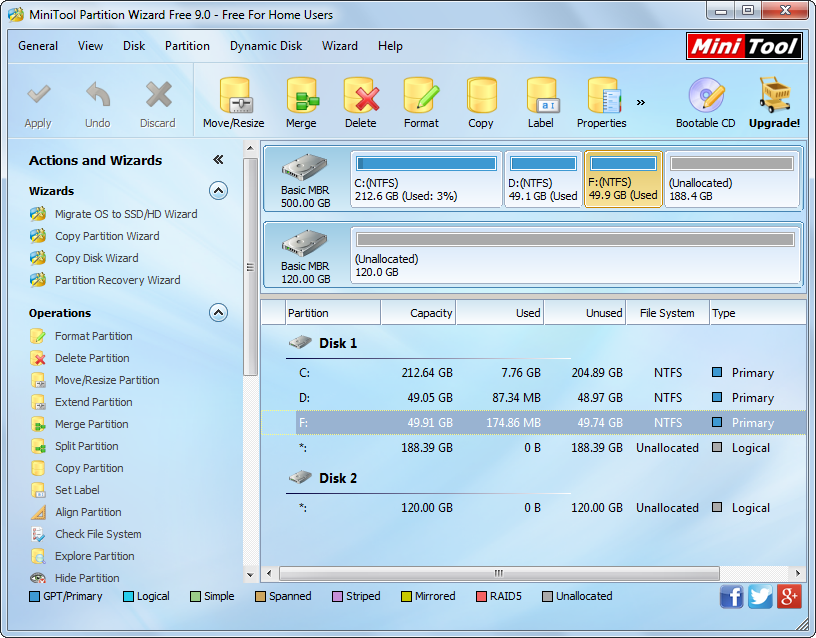
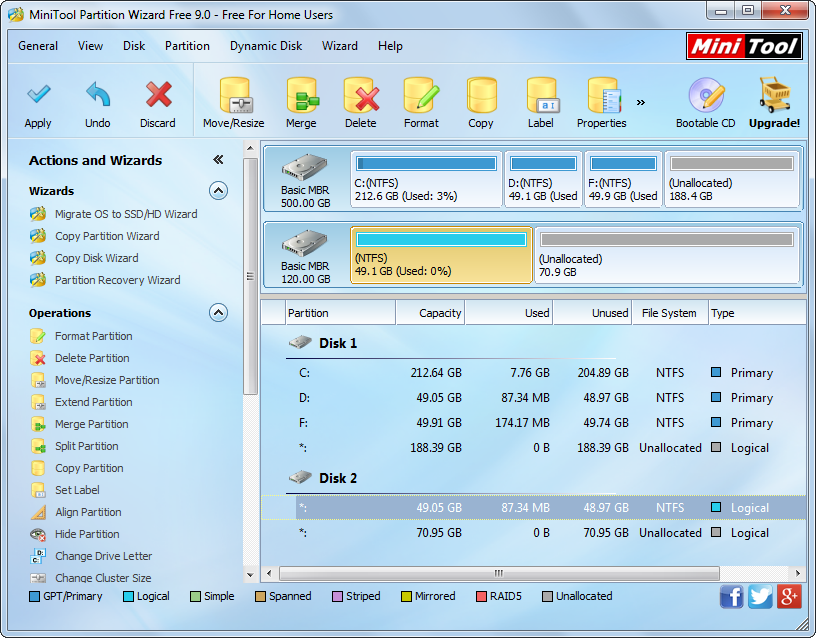
Firstly, please download MiniTool Partition Wizard Bootable CD which is an ISO file from the official website of MiniTool. Then, burn it to CD or DVD to make a bootable disc. Then, set the CD or DVD as the default boot device in BIOS, and boot computer via the bootable disc to get the window below:
minitool-partition-wizard-bootable-cd-main-interface
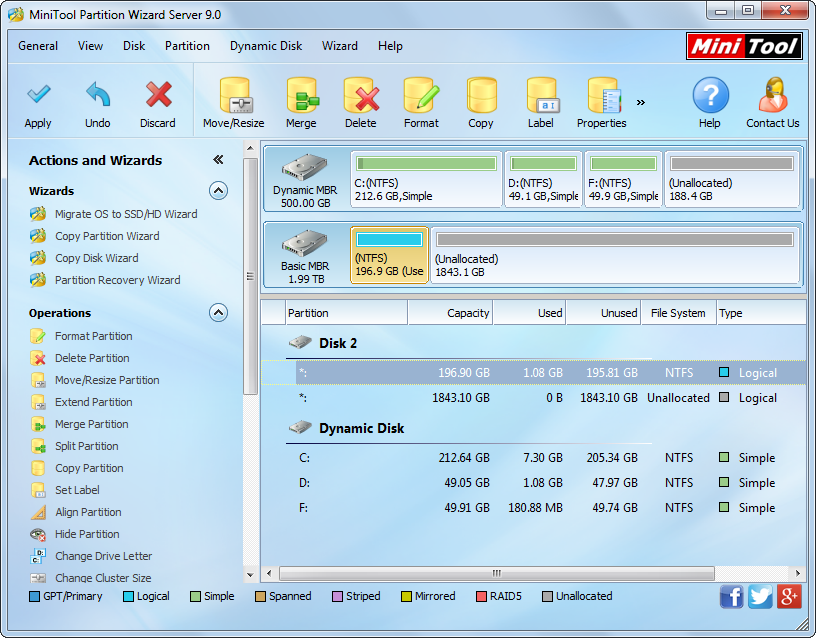
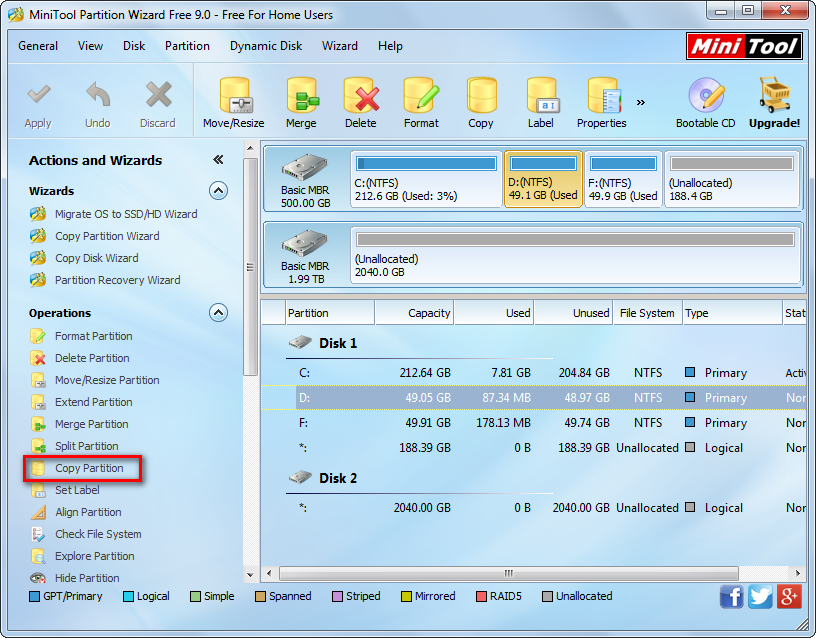
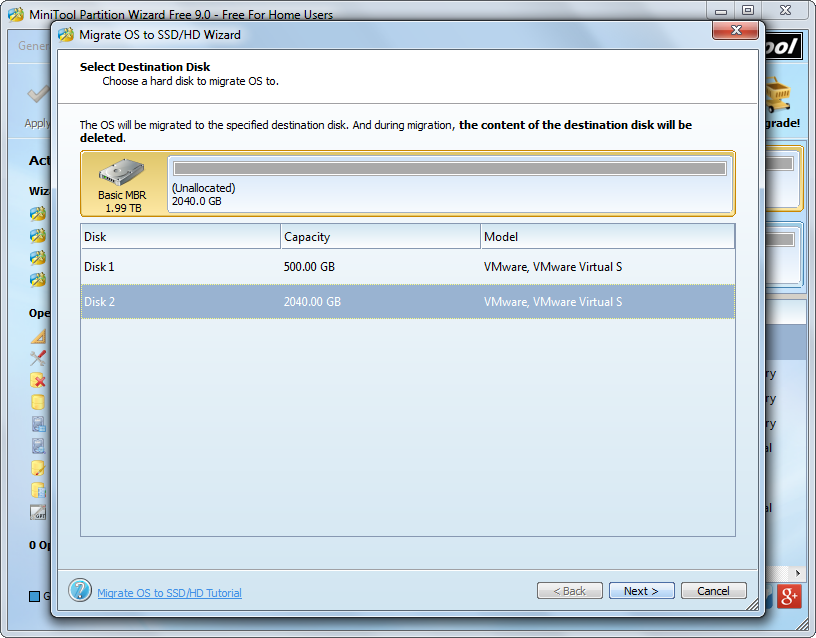
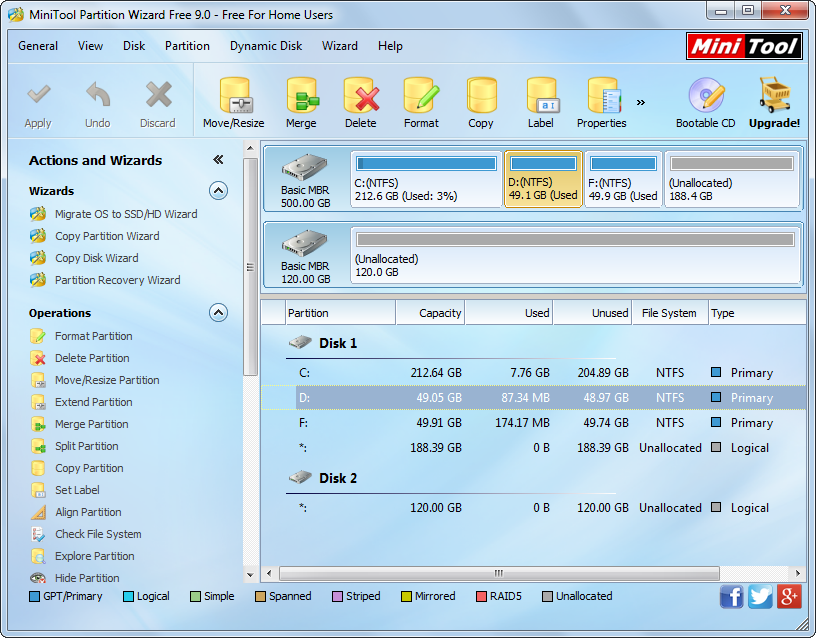
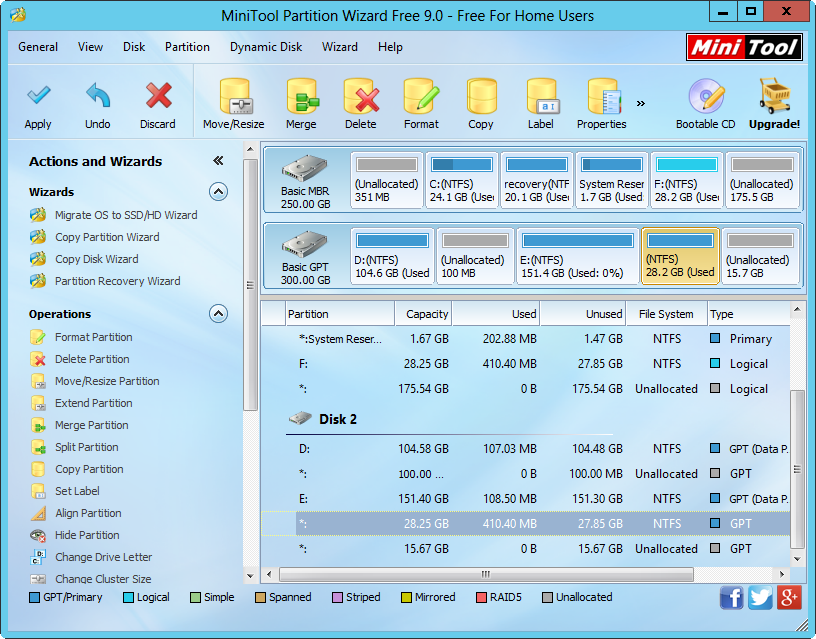
This is the main interface of MiniTool Partition Wizard. To clone a hard drive, we need to select the source drive and choose corresponding function from the left side. Here, let’s copy the boot partition for example. Select the partition and click “Copy Partition”.
copy-partition-without-windows-os-select-unallocated-space-to-save-the-copy
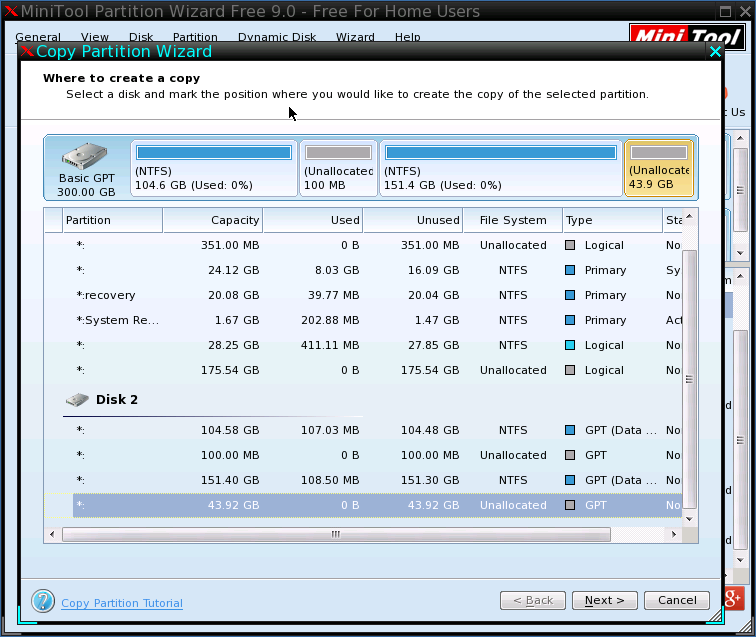
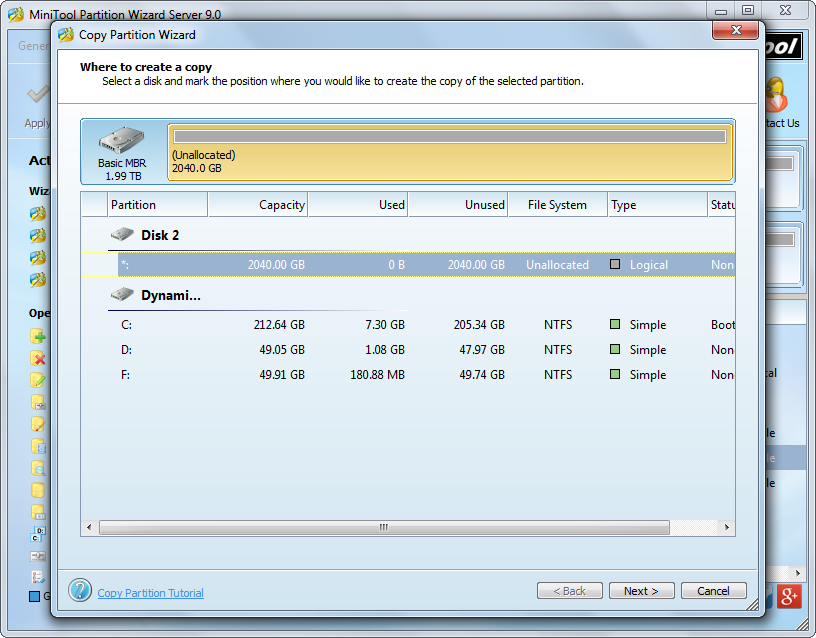
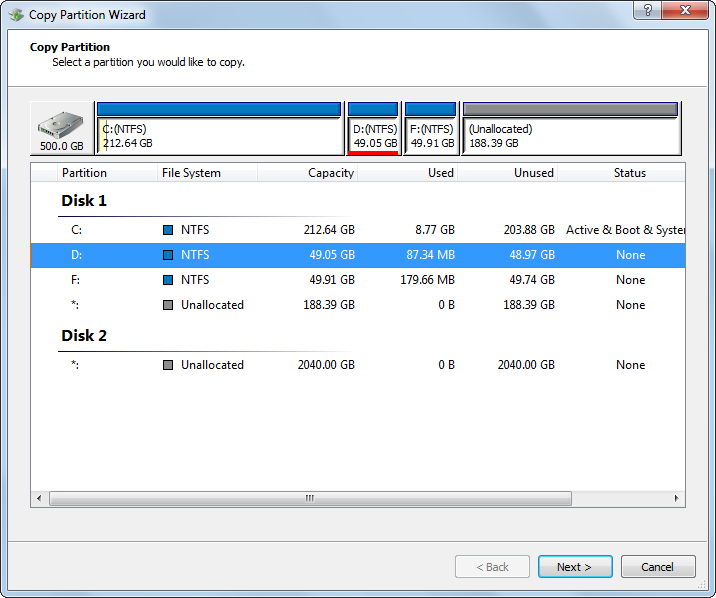
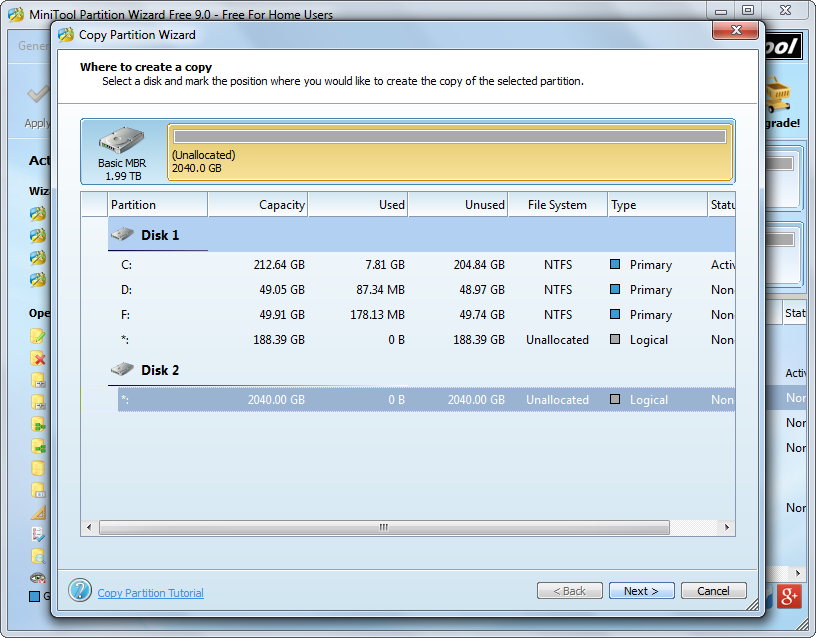
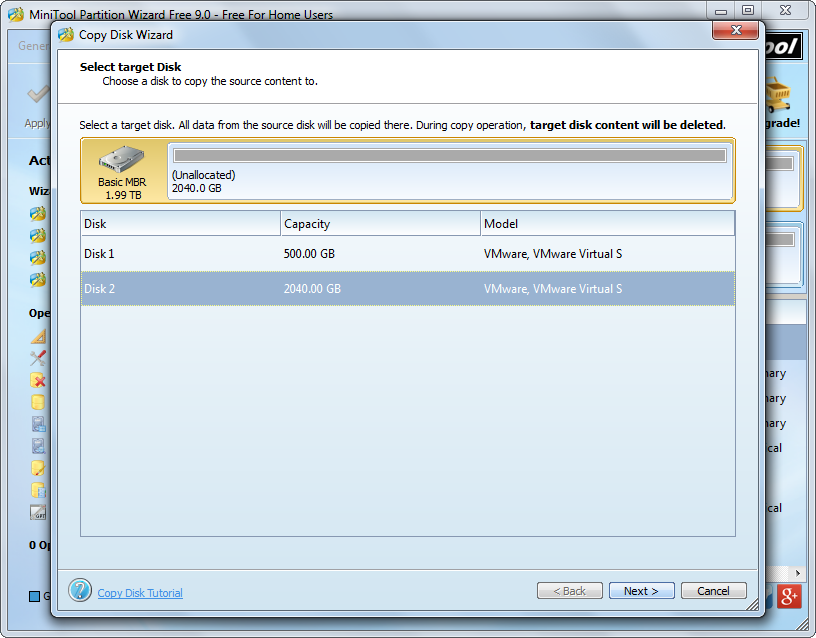
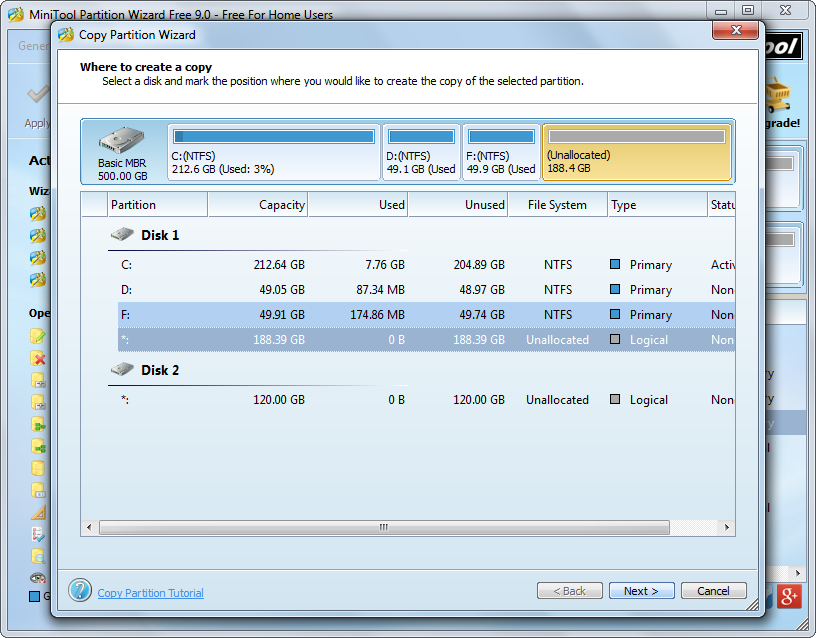
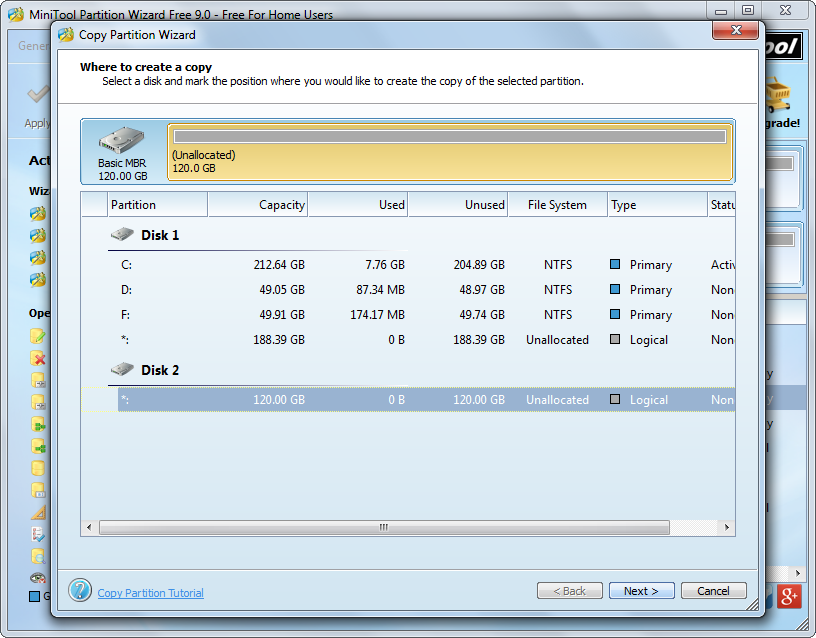
Then, select an unallocated space from another hard disk to save the copy of the source partition and click “Next>”.


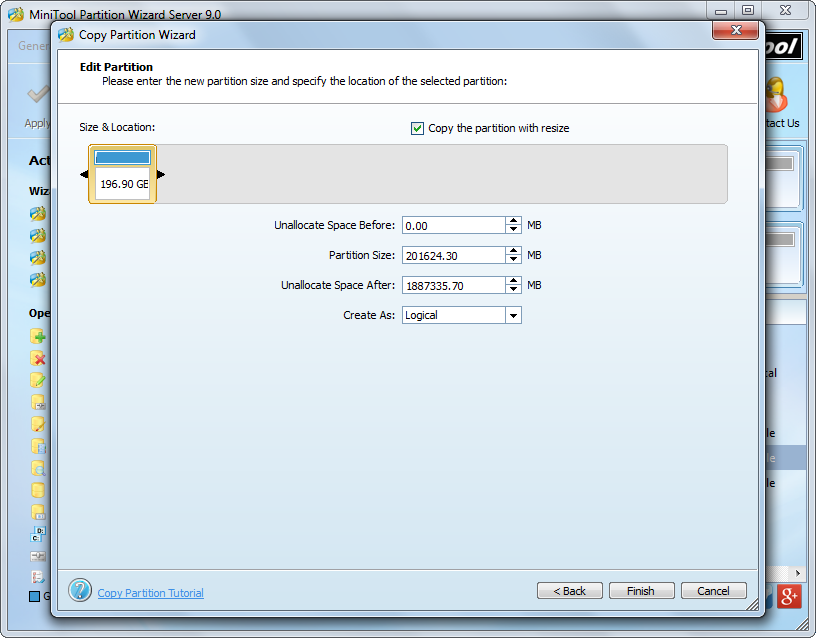
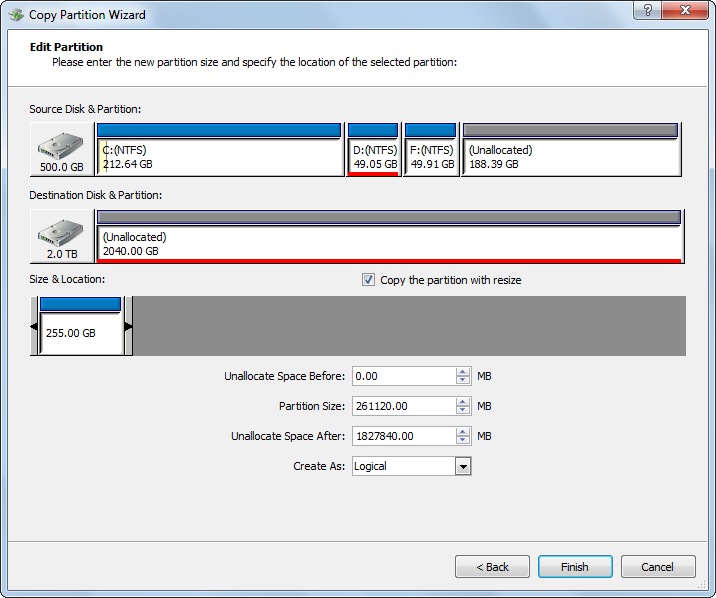
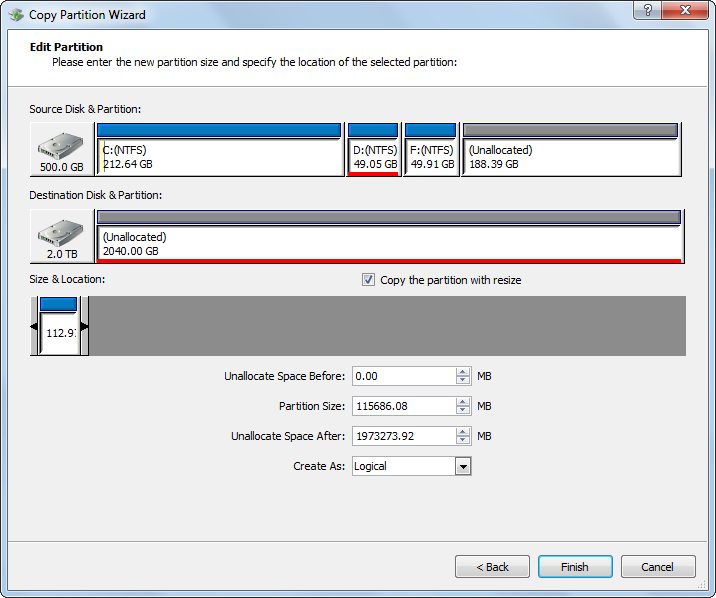
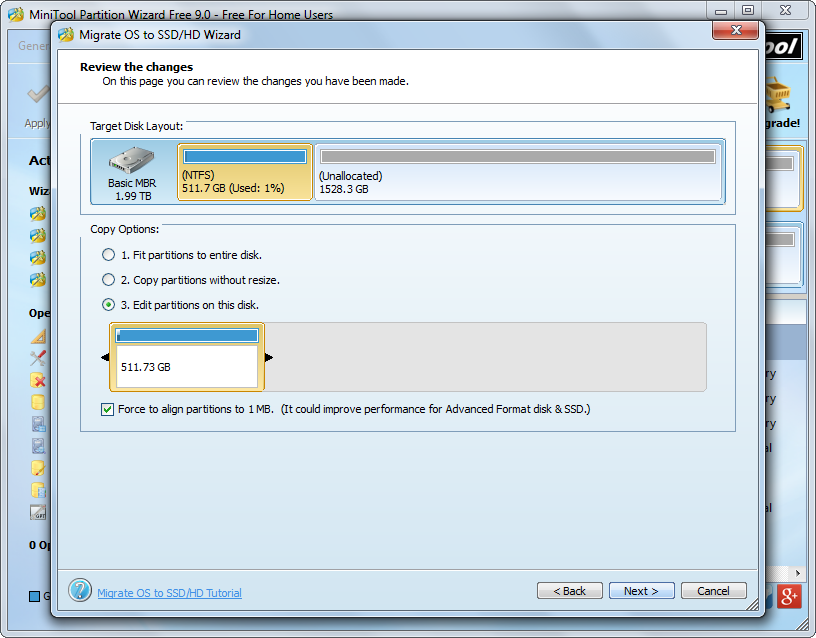
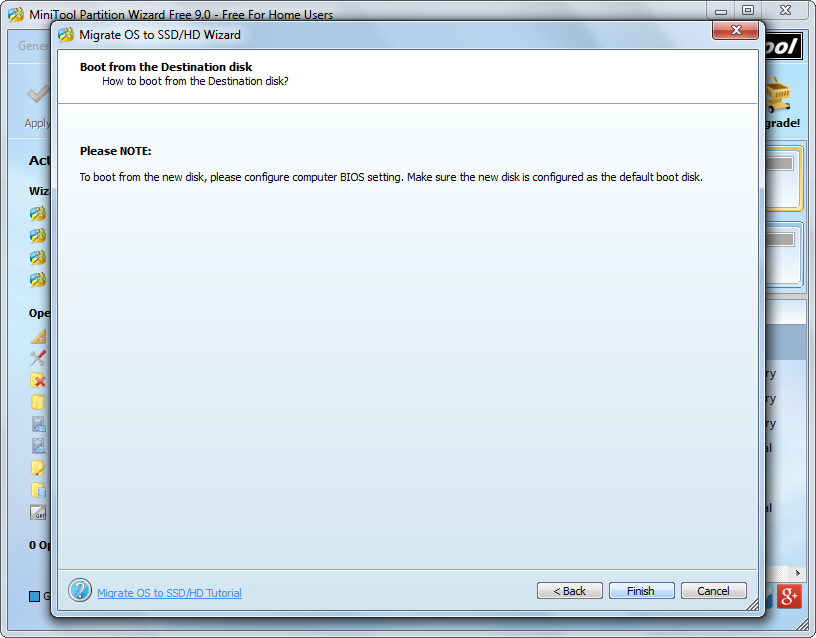
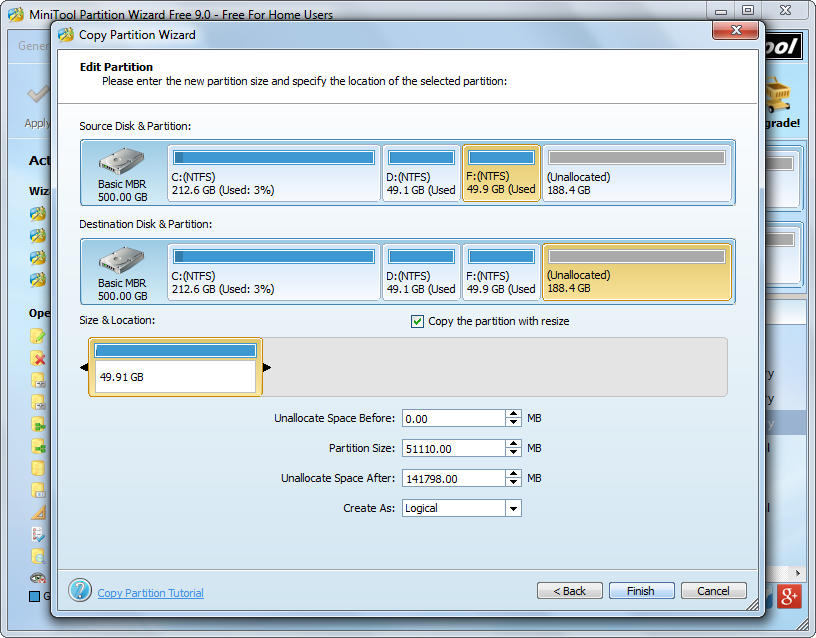
Next, change the size and location for the partition which saves the copy. Of course, you can choose to do nothing in this step but just click “Finish” to go on.
copy-partition-without-windows-os-apply-changes
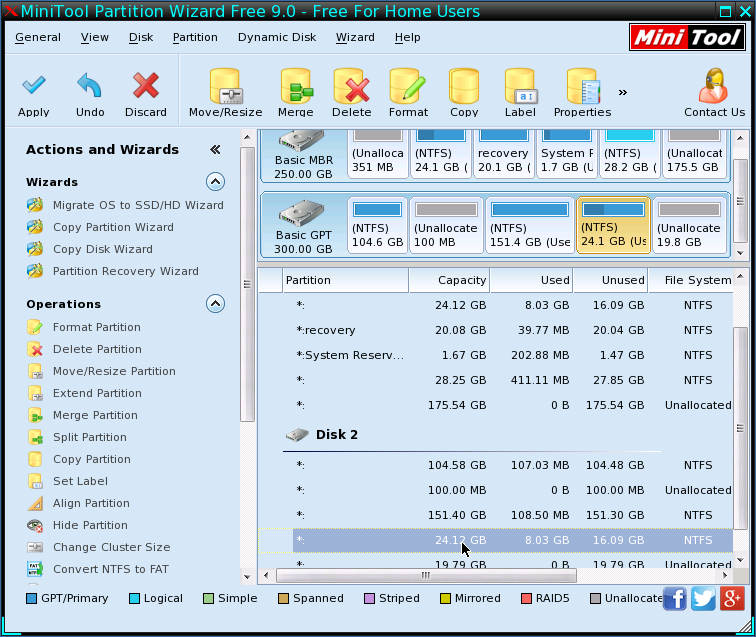
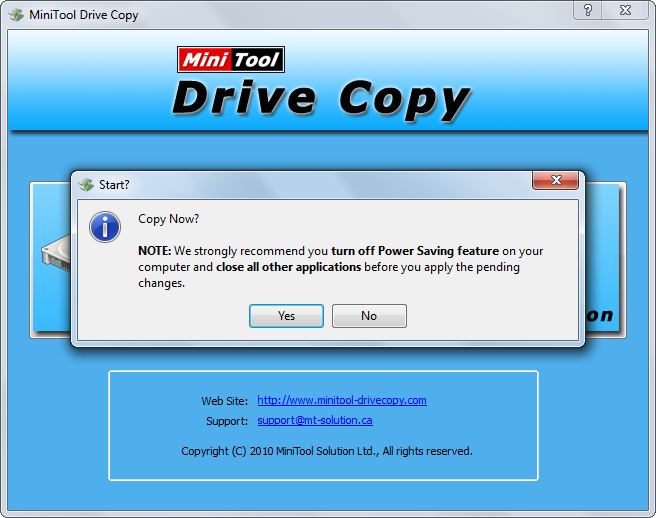
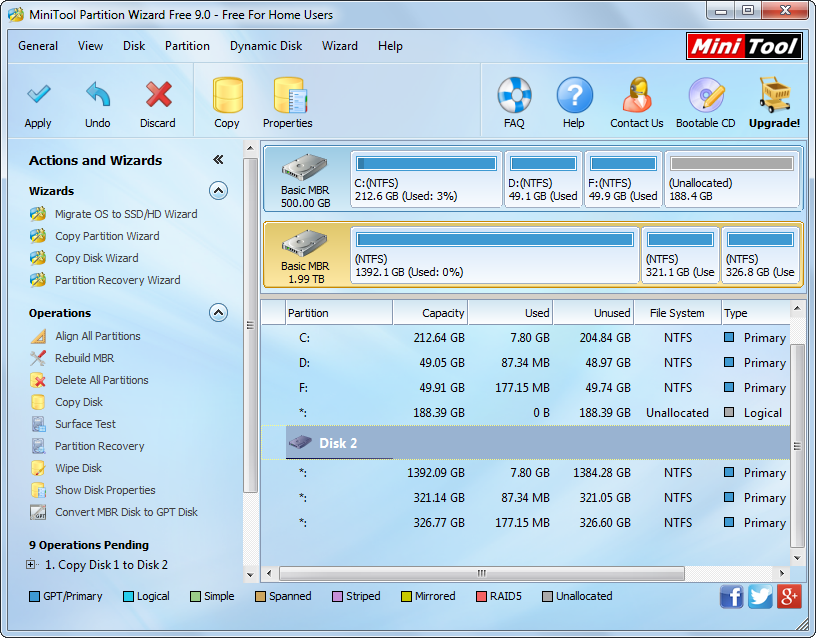
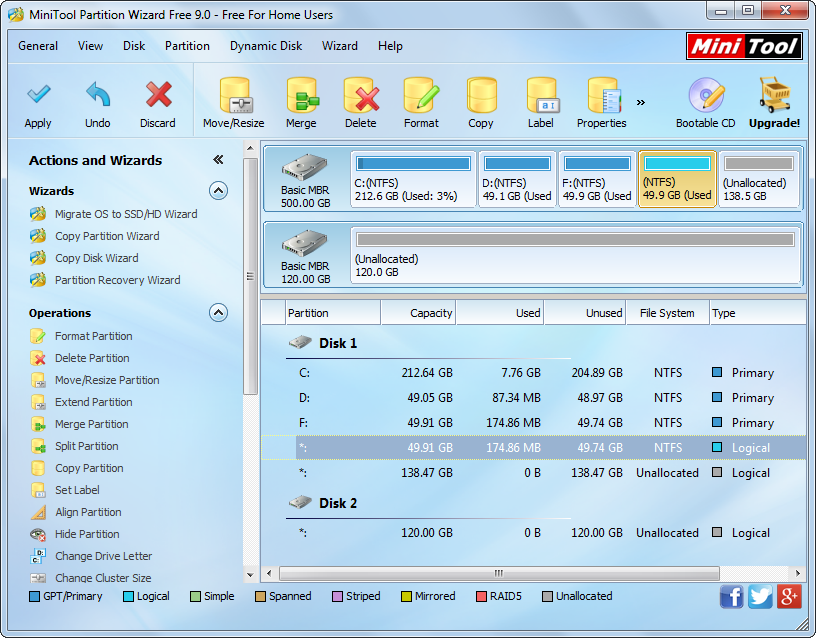
At last, click “Apply” button to make all changes performed.


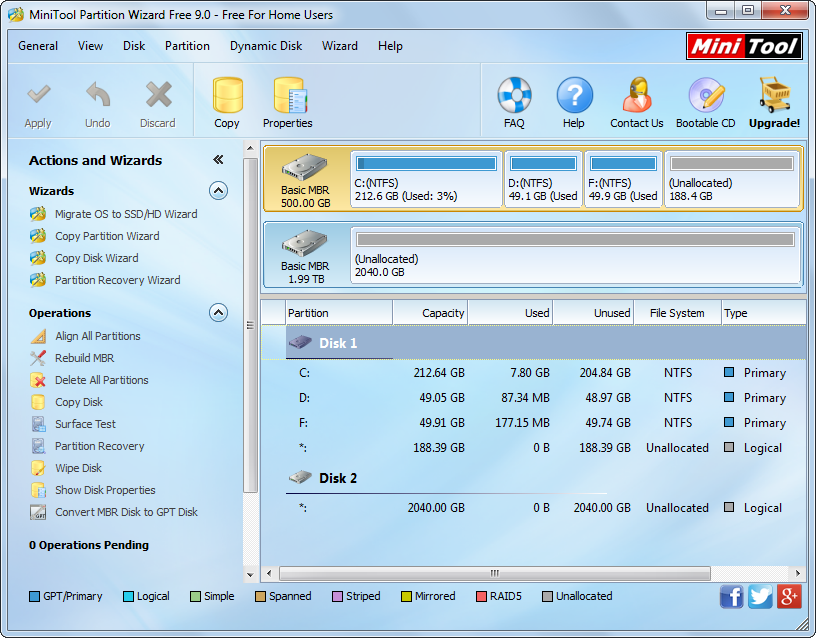
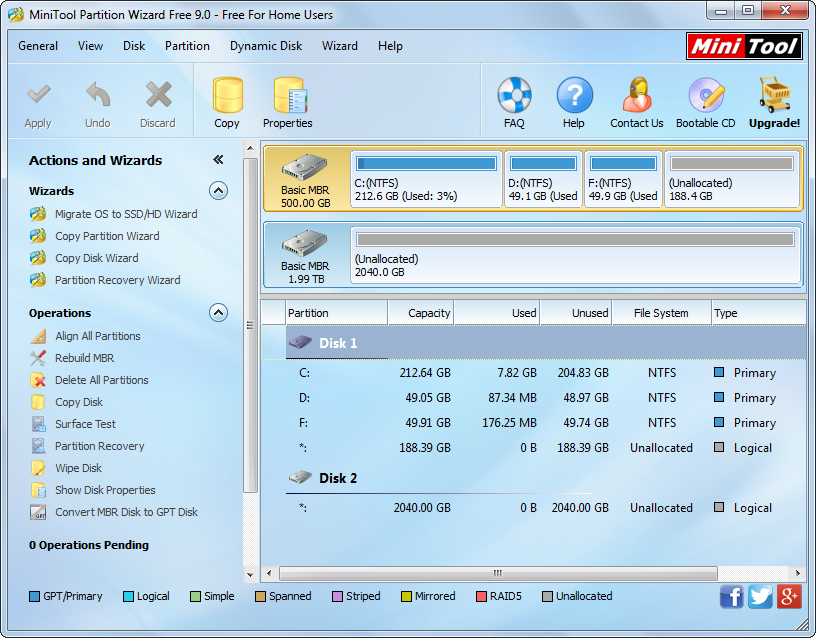
Once MiniTool Partition Wizard shows it copied partition successfully, we can close the program and shut down the computer.


If your Windows OS is also unbootable and want to transfer important data out before reinstalling or repairing, just clone hard drive by using this free bootable drive clone software.

Transfer data from dynamic disk to basic disk

Question: I have a disk which was converted to dynamic by mistake. Then, I planned to revert it back to basic disk since I am unaccustomed to using dynamic disk. However, Microsoft asks me to delete all exiting volumes before converting. As the dynamic disk saves a great number of important files, I want to transfer data from dynamic disk to a basic disk. What is the fastest way?


Answer: to save time, you’d better copy dynamic volume instead of copying files directly to basic disk, which will save much time.


What Is Copying Dynamic Volume


Generally, we can copy/paste or cut files directly to a new place so as to create a copy for source file. Similarly, we are able to create a copy for dynamic volume. It is to clone the volume as well as all included files to another place. Since it treats the volume as an entirety, much time will be saved. Well then, how can we copy dynamic volume to transfer data from dynamic disk to basic disk? Please see the following solution.


How to Copy Dynamic Volume to Basic Disk


First of all, please download a piece of drive clone software from the internet, which should support dynamic volume. Here, we suggest using MiniTool Partition Wizard. After installation, please launch it to get its main interface below:
minitool-partition-wizard-main-interface
Then, select the volume that needs copying and choose “Copy Volume” from the left side.
transfer-data-from-dynamic-disk-to-basic-disk-select-unallocated-space-on-dynamic-disk
Next, select an unallocated space from the basic disk to copy the dynamic volume to and click “Next>”. If there is no unallocated space on the basic disk, please shrink an exiting partition to create via the function “Move/Resize Partition”.
transfer-data-from-dynamic-disk-to-basic-disk-move-resize-partition
Now we can change partition size and move partition location by operating the partition handle. After getting desired size and location, please click “Finish” to go back to the main interface.
transfer-data-from-dynamic-disk-to-basic-disk-apply-changes
Now we can see the source dynamic volume has been copied to basic disk, which shows all data will be transferred to basic disk from dynamic disk as long as we click “Apply” button to make all changes performed.


However, if you have more than one dynamic volume to copy, just copy them one by one. And this is a quite fast way to transfer data from dynamic disk to basic disk compared with copying files directly.

Copy hard drive partition free

Most users know it is a necessity to create a backup for their important files since this can help them get out of data loss issues in the shortest time. Common users choose to copy and paste files to make such a backup, but this solution will cost lots of time or even bring damage to original data especially when there are lots of files to backup. And experienced users would like to copy the entire hard disk or hard drive partition to backup data, because this is a time-saving and safe enough solution.


To clone hard drive or partition, many users choose to employ a piece of professional data backup software. However, this kind of software is always chargeable, and some of them are even quite expensive. Actually, if you just need to create an ordinary copy for important files rather than make advanced backups like incremental backup, free drive clone software can meet your demands. Here, we suggest using MiniTool Drive Copy.


It provides users with 2 modules to create copies for important data, including “Disk to Disk” and “Partition to Partition”. The former aims at cloning the entire hard disk while the latter targets copying a single partition. Just choose the most appropriate module according to actual demands. Next, we take cloning hard drive partition in Windows 7 for example to show users how to operate this program.


Copy Hard Drive Partition for Free with MiniTool Drive Copy


After running the free drive clone software successfully, we can see its startup interface like this:
minitool-drive-copy-start-interface
Here are 2 functional modules mentioned just now. Please select “Partition to Partition” module to clone a single partition.
copy-hard-drive-partition-for-free-select-source-partition
Then, select the hard drive partition which needs copying and click “Next>”. Then, select an existing partition or unallocated space to save the copy of the source partition and click “Next>”. Tip: if you select an existing partition, all data saved in this partition will be erased once the copy is completed. Therefore, users had better choose a relatively empty partition or unallocated space to save the copy. After that, you can change the size and location for the partition which saves the copy:
copy-hard-drive-partition-for-free-confirm-changes
To resize partition, please change the length of the handle. To move partition, please change the location of the handle. Then, click “Finish” to continue.


At last, click “Yes” to confirm operations. Once MiniTool Drive Copy shows it succeeded in cloning a hard drive partition, the backup has been made.


If you also want to make a common backup for your important data in case of data loss, try using free drive clone software to copy hard drive or hard drive partition.

Move data to a safe disk

You may save lots of important data on local hard drive and think these data are safe enough since anti-virus software has been installed. But as a matter of fact, not all viruses can be prevented, and furthermore our data may get damaged or lost due to other factors apart from virus attack, such as mistaken operation, power outage, and hardware damage. Therefore, it is very necessary to move our significant data to a safe disk which can be external hard drive, USB flash drive, memory card, etc.


We can transfer these data by copying and pasting if there are not so many data to move. However, if there are so many files, users had better clone a disk or certain partition to move data, because this will save much time.


To make a disk clone or partition clone, we had better resort to free drive copy software. There are 3 reasons: simplify operations, give better protection to data, and save much money. Here, the freeware MiniTool Partition Wizard is highly recommended since it has been used by more than 16 million users. Next, we will show detailed steps to move data to a safe disk by using this program. Tip: this is a software specially running on Windows platform.


How to Move Data to Safe Disk with MiniTool Partition Wizard


Firstly, run and launch the free drive copy software to get its main interface:

minitool-partition-wizard-main-interface
Here, all disks and partitions are listed. In this interface we should confirm there is an unallocated space on the safe disk to hold our important data. If there is no such space, shrink an existing partition on the safe disk to create. Then, transfer data like this: if you want to transfer data from one disk to another disk, select the source disk and choose “Copy Disk” feature from the left side. If you want to move data from one partition to a safe disk, select the very partition and choose “Copy Partition” feature. Here, we take the latter for example to get the following interface:
move-data-to-safe-disk-select-unallocated-space-to-save-source-data
Here, users need to select an unallocated space from the safe disk to transfer data to and click “Next>”. Then, change the size and location for the new partition and click “Finish”.
move-data-to-safe-disk-apply-changes
At last, click “Apply” button on the top to make all previous changes performed. Once the clone is completed, our important data are moved to the safe disk successfully.


However, if you want to transfer data saved in one hard disk to a relatively safe hard disk, please see Copy Disk to get detailed steps.

Backup HDD partition Windows 7

A new hard disk drive (HDD) cannot be used to save data unless we partition it, which is to create partitions on the hard disk. And these partitions may save lots of important files, such as Windows OS, study or working documents, and precious photos. What if these files get lost or damaged? Undoubtedly, we need to do repeated work, which is so time-wasting, or bear economic losses. Therefore, it is highly suggested that users backup the HDD partition which saves significant files. Next, we take Windows 7 for example to show users how to make such a kind of backup.


Firstly, users need to download a piece of drive backup software from the internet, because Windows 7 does not offer a good function to clone the specified HDD partition. However, most backup tools are chargeable, and some of them are even expensive. Considering this situation, we suggest using MiniTool Drive Copy, which is a free drive backup software for users who are running Windows 7, Windows 8, or other Windows non-server operating systems.


After the program has been installed, you can run it to clone HDD partition under Windows 7. Detailed steps are as follows.


Backup HDD partition in Windows 7 with MiniTool Drive Copy


If you want to create the backup on a different disk, please make sure the target disk has been connected and recognized, and then launch the program. If the backup will be created on the same disk, just launch the program to get its main interface:
minitool-drive-copy-start-interface
There are 2 modules available, but we need to choose “Partition to Partition” since we are going to clone a single partition rather than the whole HDD. Then, all disks and partitions are listed:
backup-hdd-partition-in-windows-7-select-source-partition
Please select the partition you want to backup and click “Next>”. Then select an existing partition or unallocated space to save the backup of the source HDD partition and click “Next>”. Tip: if you are selecting a partition to save the backup, all data stored in this partition will be erased, so please transfer important files to a safe place in advance. After these operations, users will get an interface where they can change the size and location of the target partition:
backup-hdd-partition-in-windows-7-move-resize-partition
Just change the length of the handle to resize partition or change the location of the handle to move partition position, and then click “Finish”.
backup-hdd-partition-in-windows-7-confirm-operations
At last, click “Yes” to confirm all changes made just now. When MiniTool Drive Copy shows it copied partition successfully, your work is done.


Of course, by using this free drive backup software, you can also clone the entire HDD apart from a single partition of Windows. For detailed steps, please see Copy Disk.

Freeware to clone Western Digital hard drive

As we know, Western Digital (WD) is one of largest hard disk manufactures all over the world, and its hard drives are widely used on both PC and laptop. Therefore, questions, for instance what is the best freeware to clone Western Digital hard drive, are often asked on different types of forums or technical websites.


It is a wise choice to ask freeware for help, because this will save much money and time. Here we suggest using MiniTool Partition Wizard to clone a hard disk. Firstly, it provides powerful data protections in the whole process of disk clone even if power is off suddenly. Secondly, you will be given detailed operating prompts in every step. Thirdly, this program can be compatible with almost all Windows operating systems, including Windows XP/Vista/7/8/10 and Windows Server 2003/2008/2012. Moreover, it not only can copy the entire Western Digital hard disk but can clone a single partition on the disk, and the copy can be used directly.


Maybe, some users are doubtful about security and functions of MiniTool Partition Wizard since it is a piece of freeware. Don’t worry. So far, it has been used by more than 16 million users, and 95% of them give it high ratings. Next, let’s see how easy it is to copy Western Digital hard disk by using this freeware.


Clone Western Digital Hard Drive with MiniTool Partition Wizard


Tip: the disk that will save the copy of the Western Digital hard disk should be connected at first if it is external; if it is a portable drive, you can connect it with computer either before or after starting the program.


After the freeware is installed, please open and launch it to get the main interface shown below:
minitool-partition-wizard-main-interface
Then, select the Western Digital hard drive and choose “Copy Disk” feature from the left side.
clone-western-digital-hard-drive-select-target-disk-to-save-copy
Next, select the disk where the copy of Western Digital disk will reside and click “Next>”. Then, change the size and location of partitions on the drive and click “Next>”. After these operations, you can see a boot note. Please read the note and click “Finish” to go back to the main interface where a preview effect is offered:
clone-western-digital-hard-drive-apply-changes
If the preview effect is desired, please click “Apply” button on the top to make all changes performed.


For more information about this function, please see Copy Disk.


Apart from Western Digital hard drive, the freeware MiniTool Partition Wizard works well on other types of hard disks, like Samsung hard disk, Seagate hard disk, and Maxtor hard disk. Just try this program out when necessary.

Transfer Windows 7 to bigger drive

When installing Windows 7, we may allocate dozens of GB space for the partition that will save Windows 7 system files (it is always the drive C) and think these space are enough. However, after using the system for a period of time we may find there is little free space left in this partition since programs, system updates, software updates, and so on are saved to this partition continuously. As a result, Windows runs slowly. At this time, if there is a bigger hard disk available, most users would like to transfer Windows 7 to bigger hard drive so as to get smooth computer running. Well then, how can we complete the transferring without bringing any influence on system?


It is highly suggested that users turn to a free system migration software, because using software will simplify operations. However, not any software can be chosen. If you use a program with poor quality to transfer Windows 7 to bigger drive, the migrated system may be unbootable. More seriously, Windows 7 on the source disk may crash. Here we recommend using MiniTool Partition Wizard, which has been proved to be a safe and easy to use system migration freeware.


Transfer Windows 7 to Bigger Drive with MiniTool Partition Wizard


Firstly, launch the system migration freeware to get the main interface:
minitool-partition-wizard-main-interface
Then, choose “Migrate OS to SSD/HD Wizard” feature from the left side.
transfer-windows-7-to-larger-drive-select-the-larger-drive
Next, select the larger hard drive to migrate Windows 7 to and click “Next>” to get the following window:
transfer-windows-7-to-larger-drive-resize-partition-on-larger-drive
All partitions related to Windows startup will be cloned to the larger drive, and we can change the size and location for these partitions now. After getting desired size and location, click “Next>” to get a boot note:
transfer-windows-7-to-larger-drive-boot-note
This note is very useful for users who are employing MBR + Legacy BIOS boot. Remember to set the larger hard drive as the default boot drive when rebooting computer. If you are using GPT + UEFI boot, just ignore the note and click “Finish”.
transfer-windows-7-to-larger-drive-apply-changes
At last, click “Apply” button on the top to make all changes performed. Tip: since Windows 7 is running, we will be asked to reboot computer. Click “Start Now” and MiniTool Partition Wizard will make all changes in boot mode.


Now Windows 7 has been transferred to the larger hard drive. Actually, if the source disk has a lot of free space left, there is no need to migrate Windows 7, and you can extend the Windows partition by taking free space from other partitions or unallocated spaces on the same disk. For details, please see Extend Partition.

Create a backup for one partition

With the application of dynamic disk, we can create a mirror for the volume which saves important files so as to create one or more copies in case of accidental data loss or system crash, and it is called mirrored volume. However, if we want to create such a backup, the following 2 conditions should be met:
1. A mirrored volume must be created on 2 or more dynamic disks. If you are using basic disks, convert them to dynamic disk. Tip: some operating systems like all Windows home editions do not support booting from dynamic disk.
2. Only simple volume can be mirrored.


Well then, what if there is only one hard disk or we want to make a mirror for striped volume or spanned volume? Actually, a piece of drive clone software can meet this demand.


There is drive clone software which can help create a backup for one partition on any connected hard disk, and all types of partitions (primary or logical) and volumes (simple volume, striped volume, spanned volume, mirrored volume, and RAID volume) are supported. Moreover, operations will be simplified so that common users can operate it with easily. However, if you do not know which software is available, we suggest using MiniTool Partition Wizard. Please see the following example to get detailed steps to make a mirror for one partition in Windows OS.


How to Create a Backup for One Partition


If the drive clone software has been installed, please run and launch it to get its starting interface:
minitool-partition-wizard-main-interface
Then, select the partition you want to backup and click “Copy Partition” feature from the left action pane.
create-a-backup-for-one-partition-select-unallocatd-space-to-save-backup
Next, select an unallocated space from any hard disk to save the backup of source partition and click “Next>”, but the space should be large enough to hold all content on the source disk. Tip: if there is no such unallocated space, users need to shrink an existing partition to create before doing any operations.
create-a-backup-for-one-partition-change-partition-size-and-location
Now we can change the size and location for the partition which saves the backup of the source partition. After getting desired partition size and location, click “Finish” to go back to the main interface.
create-a-backup-for-one-partition-apply-all-changes
At last, click “Apply” button and MiniTool Partition Wizard will apply all changes made just now to computer automatically.


However, if you want to create a backup for dynamic volume rather than basic partition, MiniTool Partition Wizard Professional or more advanced editions is needed. For detailed information about each edition, please see Compare Main Features.

Copy one partition to external HDD

In many situations, we need to copy one partition to external HDD. For example, certain partition saves a lot of important files so that we want to copy this partition to external HDD to create a backup; local hard disk is running in low disk space, so we plan to clone a partition to external hard disk and then free up local disk space. Well then, how can we create such a kind of copy? Definitely, a professional drive copy software is needed since it can save much time and simplify operations.


Free Drive Copy Software Recommendation


Searching on the internet you can find a lot of such tools, but most of them are chargeable. If you are unwilling to purchase a program, try using MiniTool Partition Wizard, which is a freeware for Windows non-server users. Moreover, it can help users save much time compared with copying files directly. During the cloning process, all data will be under great protection even if the operation ends suddenly.


Copy One Partition to External HDD with MiniTool Partition Wizard


First of all, download and install the free drive copy software to computer. Then, launch it to get the main window below:
minitool-partition-wizard-main-interface
Here all disks as well as partitions are shown. To clone a partition to external hard disk, we should create an unallocated space on the external drive to save the copy of the source partition (of course, if there is unallocated space available, just ignore this step). Please select a partition which has much unused space left and click “Move/Resize Partition” feature. Then, shorten partition handle to create unallocated space and click “OK”. Once the unallocated space is made, we need to select the partition which needs copying and choose “Copy Partition” function from the left side.
copy-partition-to-external-hdd-select-unallocated-space-to-save-copy
Then, select the newly created unallocated space and click “Next>”. After these steps, you are able to change the size and location for the partition which saves the copy of source partition, and next click “Finish” to go back to the main interface:
copy-partition-to-external-hdd-apply-change
Now we can see the source partition has been copied to external HDD, but this is just a preview effect. And users need to click “Apply” button on the top to perform all pending operations.


Actually, apart from copying a single partition, this program is capable of cloning the entire hard disk. For detailed steps, please see Copy Disk. Now download the free drive copy software MiniTool Partition Wizard to backup your important data or transfer files to external drive.

How to backup data on partition

Question: I have a partition which saves all previous photos and videos taken in recent years. Being unwilling to lose anything, I’d like to make a backup for all these items on another hard disk. However, these files are nearly 60GB, and I know copying and pasting them would cost a lot of time. Can anyone show me how to backup data on a partition with ease?


Answer: you can copy the entire partition to create such a backup, because all data will be cloned along with partition copy. More importantly, a lot of tests have proven this will save nearly half of the time compared with copying files directly. To be specific, you may cost one hour to copy and paste 100GB files, but copying partition which saves 100GB files may cost 30 minutes. Well then, how to copy a partition?


To do this kind of operation users need to download a free drive copy software from the internet since Windows does not provide a good solution. And MiniTool Partition Wizard may help you a lot. This program brings no damage to data in the process of partition clone, and the backup can be created in several steps. For detailed steps, please see the following demonstration.


How to Backup Data on Partition with MiniTol Partition Wizard


After running and launching the free drive copy software successfully, we can see its main window below:
minitool-partition-wizard-main-interface
Here all partitions are listed. If we want to copy a partition, there must be an unallocated space which is large enough to save all content on the source partition. If there is no such space, we need to create one by shrinking an existing partition via the function “Move/Resize Partition”. After the unallocated space is created, we need to select the partition which needs copying and click “Copy Partition” feature from the left side.
how-to-backup-data-on-partition-select-unallocated-space-to-save-the-copy
Next, select an unallocated space from any hard disk to clone source partition to and click “Next>”.
how-to-backup-data-on-partition-change-partition-size-and-location
Now we are able to change the size and location of the cloned partition. After getting desired partition size and location please click “Finish” to go back to the main interface.
how-to-backup-data-on-partition-apply-changes
At last, click “Apply” button on the top to make all changes performed, and you will find this will cost much less time.


Apart from backing up data on a partition, MiniTool Partition Wizard is capable of backing up the entire hard disk, too. For detailed steps, please see Copy Disk.