Author Archives: zxl123

Copy system drive to SSD

Question: I got a 120GB solid state drive recently, so I’m going to transfer Windows 7 from HDD to SSD since someone told me installing Windows on SSD will make my computer run much faster. So can I copy the system drive (the drive Windows 7 is installed) to SSD for system migration? I don’t want to clone the entire system disk, which must be time-consuming.


Answer: it is not a wise choice to copy system drive for system migration. To move Windows from one disk to another disk not only requires transferring Windows system files and boot files but requires fix and update boot information on the SSD. If we just copy the system drive to SSD, Windows on the SSD may be unbootable due to lacking correct boot parameters. Actually, the best way to do this is to migrate Windows from HDD to SSD by using a professional system migration tool, because this kind of tool will do everything required by transferring a OS.


On the internet you can find a lot of such tools, but some of them may bring damage to system. For sake of security, we suggest using MiniTool Partition Wizard Free which has been praised by many users. More importantly, it is a freeware. Next, let’s see detailed operations.


How to Migrate Windows to SSD with MiniTool Partition Wizard


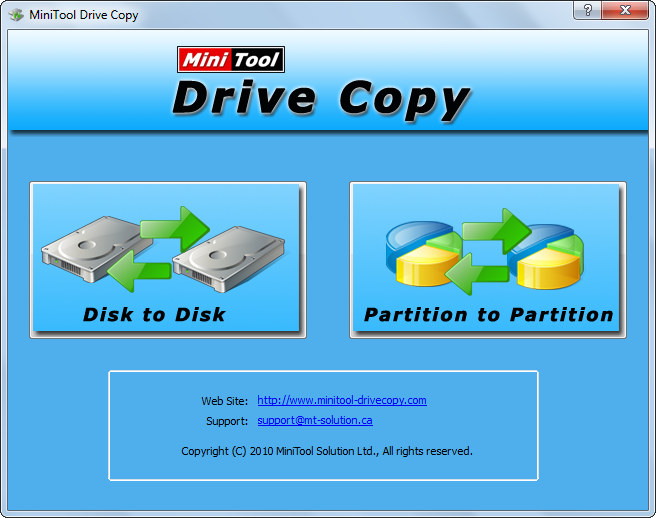
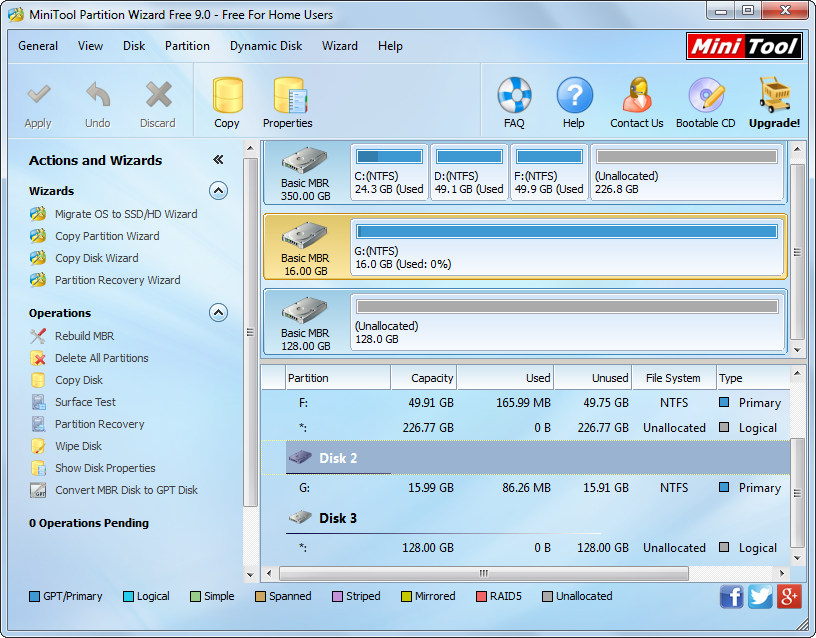
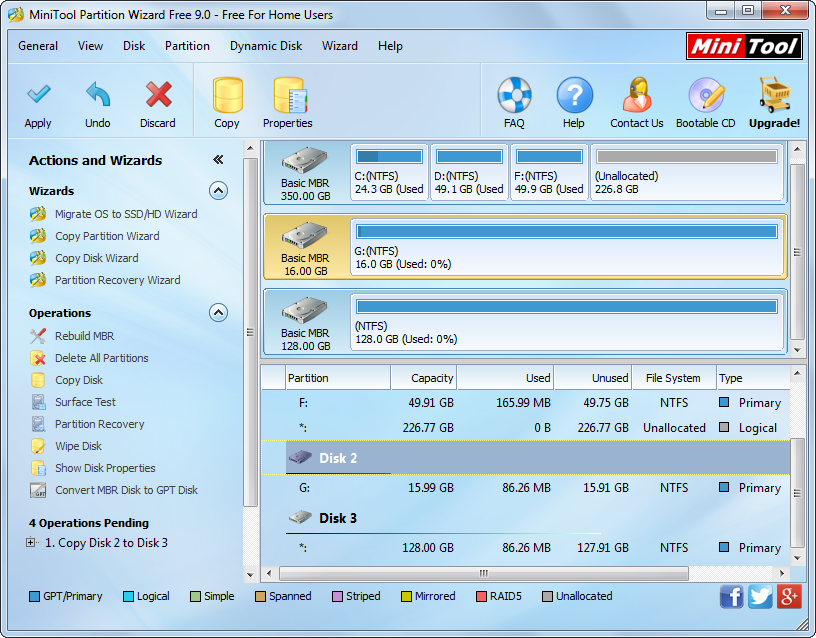
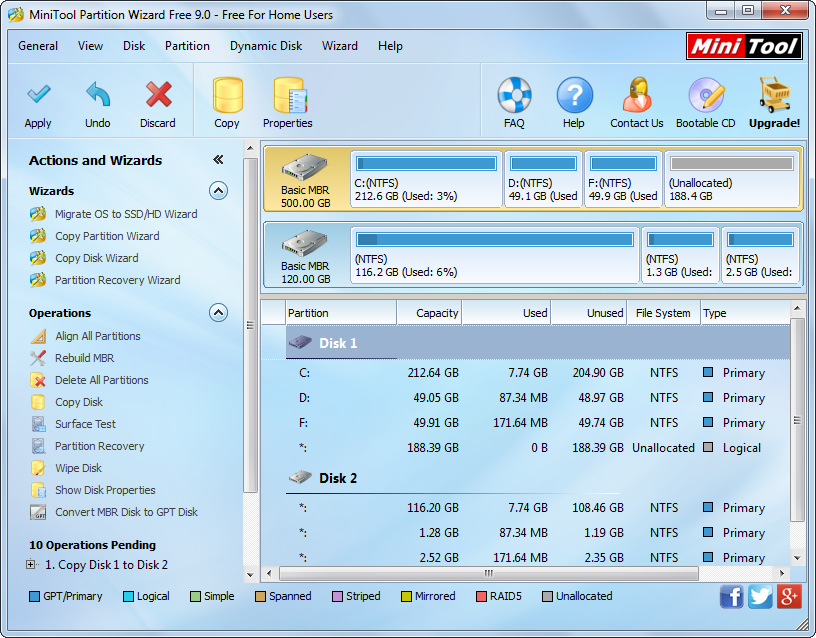
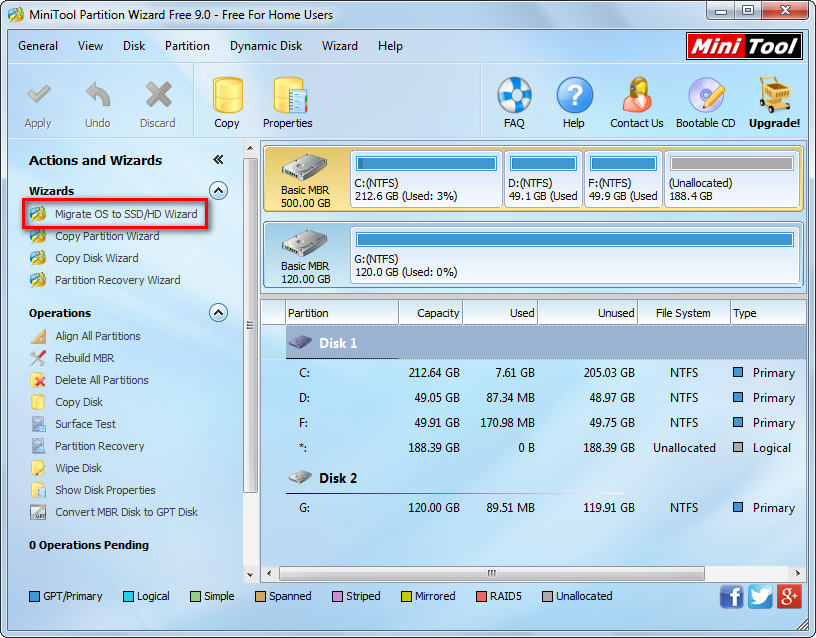
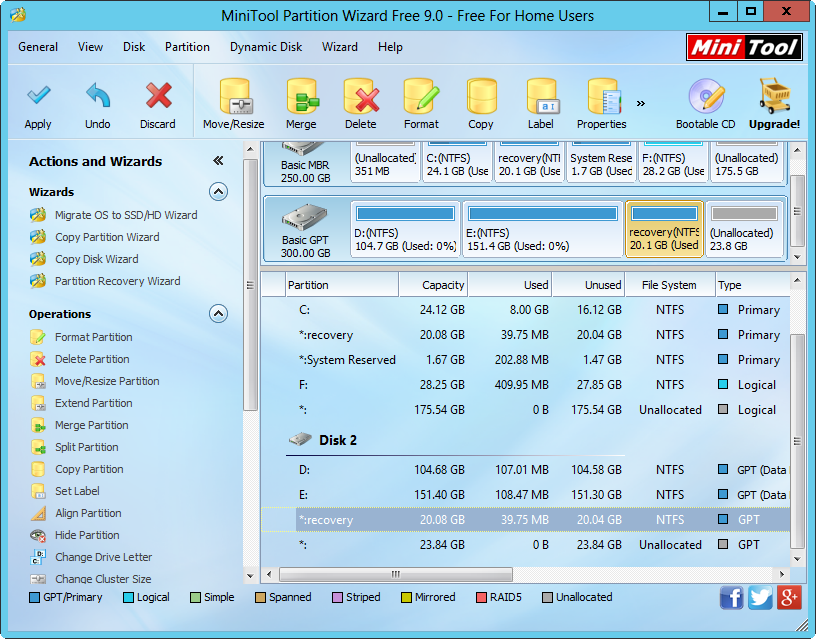
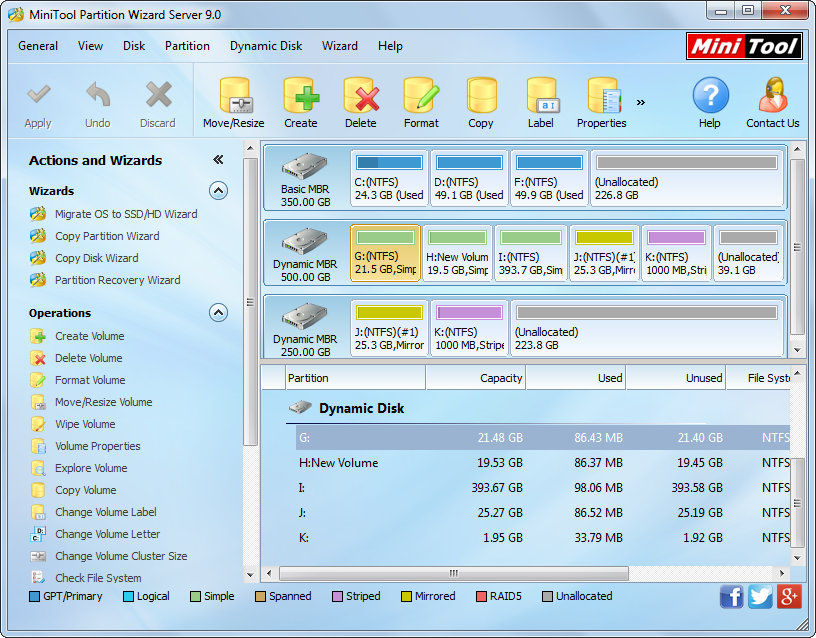
Firstly, download and install the free system migration tool to computer. Then, run and launch it to get the main interface below:
minitool-partition-wizard-main-interface
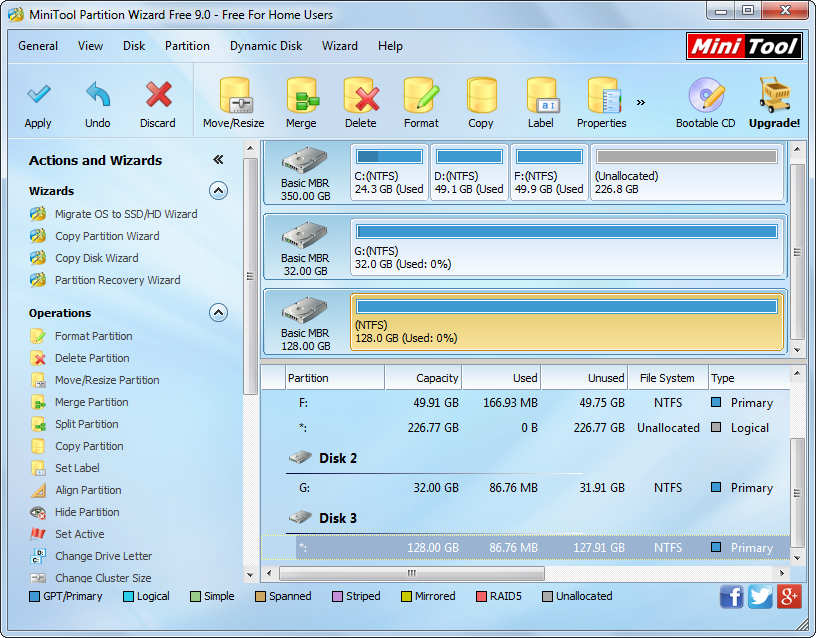
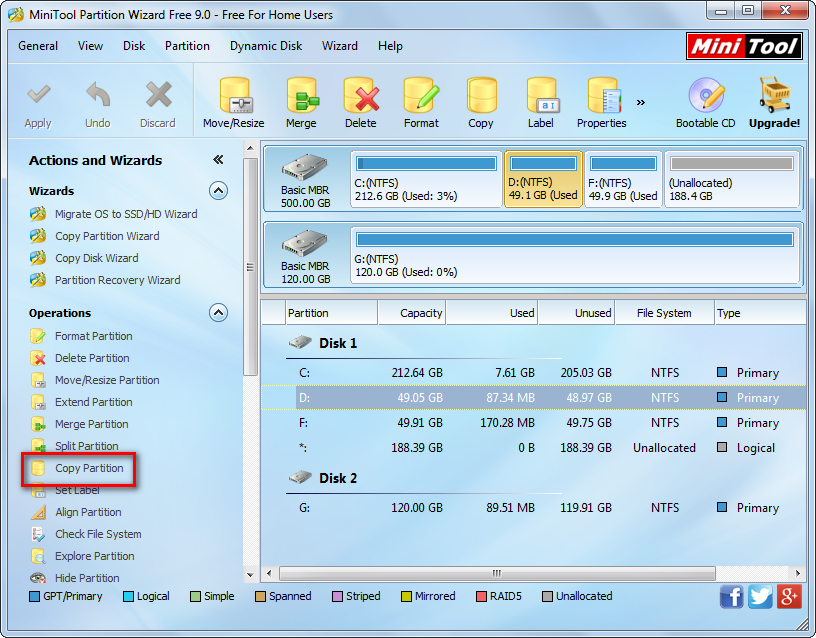
In the main interface please select “Migrate OS to SSD/HD Wizard” from the left pane.
migrate-windows-to-ssd-select-the-ssd
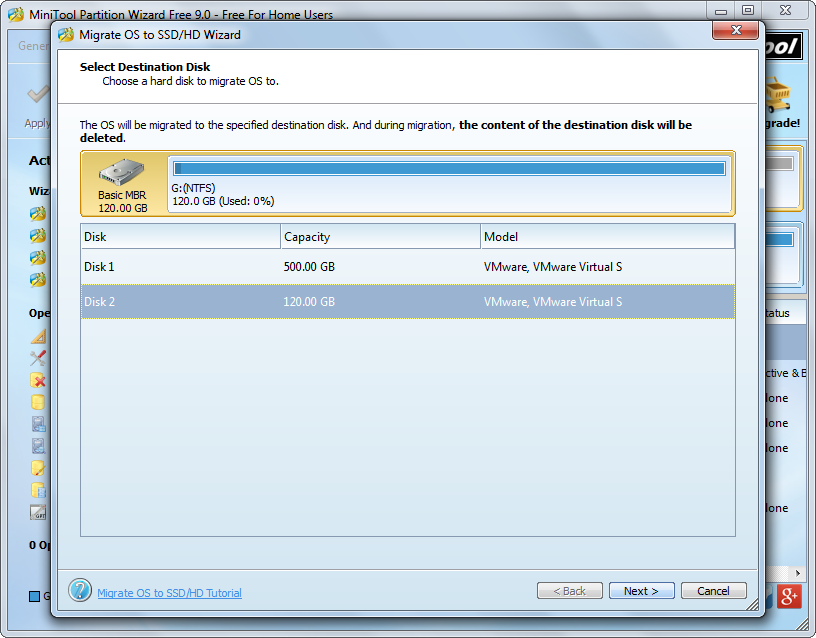
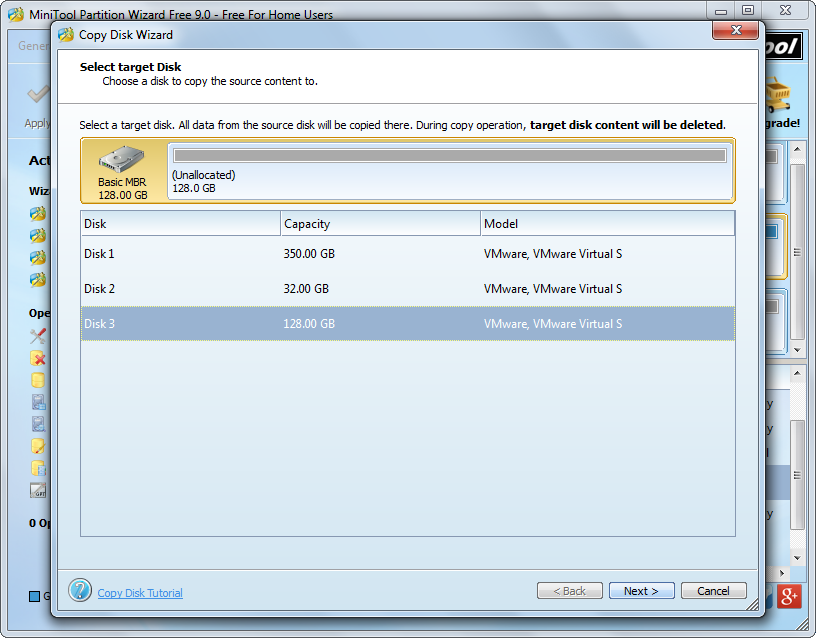
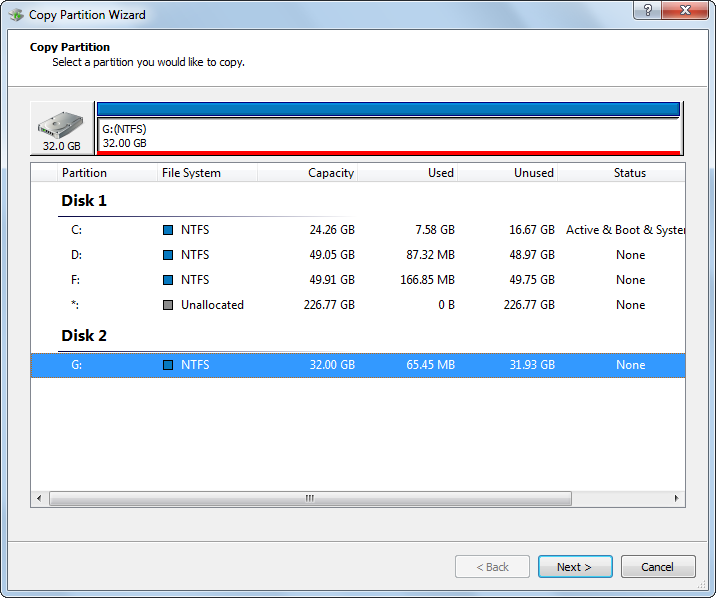
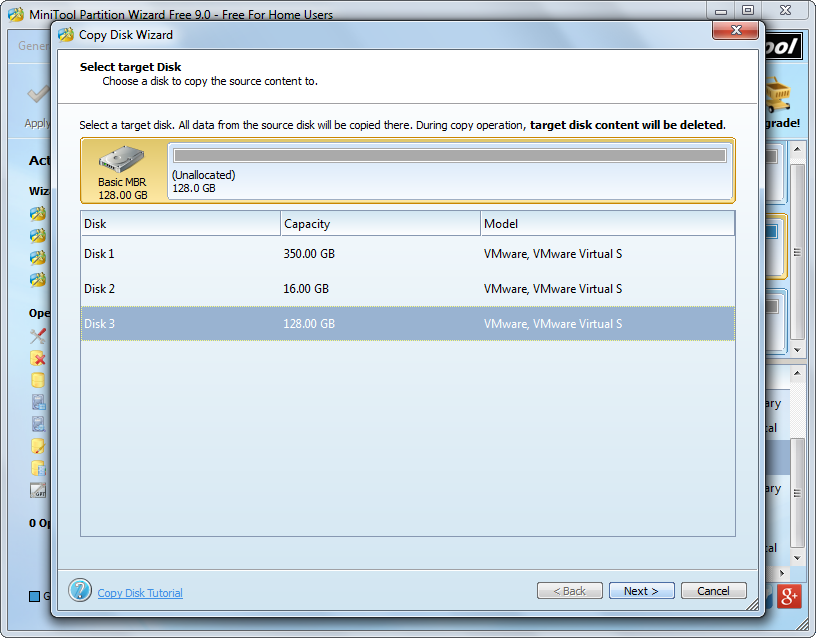
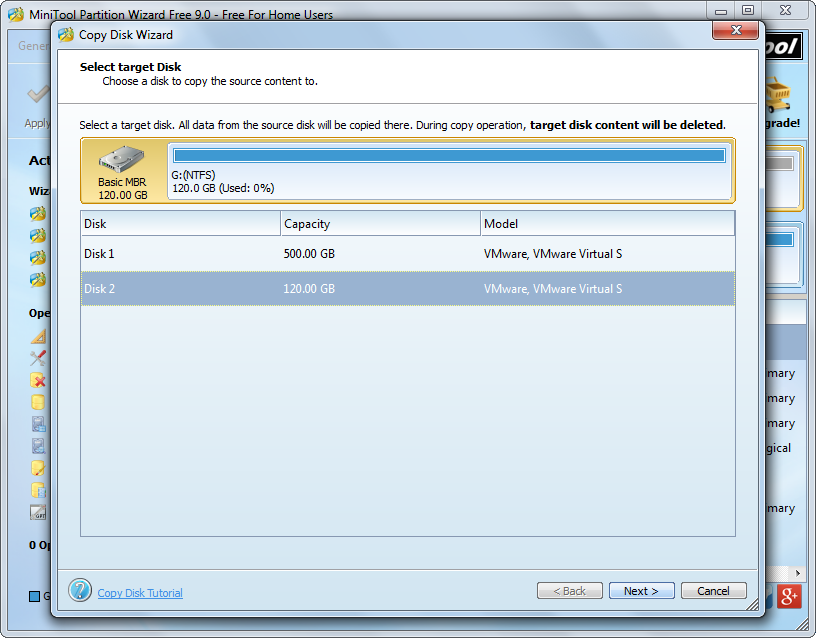
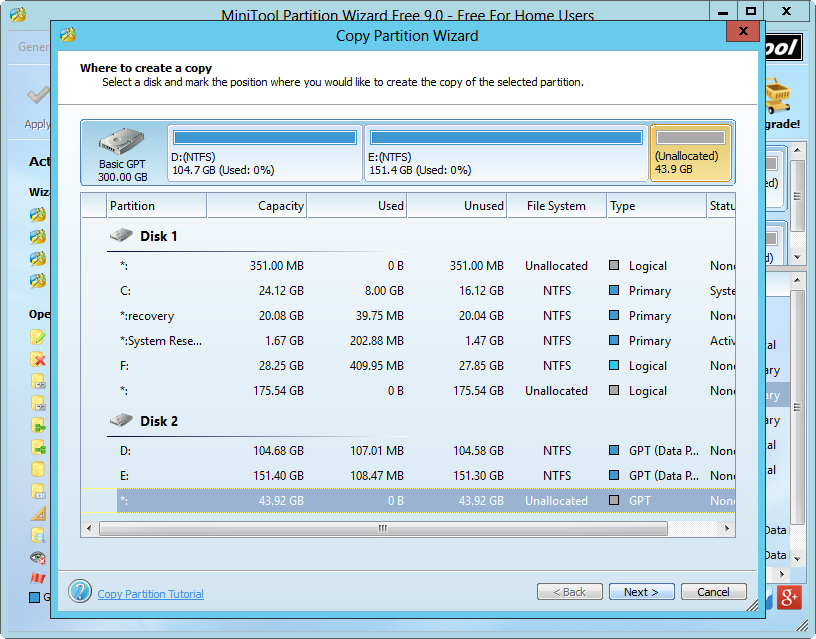
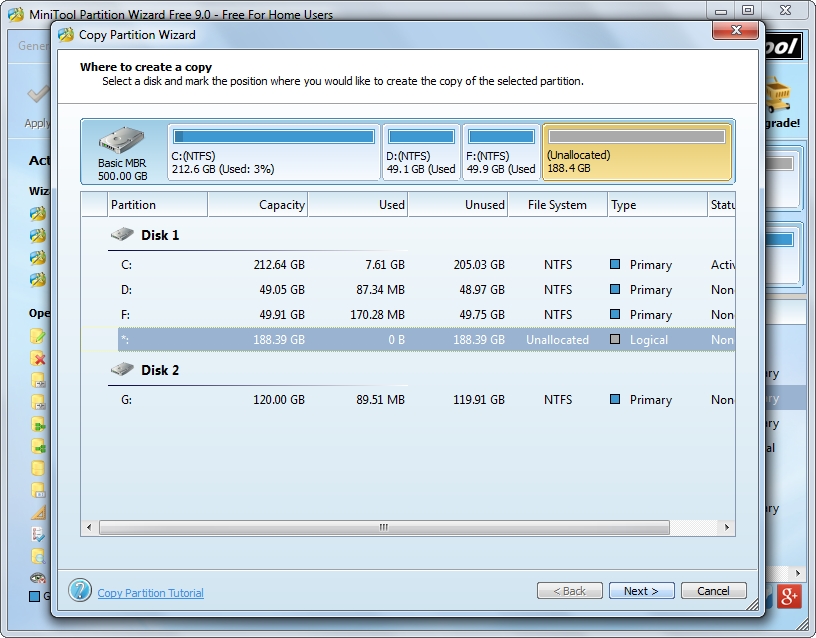
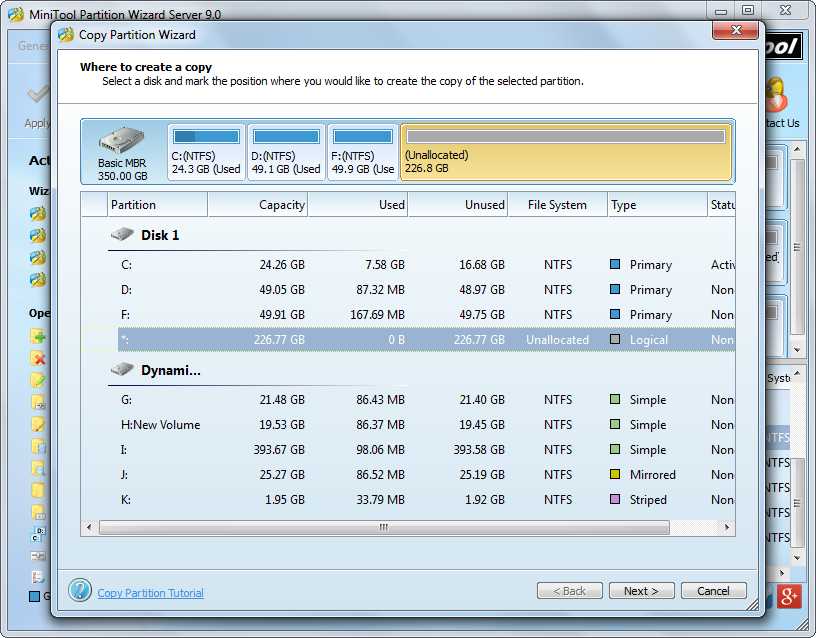
Then, select the SSD to migrate Windows to and click “Next>”. Tip: if the SSD has saved data already, please backup important ones since this will erase all existing data.
migrate-windows-to-ssd-resize-partition
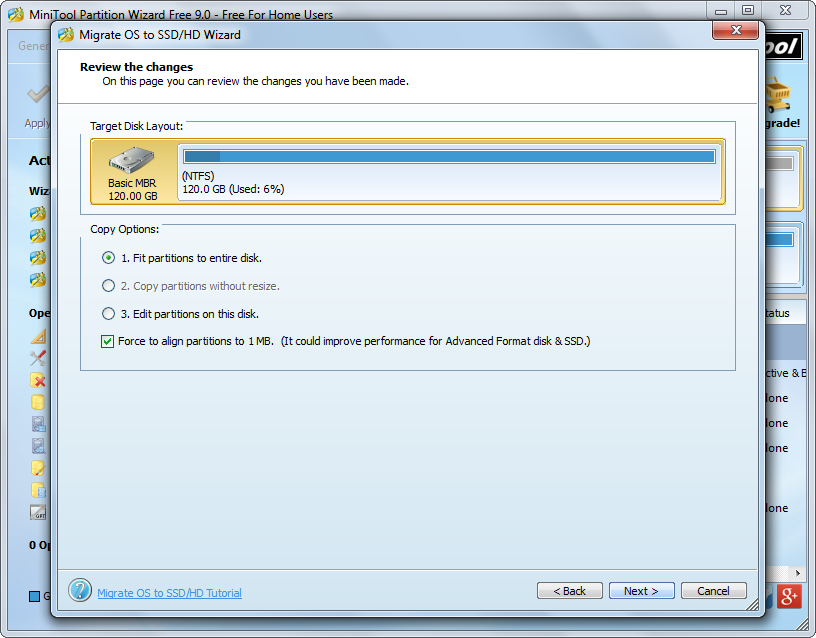
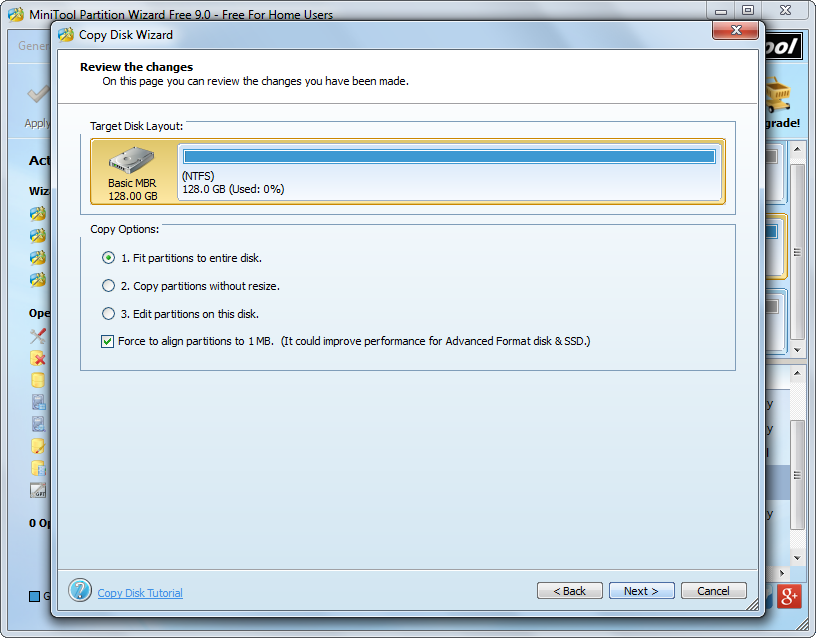
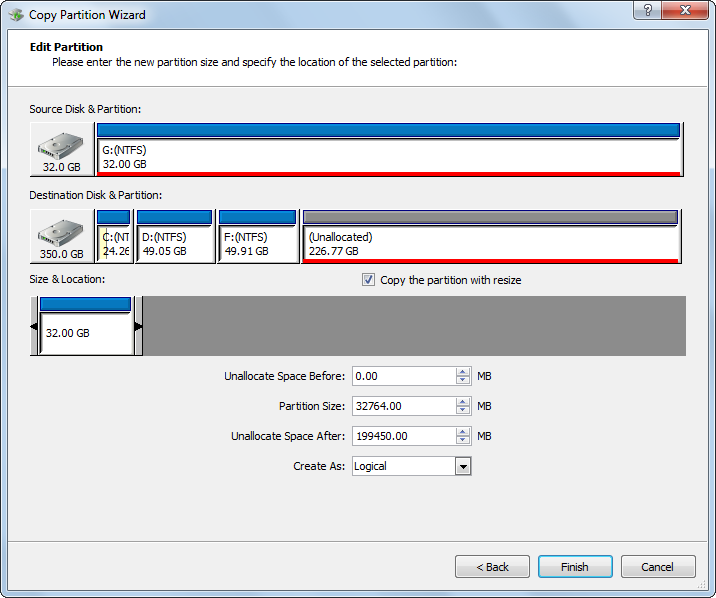
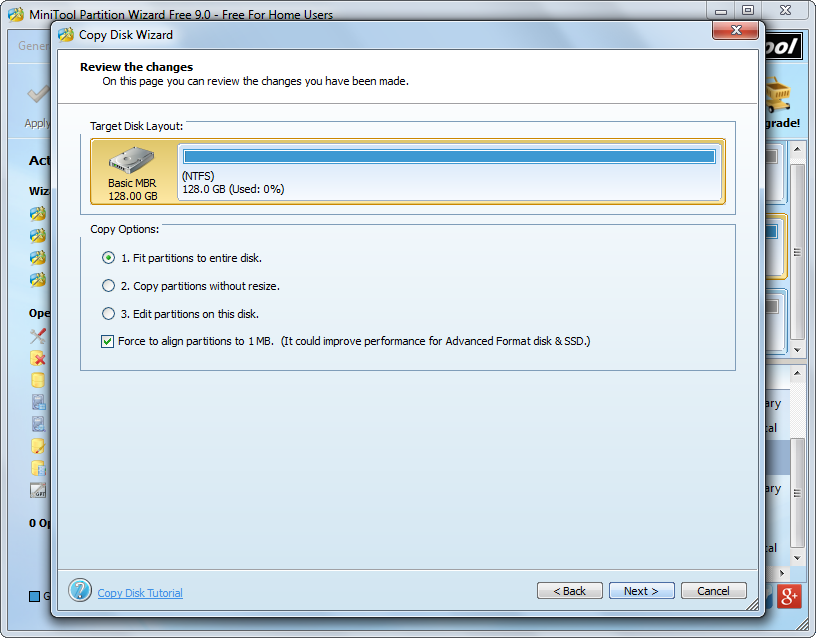
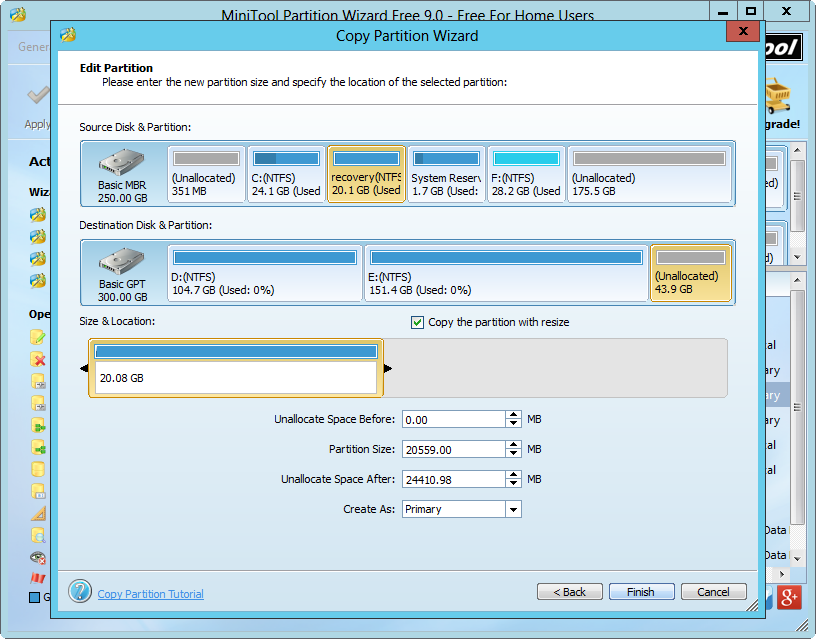
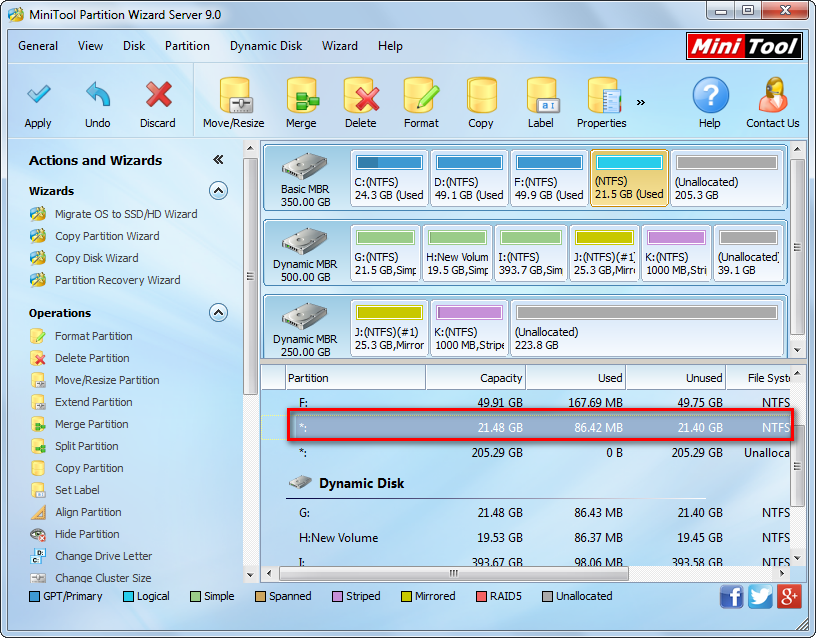
Next, change the size and location for partitions on SSD in accordance with actual demands and click “Next>”. After that, a note showing how to boot from SSD will appear. Read it and click “Finish” to go back to the main interface:
migrate-windows-to-ssd-apply-changes
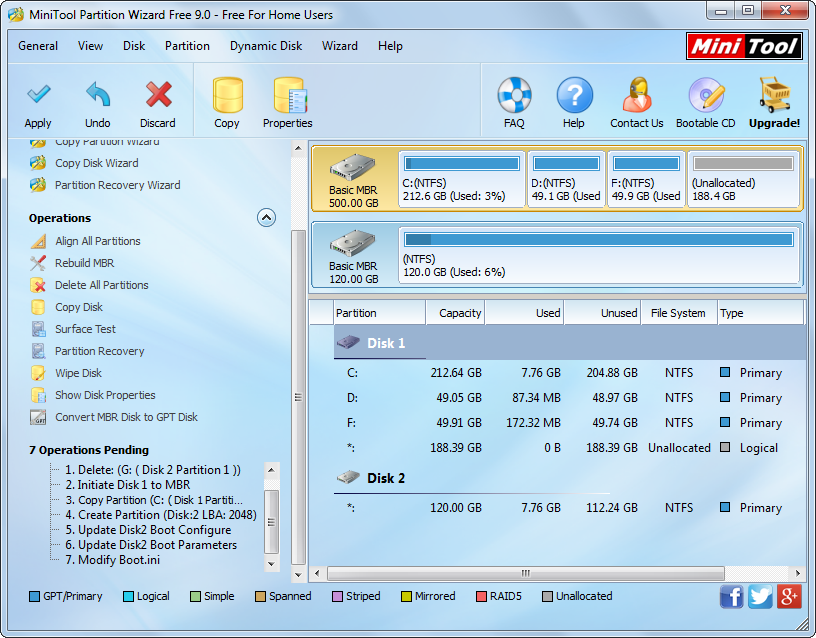
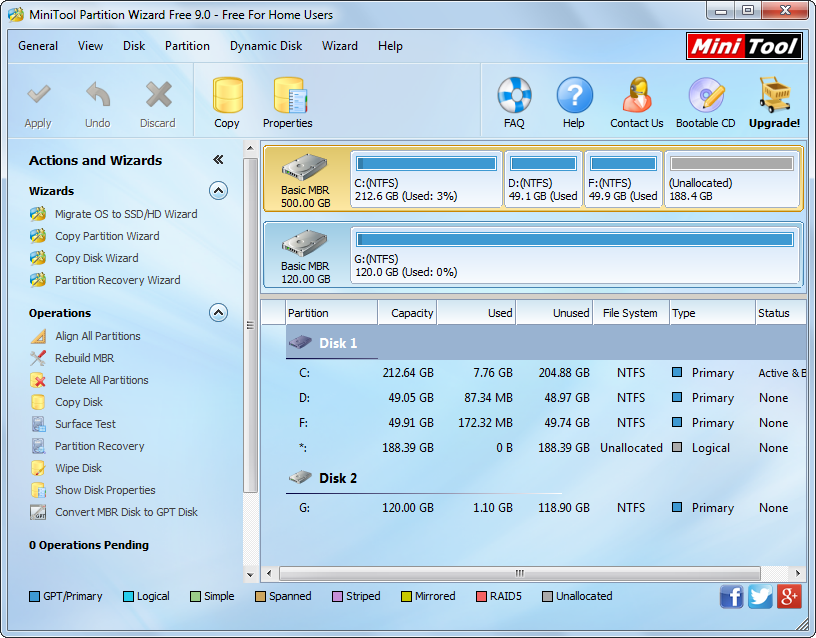
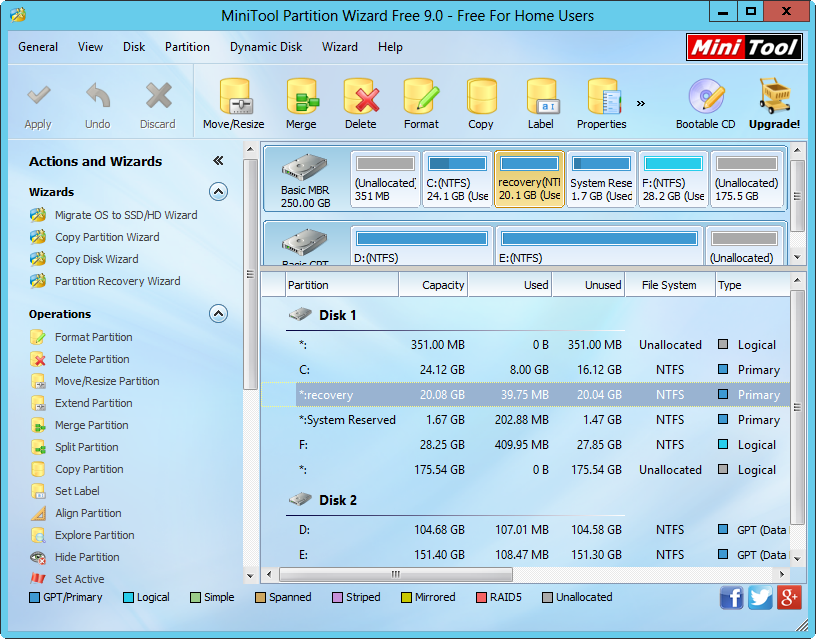
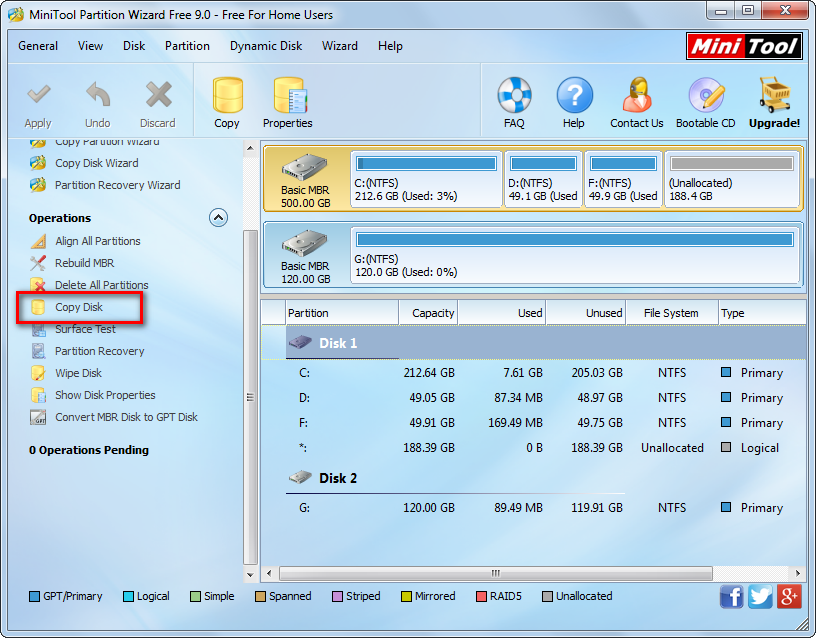
From the left pane we can see there are 7 pending operations, including copy drive C (system drive), update disk 2 boot configuration and parameters, modify Boot.ini, etc. At this time, please click “Apply” button to make all changes applied. If MiniTool Partition Wizard asks to restart computer after clicking “Apply”, please do as it tells, because this is to protect your system.


In conclusion, you are suggested migrating Windows to SSD rather than copying system drive if you want to transfer Windows from HDD to SSD. And this post may help you a lot.

Make a clone for system disk

What is System Disk


System disk is the disk which saves operating systems. Actually, apart from the OS, there are many other important files saved in this kind of disk, like system updates, necessary programs, and program updates. Therefore, it is very necessary to make a clone for system disk in case of sudden system crash.


How to Make a Clone for System Disk


Since this is to clone a disk rather than copy files, users had better resort to third party tools. There are many programs which can help achieve the goal, like Winhex and Norton Ghost, but most of them are chargeable and require professional and complex operations so that common users may have difficulties in operating these programs. Aiming at this situation, we recommend an easy-to-use and free drive clone software to help users do such a clone with ease. It is MiniTool Partition Wizard.


A Brief Introduction to MiniTool Partition Wizard


It is a professional partitioning program with numerous functions, including copy disk, copy partition, recover lost partition, rebuild MBR, convert file system, and so on. During the process of operating a disk or partition, it brings no damage. More importantly, it is a freeware if you are running Windows XP, Windows Vista, Windows 7, Windows 8, and Windows 10.


How to Make a Clone for System Disk with MiniTool Partition Wizard


After the free drive clone software has been installed, we need to start and launch it to get its main interface shown below:
minitool-partition-wizard-main-window
Then, select the system disk and click “Copy Disk” feature from the left side. Tip: we had better connect the disk that will save the copy of the system disk with computer in advance.
make-a-copy-for-system-disk-select-disk-to-clone-disk-to
Next, select the target disk to save the backup of system disk and click “Next>”. After that, users are able to change the size and location of partitions on the target disk. Please do in accordance with actual demands and then click “Next>” to get a boot note. Just read the note and click “Finish” to go back to the main interface:
make-a-copy-for-system-disk-apply-changes
Now we can see all files and partitions on system disk have been cloned to another disk. At this time, we need to click “Apply” button on the top to make all these changes performed. Tip: since the system disk saves Windows which is running, for sake of data security, MiniTool Partition Wizard will ask us to restart computer. Please do as it tells.


Once all changes are completed in boot mode, our computer will start normally. And we can restore our computer to the current state via the backup of system disk at any time. However, if you just want to make a clone for Windows, please see Migrate OS to SSD/HD for details.

Free system clone Windows 7

In the same machine, you are allowed to migrate Windows OS from one place to another place. For example, you can transfer Windows from mechanical hard drive to a solid state drive. To help users achieve this goal, some SSD manufacturers like Samsung offer data migration tool. Apart from manufacturers, a lot of software companies have released data or system migration programs, but most of them are chargeable. Nowadays, we have to face the situation where freeware is always inferior while professional apps are expensive. So is it possible for us to complete good but free system clone in Windows 7 or other Windows operating systems?


Actually, there is professional but free system clone software, but users have to cost a lot of time to find a good one, because they need to compare and test programs one by one. Here, we suggest using MiniTool Partition Wizard which has been praised by a great number of users.


This program only requires several steps to do free system clone in Windows 7, and detailed prompt information is provided in every step. But note: it is free for Windows Vista, Windows 7, Windows 8, Windows 10, and other Windows non-server users only. For server support, you may need to purchase the server edition. More importantly, the cloned Windows is always bootable since MiniTool Partition Wizard will fix and update boot information automatically during clone. For steps to copy Windows with this free system clone software, please look at the following example.


How to Make Free System Clone in Windows 7


After the program is launched, we can see the following interface:
minitool-partition-wizard-main-interface
Here please choose the function “Migrate OS to SSD/HD Wizard” from the left pane.
clone-windows-to-new-disk-select-the-new-disk
Then, select the new hard disk to migrate Windows OS to and click “Next>”. Tip: all data on the new disk will be erased, so please backup important ones. Next, resize partitions on the second hard disk and click “Next>”. After these steps, a note showing how to boot from the new disk will pop up. Read it carefully and click “Finish” to go on.
clone-windows-to-new-disk-apply-changes
Now we can see Windows OS has been migrated to the new hard disk, so please click “Apply” button to make all changes applied. However, as the Windows we clones is running, the free system clone software will ask us to restart computer. Click “Restart Now” and MiniTool Partition Wizard will do all operations in boot mode. Once all changes are completed, our computer will reboot.


Tip: if Windows is installing on MBR disk and you want to boot from the new hard disk, please restart computer and enter BIOS before Windows is loaded, and then make the new disk enjoy boot priority.


Now to do free system clone in Windows 7 is done, and I hope this post is useful for you.

Migrate HP recovery partition to external

Question: I have a HP laptop, which is with a 500GB hard disk. Now the partition saving Windows 8 (partition C) is nearly running out of space, so I want to extend it. Nevertheless, there is no contiguous unallocated space on the right side of partition C so that “Extend Volume” feature is grayed out. Fortunately, several recovery partitions (one of them is even 20GB) are after drive C, so I am going to migrate HP recovery partitions to external hard disk, and then delete the source ones to create unallocated space for partition C. Who can give me a suggestion? Much appreciated.


Answer: the best way is to copy recovery partitions to external disk by using drive copy software since to clone a partition will copy all files saved in this partition. More importantly, this kind of software can help simplify operations, save time, as well as protect data. However, as HP recovery partition is a hidden partition, many drive copy programs do not support cloning it. Considering this situation, we suggest using MiniTool Partition Wizard Free Edition, which is a freeware to migrate HP recovery partition to external hard drive in Windows non-server operating systems. For detailed steps, please see the following demonstration.


How to Migrate HP Recovery Partition to External Drive


After the drive copy software has been installed, please run and launch it to get the main interface below:
minitool-partition-wizard-main-interface
Then, select the recovery partition we want to migrate and click “Copy Partition” feature from the left action panel.
migrate-hp-recovery-partition-to-external-select-unallocated-space
Next, choose an unallocated space from the external hard drive to save the copy of the recovery partition and click “Next>”. If there is no unallocated space, please shrink an existing partition to create.
migrate-hp-recovery-partition-to-external-resize-partition
Then you can resize the newly created partition on external hard drive by changing the length of the partition handle. After getting needed partition size, click “Finish” to go back to the main interface of MiniTool Partition Wizard:
migrate-hp-recovery-partition-to-external-apply-changes
Now we can see the selected HP recovery partition has been migrated to external hard drive. However, if you have more than one recovery partition to transfer, just clone them one by one. After all partitions are copied, click “Apply” button on the top to make all changes performed.


Actually, to free up space of local disk is one of reasons for migrating HP recovery partition to external, and you may want to make a backup for this kind of partitions. Whatever reasons, the free drive copy software MiniTool Partition Wizard can help you a lot. It also supports cloning recovery partition of Dell, Toshiba, Samsung, and so on in addition to HP.


Nevertheless, after complete the migration, users may be unable to delete the source recovery partitions in Disk Management, which is a quite common situation. To solve this problem, please see Solutions to Deleting Drive.

Free drive to drive clone

Generally, a drive in Windows can be referred to either a hard disk or a partition on hard disk. After users save a lot of important files to a drive, it is highly suggested that they make a copy for the hard drive in case some or all of data get lost accidentally, and making drive to drive clone is a good method since it can save a lot of time.


What is Drive to Drive Clone


As we know, we can clone files from one place to another place so as to make a backup. Naturally, we can clone a drive to another drive to make a backup for the entire drive. When the drive is a hard disk, cloning drive will copy all partitions as well as all files saved in these partitions to another drive. When it is a partition, cloning will copy the partition and files stored in this partition to another partition.


Some users may think it may cost them much more time to make drive to drive clone compared with direct file copy. Actually, as long as users resort to excellent drive clone software, operations will be simplified, and all data will be protected. Here, we suggest using the freeware MiniTool Partition Wizard.


How to Make Free Drive to Drive Clone with MiniTool Partition Wizard


Firstly, download and install the freeware to computer. Then launch the program to get the main window:
minitool-partition-wizard-main-interface
All disks and partitions are shown here, and we need to select the drive which needs copying. Here, we take cloning partition D for example. Select the drive and click “Copy Partition” feature from the left side.
free-drive-to-drive-clone-select-unallocated-space-to-save-the-clone
Then, select an unallocated space from either the same disk or a different hard disk to save the copy of partition D and click “Next>”. If there is no unallocated space, you need to shrink the partition which has lots of unused space left to get. Then, we can change the size and location for the new partition. After getting desired partition size and position, click “Finish” to go back to the main interface:
clone-hard-drive-partition-apply-changes
Now we can see partition D has been copied to another place, so finally we need to click “Apply” to make these changes performed.


However, if you want to make disk to disk clone rather than partition to partition copy, please see “Copy Disk” to get details. And we hope this post is useful when you need to make free drive to drive clone.

Free disk to disk copy software

Why Free Disk to Disk Copy Software is Needed


Free disk to disk copy software is a requisite program under the following situations:
1. Want to replace the small hard disk with a larger hard disk.
2. Transfer data like Windows OS and necessary programs from HDD to SSD for better computer performance.
3. Make a copy for files saved in one hard disk.


Free disk to disk copy software is capable of cloning one hard disk to another hard disk, and all files will be cloned at the same time, so it is a good tool for data transferring and backup. Nevertheless, when using such a kind of program, users may meet different kinds of problem. For example, it is impossible to clone a large disk to a small hard disk; computer cannot boot from the cloned disk. Actually, all these problems are caused by using an inferior software, so which program should we use?


Free Disk to Disk Copy Software Recommendation


In this post, we suggest using MiniTool Partition Wizard. Firstly, it can either clone small hard disk to large hard disk or copy large disk to small disk as long as the target disk has enough space to save content of the source partition. Secondly, all data will be protected during the process of cloning. Thirdly, it will save users much time. At last, only several steps are needed.


How to Copy Disk with MiniTool Partition Wizard


First of all, download and install the program on computer. Then, launch it to get the main interface below:
minitool-partition-wizard-main-interface
Here please select the hard disk which needs cloning and click “Copy Disk”. Then, select the target disk to save the copy of the source disk and click “Next>”. After these steps, we are able to change partition size and location on the target disk:
clone-hard-disk-resize-partition-on-target-disk
To change partition size, we need to change the length of the partition handle. To move partition position, we need to change the location of the partition handle. Then, click “Next>”. After these steps, a note showing how to boot from the target disk will appear. Please read it carefully and click “Finish”.
clone-hard-disk-apply-changes
Now we can see disk 1 has been cloned to disk 2, so finally we need to click “Apply” button on the top of the interface to apply all changes.


For more detailed steps or video help, please see Copy Disk.

Dynamic volume cloner

We may convert a basic disk to dynamic disk by mistake or specially configure dynamic disks to improve computer performance. However, data saved in dynamic disk are not absolutely safe, so it is very necessary to make a clone for important files. And when significant files are saved in one or more volumes, users had better clone the entire volume by using a dynamic volume cloner rather than copy and paste files since the former will save users a lot of time.


Of course, users can also create a mirrored volume to backup data if they have 2 or more dynamic disks. However, just because all data (both the original and the increased) saved in the mirrored volume will be written to both volumes, which results in disk capacity of only 50 percent. Therefore, if there is only one dynamic disk or users do not want to backup the increased files, they had better make a copy for the dynamic volume which saves important files by using dynamic volume cloner. Next, we will introduce such a piece of software.


Dynamic Volume Cloner Recommendation


MiniTool Partition Wizard is the program we recommend, and its professional and more advanced editions support operating dynamic disks perfectly. It can be compatible with all mainstream Windows operating systems, including Windows 7, Windows 8, Windows 10, Windows Server 2008, and Windows Server 2012, and supports simple volume, striped volume, spanned volume, mirrored volume, etc. Moreover, cloning volume can be completed in several easy operations and without any data loss. Next, we will show users how to operate this dynamic disk cloner to make a copy for dynamic volume.


How to Clone Dynamic Volume with MiniTool Partition Wizard


Firstly, launch the program to get its main interface:
minitool-partition-wizard-main-interface
Then, select the volume we want to copy and choose “Copy Volume” from the left pane.
clone-dynamic-volume-mark-a-place-to-save-the-clone
Next, mark a place to save the copy of the source dynamic volume, which can be unallocated space on either basic disk or dynamic disk. After that, click “Next>” to continue.


Then, we can resize the partition or volume which saves the copy of the source dynamic volume and click “Finish”.
clone-dynamic-volume-apply-changes
Now we can see the copy for volume G has been created on Disk 1. At this time, we need to click “Apply” button on the top to make all these changes performed.


Therefore, when you want to backup important files saved in one or more dynamic volumes, try using the dynamic volume cloner MiniTool Partition Wizard, which may save you much time. Or if you want to copy a dynamic disk, please see Clone Dynamic Disk to get details.

Clone Micro SD card for free

micro-sd-card
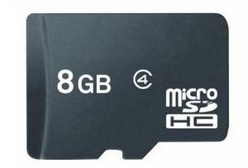
As we know, Micro SD card is one of most widely used storage devices for mobile phone. At the beginning of time, we might purchase a 16GB or smaller Micro SD card to save data, but now it is too small to store HD video or high pixel photos. At this time, our best choice is to purchase a new large SD card, and then clone the small Micro SD card to the new card for data transferring.


Nowadays, there are many large capacity Micro SD cards. SanDisk released the 200GB Micro SD card on March of 2015, and Microdia has developed the 512GB one. Of course, for we common people, there is no need to use such large SD card since large capacity means it is so expensive. 64GB or 128GB might be enough. Well then, how can we clone the small Micro SD card to the large SD card? Next, we will introduce a free solution.


How to Clone One Micro SD Card to Another SD Card for Free


Step 1: download a piece of free but professional drive clone software from the internet, and then install it on computer. Here, we take MiniTool Partition Wizard for example.


Step 2: connect both SD cards to computer and launch the program to get its starting interface. Tip: if you cannot connect both SD cards to computer at the same time (there is only one carder reader or slot, for example), clone the small Micro SD card to computer, and then transfer the clone to large SD card.
minitool-partition-wizard-main-interface

Step 3: select the small Micro SD card and click “Copy Disk” feature from the left pane.

clone-micro-sd-card-for-free-select-the-large-sd-card
Then, select the large SD card and click “Next>”.

clone-micro-sd-card-for-free-resize-partition
Step 4: choose “Fit partitions to entire disk” and click “Next>”. Then, click “Finish” to go on.

clone-micro-sd-card-for-free-apply-changes
Step 6: now we can see the small Micro SD card has been cloned to the large SD card for free, so now we only need to click “Apply” button on the top to make all changes performed.


Apart from Micro SD card, this free drive clone software is able to copy hard disk, CF card, USB flash drive, memory stick, and so on, so it is worth owning this program.

Transfer photos from digital camera to computer

Problem description: I’m loving shooting so that I bought a Canon Digital Single Lens Reflex with a 32 GB CF card. Every time the CF card is nearly full, I need to transfer photos from digital camera to computer to free up space, but this will cost me a lot of time, so I am considering whether there is a fast way to do this. Who can give me an idea?


Solution: the easiest way is to clone memory card of Canon digital camera to computer, which can save you half of the time. However, to do memory card clone, users need the help of drive clone software.


Searching memory card cloner on the internet, you may find lots of such tools, but some of them should be paid and some may bring damage to your photos. Aiming at this situation, we suggest using the freeware MiniTool Drive Copy. Just try using it to transfer photos from digital camera to computer, because it is turned out that this drive clone software does not bring any effect on original data. Next, let’s see specific steps to clone memory card of Canon camera to computer by using this program.


How to Transfer Photos from Digital Camera to Computer


Firstly, download and install the free drive clone software to a Windows computer. Then, connect the memory card to the very computer via card reader or directly connect the camera to computer through cable. Next, launch the installed app to get its starting interface shown below:
minitool-drive-copy-start-window
Here, we can choose “Partition to Partition” module to clone memory card since there is always only one partition on a memory card.
clone-memory-card-to-computer-select-the-memory-card
Then, select the memory card we want to copy and click “Next>”. After that, select an existing partition or unallocated space on hard disk of computer to save the clone of memory card and click “Next>”. Tip: if you are choosing a partition, please transfer or backup all important data saved in this partition in advance, because all data will be erased after the clone is completed. If there is no unallocated space, you can shrink one of partitions to get.
transfer-photos-from-memory-card-to-computer-resize-partition
Next, just click “Finish” to continue.


At last, click “Yes” to make all changes applied.


Once all changes are completed by MiniTool Drive Copy, all photos will be transferred to computer. At this time, you can delete the source photos to free up space. Actually, this free drive clone software is capable of cloning hard disk, SD card, memory stick, etc., not limited to CF card. When there is a need, try this program out.

Clone memory card of Canon

Canon camera is the most widely used single-lens reflex camera all over the world, so questions about this device are frequently asked. Today, we take cloning memory card of Canon for example.


As we know, all photos and pictures taken by Canon camera will be saved to its memory card. However, with the increase of photos and photo quality, the previous memory card may be easy to run out of space so that we have to transfer photos to computer frequently to free up space, which may bring harms to memory card. Therefore, many Canon users hope to replace the small memory card with a much larger one, but they do not know how to transfer their photos to new card in a fast way.


Indeed, it is time-consuming to copy and past files directly especially when you have dozens of GB files to transfer. At this time, it is highly suggested that users clone small memory card to large memory card, and there is free drive clone software to do this kind of operations, like MiniTool Partition Wizard.


How to Clone Memory Card of Canon


Firstly, download and install a free drive clone software to Windows computer. Then, connect both SD cards with computer and launch the program to get its main interface:
minitool-partition-wizard-main-interface
Next, select the memory card which needs cloning and choose “Copy Disk” feature from the left side.
clone-memory-card-of-canon-select-the-large-memory-card
Then, select the large memory card to clone small memory card to and click “Next>”.
clone-memory-card-of-canon-resize-partition-of-memory-card
Now we can change partition size of the large memory card. Tip: since Windows only recognizes one partition of removable device, we had better choose “Fit partitions to entire disk” so as to make use of all space. Then, click “Next>” to get a boot note. Next, click “Finish” to go back to the main interface:
clone-memory-card-of-canon-apply-changes
At last, click “Apply” button on the top to make all changes performed. Once the application is done, to clone memory card of Canon is completed.


However, if you cannot connect both memory cards with computer at the same time (there is only one card reader, for instance), clone the small memory card to computer, and then transfer the copy to the large memory card. Operations are nearly the same.