


Why Free Disk to Disk Copy Software is Needed
Free disk to disk copy software is a requisite program under the following situations:
1. Want to replace the small hard disk with a larger hard disk.
2. Transfer data like Windows OS and necessary programs from HDD to SSD for better computer performance.
3. Make a copy for files saved in one hard disk.
Free disk to disk copy software is capable of cloning one hard disk to another hard disk, and all files will be cloned at the same time, so it is a good tool for data transferring and backup. Nevertheless, when using such a kind of program, users may meet different kinds of problem. For example, it is impossible to clone a large disk to a small hard disk; computer cannot boot from the cloned disk. Actually, all these problems are caused by using an inferior software, so which program should we use?
Free Disk to Disk Copy Software Recommendation
In this post, we suggest using MiniTool Partition Wizard. Firstly, it can either clone small hard disk to large hard disk or copy large disk to small disk as long as the target disk has enough space to save content of the source partition. Secondly, all data will be protected during the process of cloning. Thirdly, it will save users much time. At last, only several steps are needed.
How to Copy Disk with MiniTool Partition Wizard
First of all, download and install the program on computer. Then, launch it to get the main interface below:
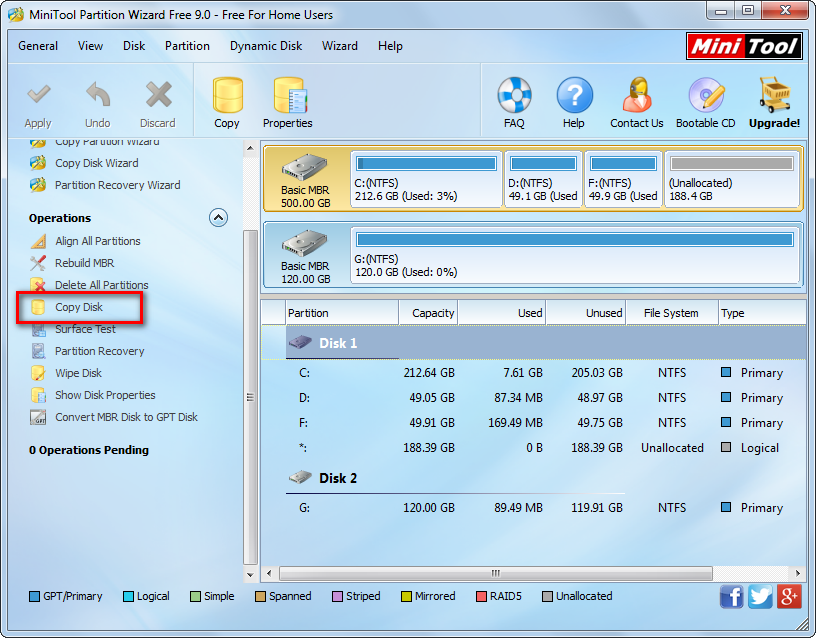
Here please select the hard disk which needs cloning and click “Copy Disk”. Then, select the target disk to save the copy of the source disk and click “Next>”. After these steps, we are able to change partition size and location on the target disk:

To change partition size, we need to change the length of the partition handle. To move partition position, we need to change the location of the partition handle. Then, click “Next>”. After these steps, a note showing how to boot from the target disk will appear. Please read it carefully and click “Finish”.

Now we can see disk 1 has been cloned to disk 2, so finally we need to click “Apply” button on the top of the interface to apply all changes.
For more detailed steps or video help, please see Copy Disk.