Author Archives: zxl123

Clone small SD card to large SD card

Question: I have a 16GB SD card which saves a lot of useful files. However, this card now is too small to store some large capacity files so that I want to replace it with a 128GB one. However, since I have no good idea of transferring near 16GB data to new card (don’t want to copy and paste, which is so troublesome), I searched on the internet and finally find the solution: clone small SD card to large SD card by using a free drive clone software. But another problem appears – I cannot connect both SD cards with my Windows computer at the same time since there is only one card reader. What should I do?


Actually, it can be easy to deal with this kind of situations, but more steps are required. That is to clone the small SD card to computer, and then migrate the clone to the large SD card. Though we need to do 2 clones, more than half of the time will be saved compared with copying files directly. As to free drive clone software, if users do not know which one is available, try using MiniTool Partition Wizard Free Edition. It brings no damage to original data whatever happens. Tip: if you are running Windows Server, a server edition should be purchased. Next, let’s see detailed steps to clone SD card.


How to Clone Small SD Card to Large SD Card


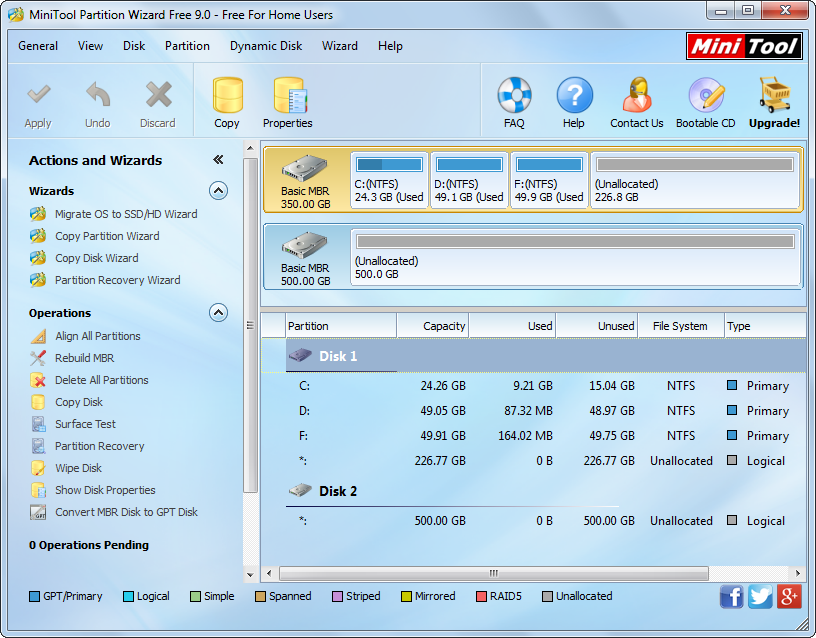
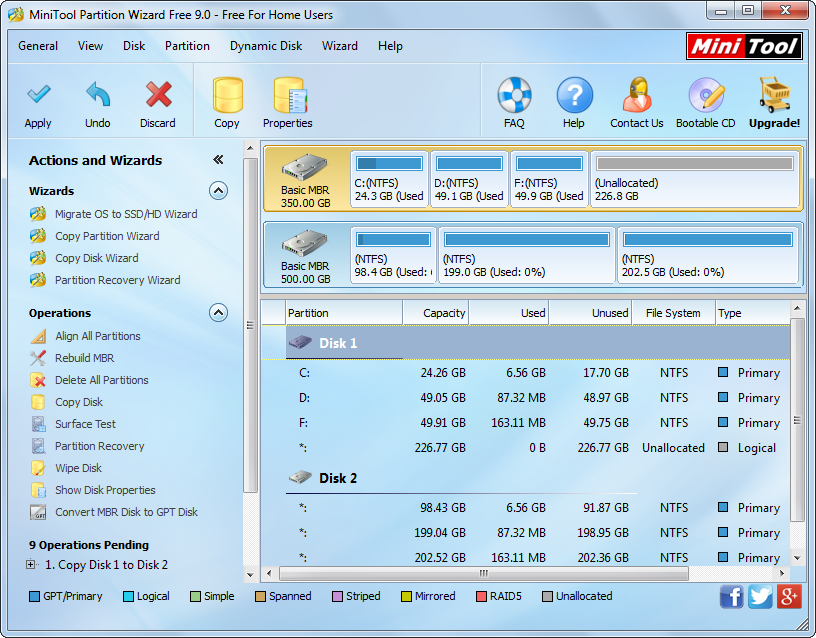
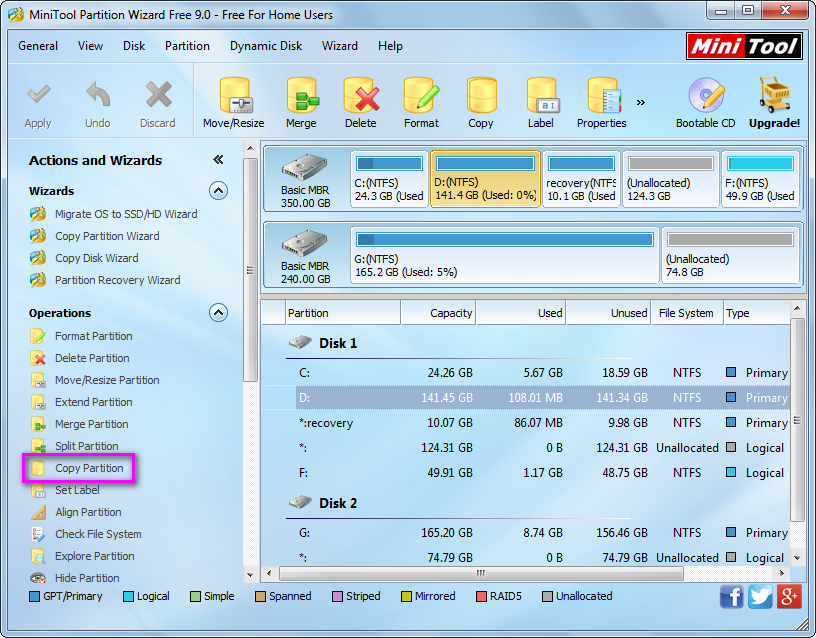
Once the free drive clone software MiniTool Partition Wizard Free has been installed, we need to connect the small SD card with computer. Of course, we can also connect it after opening the program, because this program will automatically detect and update new devices. Then, run and launch the app to get its main interface:
minitool-partition-wizard-main-interface
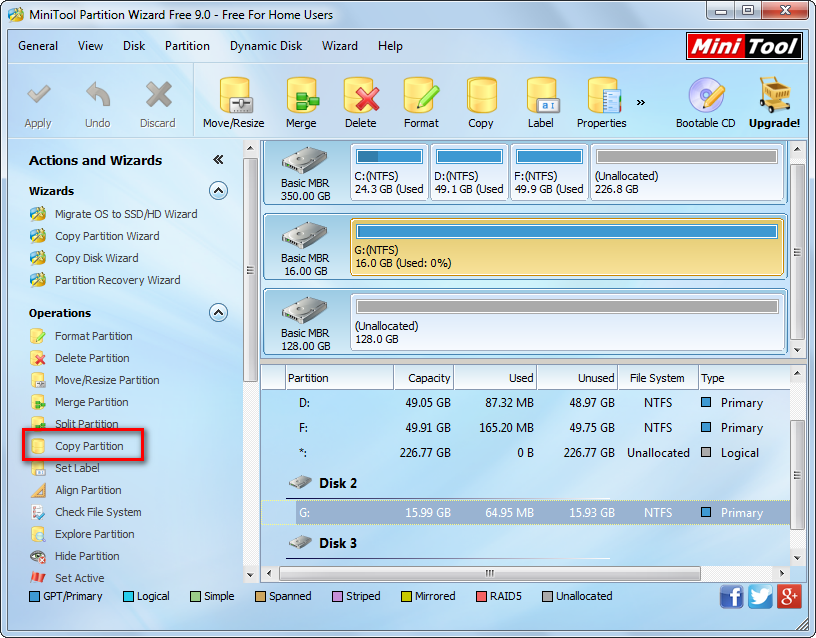
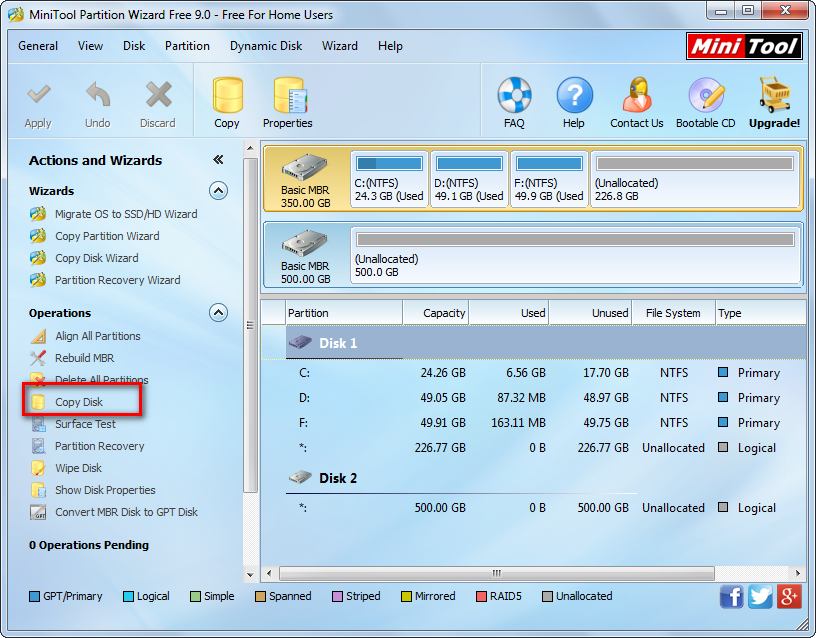
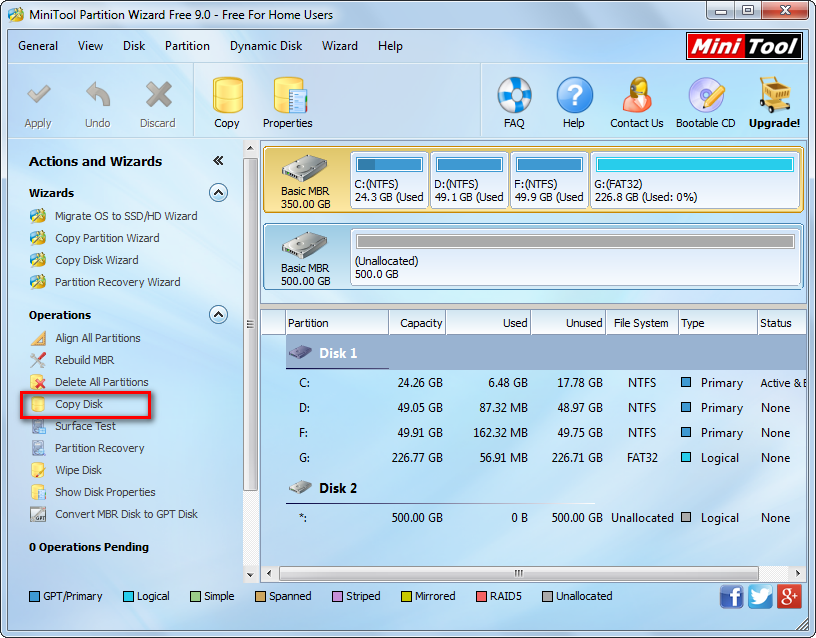
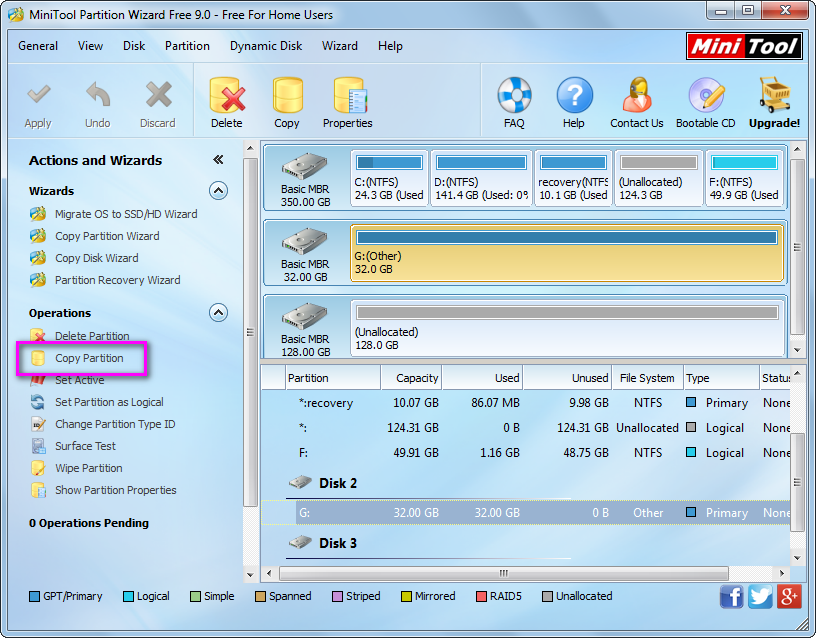
Now we can see all recognized devices. First of all, we need to clone the SD card to computer. Please select the partition of the SD card and choose “Copy Partition” feature from the left side.
clone-small-sd-card-to-computer-mark-a-place-to-save-copy
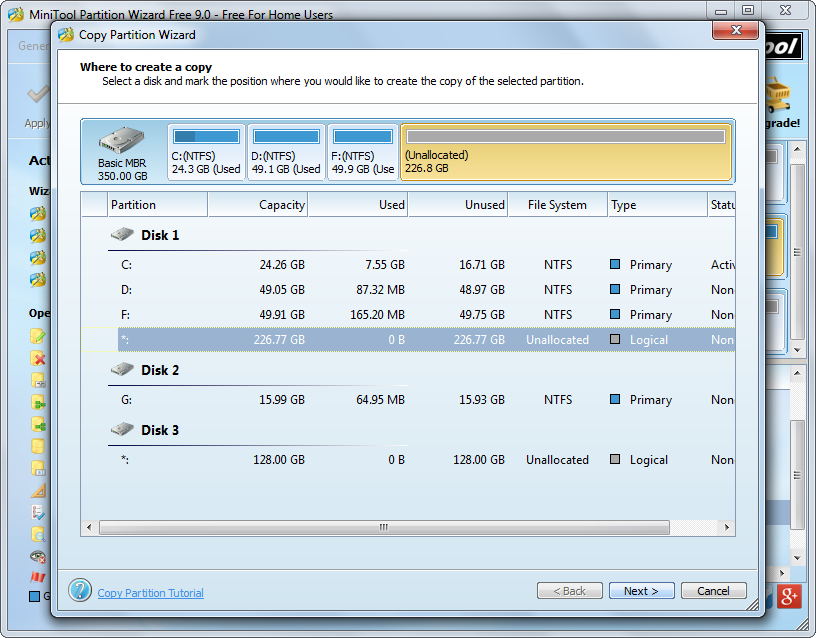
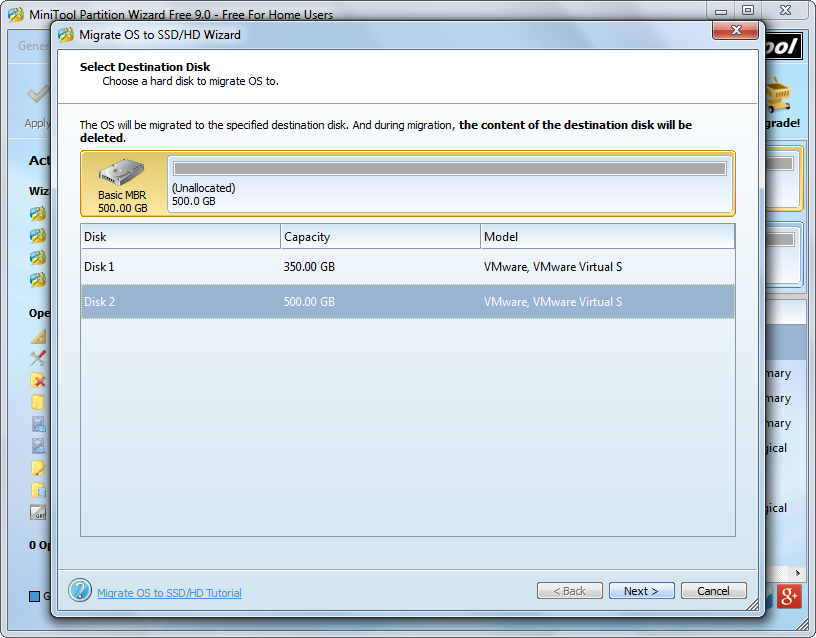
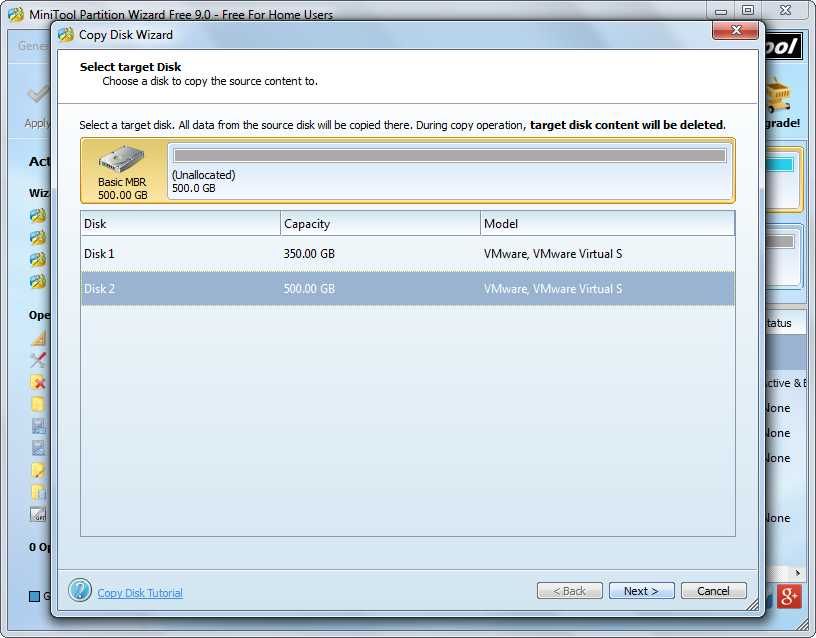
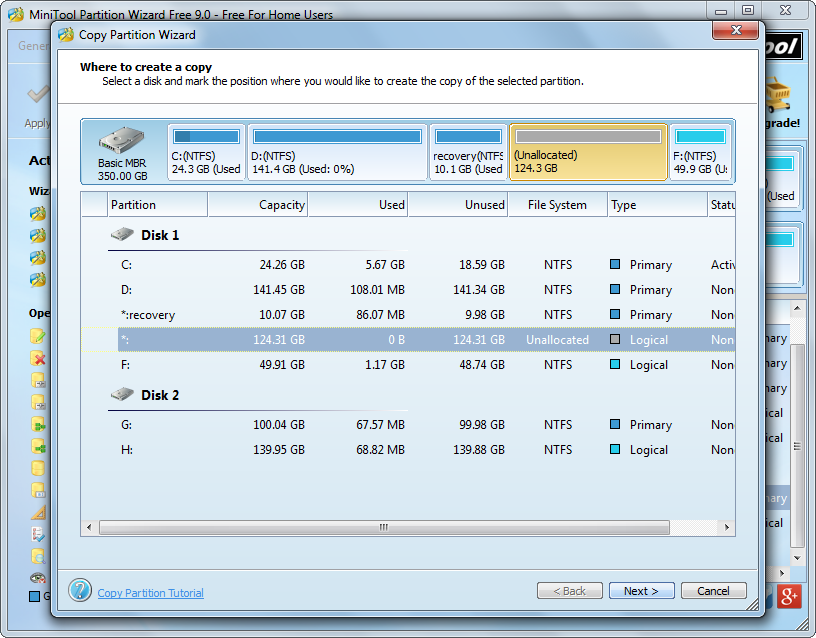
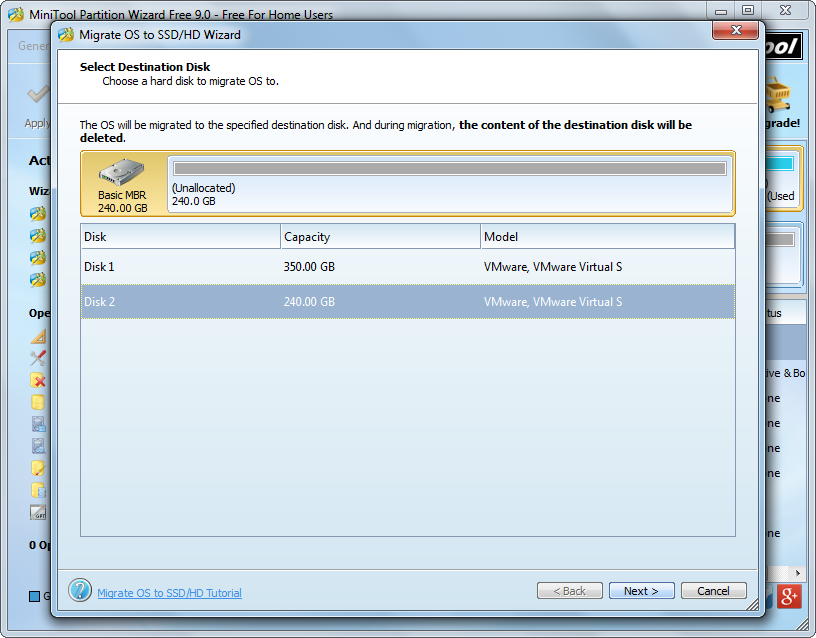
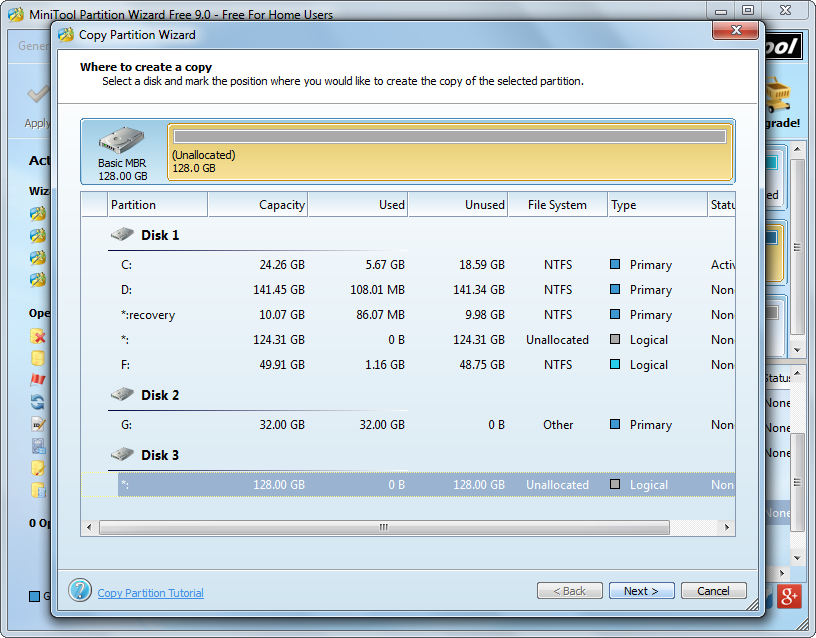
Then, select an unallocated space (unpartitioned space) to save the copy of the small SD card and click “Next>”. If there is no unallocated space, we can shrink an existing partition via the function “Move/Resize Partition” to get.
clone-small-sd-card-to-computer-resize-partition
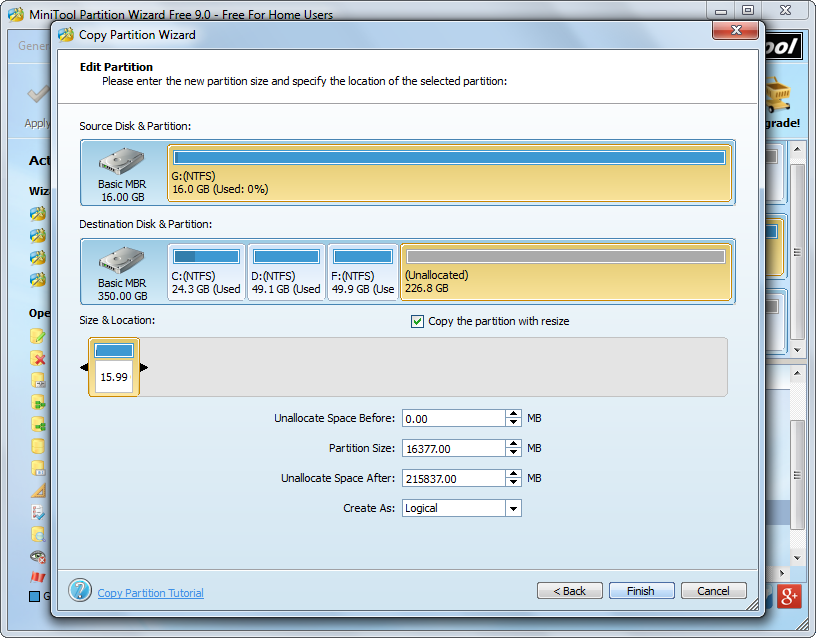
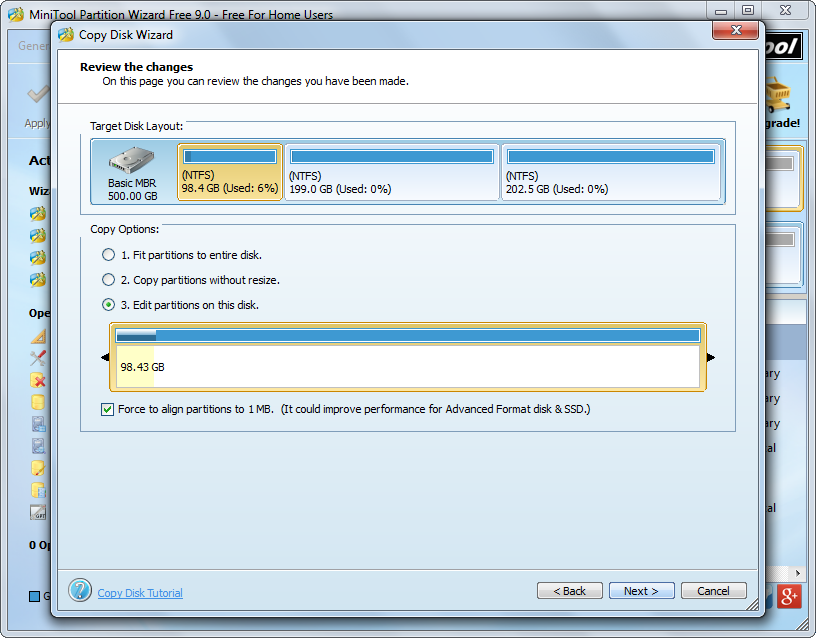
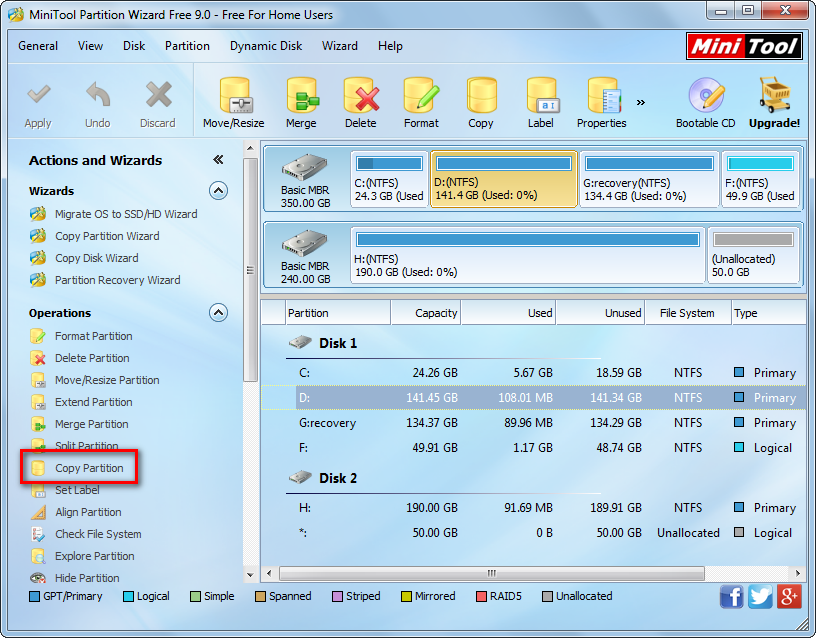
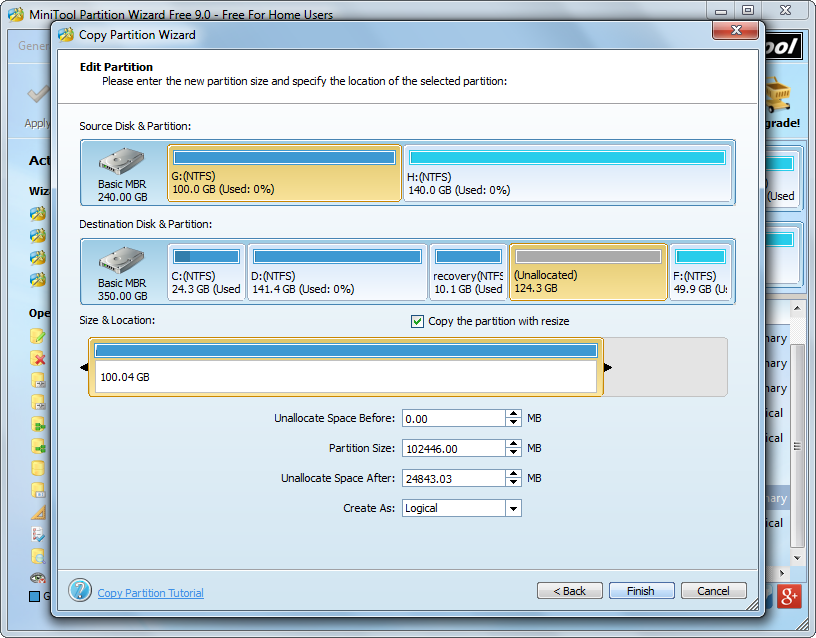
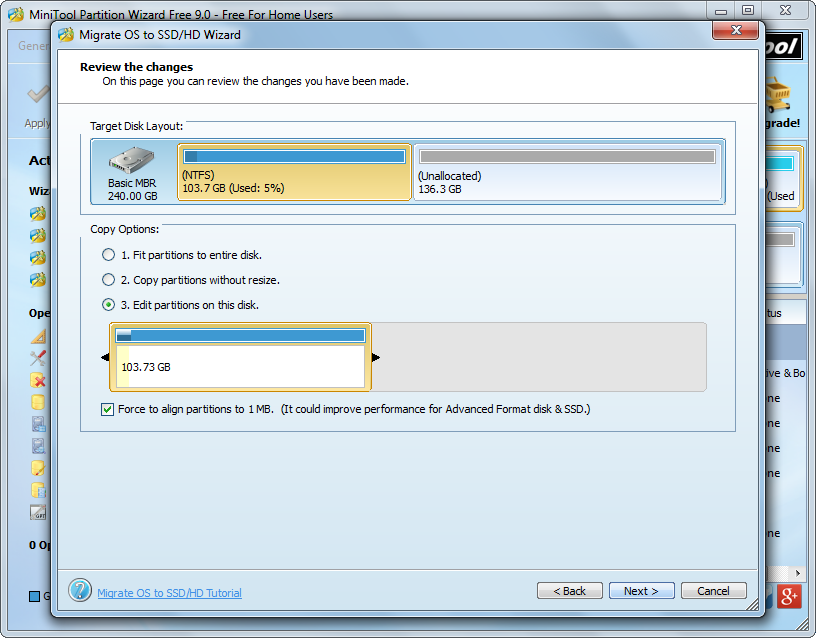
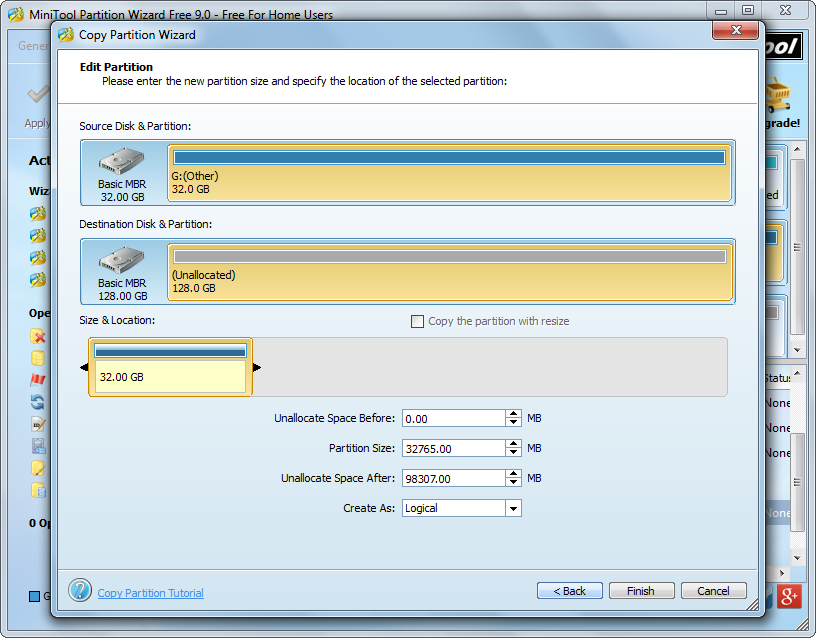
Next, we are able to resize the copy of SD card by changing the length of the handle. However, since we just clone SD card to computer temporarily, there is no need to do any operation but just click “Finish” button to go back to the main interface:
clone-small-sd-card-to-computer-apply-change
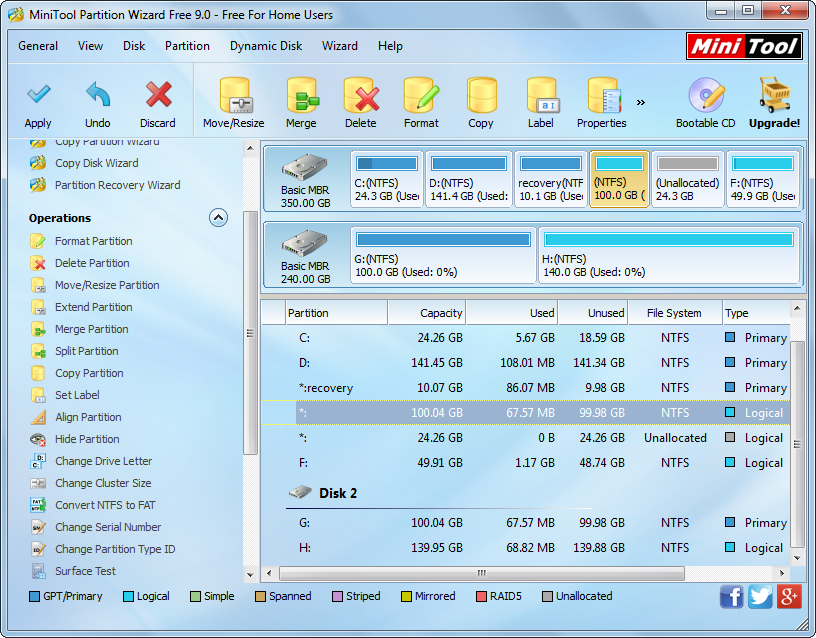
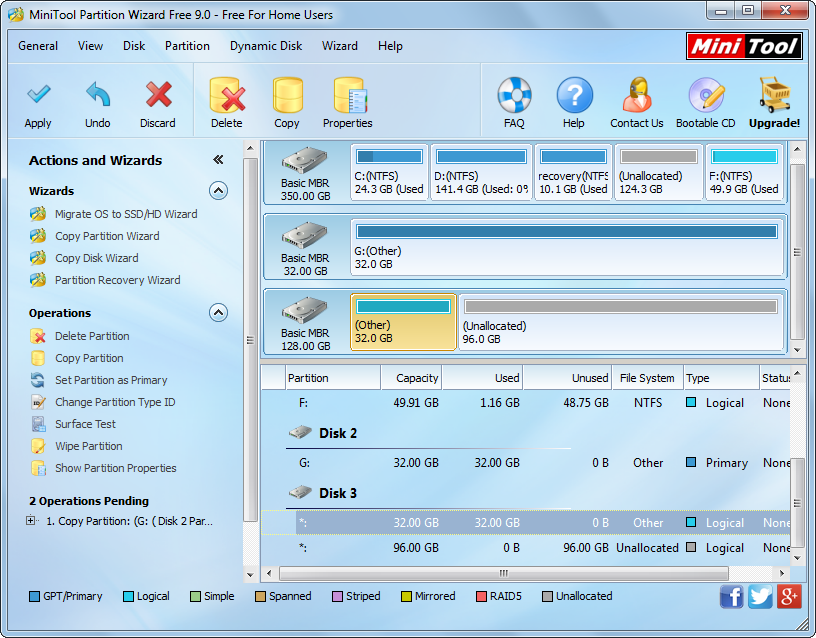
Now we can see the small SD card has been cloned to computer. At this time, please click “Apply” button on the top to make all changes performed.


Once all changes are completed, please disconnect the small SD card. Then connect the large SD card via card reader and migrate the clone to the large SD card by taking same operations.

Migrate Windows to new drive without losing anything

With using a Windows operating system for a long time, the partition saving Windows system files (it is always the drive C) may be in low disk space since it contiguously saves temporary files, cache files, etc., which will largely affect computer running speed. At this time, a good solution is to extend the Windows partition by borrowing free space from other partitions on the same disk, but what if the entire hard disk does not have much unused space left? Under this situation, we believe many people would plan to purchase a new disk and transfer Windows to this new disk. Well then, how can we migrate Windows to new disk without losing anything since it is the key to making migrated Windows bootable? To do this kind of migration, users need to download a professional system migration tool.


For Windows non-server users (users running Windows XP, Windows Vista, Windows 7, Windows 8, etc.), we suggest using MiniTool Partition Wizard Free Edition since it is a freeware for these users. For Windows server support, users need to download the server or more advanced editions. Next, let’s see detailed steps to transfer Windows from old disk to new disk.


Migrate Windows to New Drive without Losing Anything


Step 1: download and install MiniTool Partition Wizard to computer.
Step 2: run this system migration tool to get its starting interface and choose “Launch Application” to get the window below:
minitool-partition-wizard-main-interface
Step 3: choose the feature “Migrate OS to SSD/HD Wizard” from the left pane.
migrate-windows-to-new-disk-without-losing-anything-select-the-new-disk
Step 4: select the new disk to migrate Windows to and click “Next>”.
migrate-windows-to-new-disk-without-losing-anything-resize-partition
Step 5: resize partitions on the new disk and click “Next>”. Tip: if there are system reserved partition and boot partition (the partition saving Windows system files like partition C:), both partitions will be cloned to the new disk.


Step 6: read the popup boot note and click “Finish”.
migrate-windows-to-new-disk-without-losing-anything-apply-changes
Step 7: click “Apply” button on the top and tap “Start Now” to make all changes in boot mode.


Once all operations are completed, our computer will reboot. At this moment, if we want to boot computer from the new disk, we need to make the new disk enjoy the boot priority in BIOS before Windows is loaded.


For more information about migrating Windows to new drive without losing anything, please see Migrate OS to SSD/HD.

Best freeware to clone Windows OS

Due to different kinds of factors, such as mistaken operation, virus attack, and software errors, our Windows operating system may get crashed. Under this situation, if there is a copy or backup of Windows OS, we can restore system in a short time. Therefore, many people are planning to clone Windows once it is installed successfully.


To do this kind of clone, users had better turn to a system cloning software, because it can simplify operations and brings no damage to data. Next we are going to introduce the best freeware to clone Windows OS, and it is MiniTool Partition Wizard.


Reasons for Recommending MiniTool Partition Wizard


1. It is a freeware for users who are running Windows XP/Vista/7/8/10.
2. All data will be protected during the process of clone.
3. Boot parameters and configurations will be updated automatically so that the cloned Windows will be bootable.
4. Only several steps are needed, and detailed prompts will be shown.
5. If you want to migrate Windows from HDD to SSD rather than pure clone, the best freeware can align partitions on SSD automatically so as to optimize disk performance.
6. It not only can clone Windows OS but can backup the entire hard disk or a single partition.

Next, let’s see how to use this best freeware to clone Windows OS.


How to Clone Windows with MiniTool Partition Wizard


After the system cloning software has been installed, we need to launch it to get its main interface:
main-interface-of-minitool-partition-wizard
Then choose the function “Migrate OS to SSD/HD Wizard” to clone the current Windows operating system to another disk. Of course, if the current system disk saves Windows only, you can make use of the “Copy Disk” feature which will also update boot information.


Next, choose a second hard disk to save the copy of Windows, resize partitions on the second hard disk, and apply all changes successively. If you want to start the cloned Windows OS, please enter BIOS and set the disk saving the copy of Windows as the default boot disk.


Therefore, when you are planning to clone Windows operating system, try the best freeware MiniTool Partition Wizard out.

Create a copy for local hard disk

Question: my laptop just has one hard disk, and it saves all important data, including the installed Windows 7, necessary apps, personal data like precious photos and working data, and so on. Considering that some important files may get lost due to unexpected reason, I’m planning to create a copy for the local hard disk, which can restore my laptop to the original state in a short time. I don’t want to copy and paste files, which is so time-consuming, so please show me a wonderful solution.


Answer: to copy and paste files is not suggested even if it costs less time, because the copied Windows OS is always unbootable. And users had better resort to a piece of free drive copy software. There are 4 reasons for recommending this kind of programs:
1. Save a lot of time.
2. All copied data (even Windows OS) can be used normally as the source data.
3. There is freeware.
4. No complex operations are required so that a newbie can master it.


For detailed steps to clone local hard disk, please see the following example.


How to Create a Copy for Local Hard disk


Like using any other software, we need to download and install such a program at first. However, some users may not know which software to download since there are a lot of choices. Here, we just take MiniTool Partition Wizard for example.


Step 1: run this free drive copy software to get its starting interface if the disk used to save the copy of local hard disk has been connected. Then choose “Launch Application” module to enter the window below:
minitool-partition-wizad-main-interface
Step 2: select the local disk and click “Copy Disk” feature from the left side.
make-a-copy-for-local-hard-disk-select-target-disk
Step 3: choose the disk that will save the copy of local disk (the so called target disk), and then click “Next>”.
make-a-copy-for-local-hard-disk-resize-partition
Step 3: resize partitions on the target disk and click “Next>”. Tip: if you want to change partition size according to your own demands, choose “Edit partitions on this disk”.
make-a-copy-for-local-hard-disk-boot-note
Step 4: click “Finish” button since we are cloning local hard disk rather than migrate OS to another disk.
make-a-copy-for-local-hard-disk-apply-changes
Step 5: click “Apply” button on the top to make all changes applied. Tip: if MiniTool Partition Wizard asks you to restart computer, please do as it prompts, because restarting is to protect system.


Once all operations are completed in boot mode, our computer will reboot. At this time, the copy for local hard disk has been created. And you can try using this free drive clone software to make such a copy when there is a need. Moreover, this program is capable of copying a single partition, too.

Freeware to clone disk in Windows 7

Maybe your Windows 7 laptop or PC was configured with a small HDD at the beginning of the time. Then, you bought a larger hard disk and plan to transfer all files from small disk to the larger one. At this time, you may badly need a piece of freeware to clone disk in Windows 7 since it can save you a lot of time.


Drive Clone Freeware Recommendation


Searching disk clone software on the internet, users may find a lot of results. However, after they enter the corresponding pages, they find most programs are not free and some are even expensive. Aiming at this situation, we suggest using MiniTool Partition Wizard Free, which is absolutely a freeware to clone disk or partition in Windows XP, Vista, Win 7, Win 8, or even Win 10. Moreover, the drive clone freeware just requires several simple steps and brings no damage to original data. Next, let’s see how to use this freeware to clone disk in Windows 7.


Clone Disk with MiniTool Partition Wizard


Once the drive clone freeware has been installed, please launch it to get the starting interface and choose “Launch Application” to enter the window below:
minitool-partition-wizard-main-interface
Then, select the disk which needs cloning and choose “Copy Disk” feature from the left side.
clone-disk-select-target-disk
Here all connected disks are listed. Please select the target disk to save content of the source disk and click “Next>”.
clone-disk-resize-partition
In this interface users are able to change partition size on the target disk if they choose “Edit partitions on this disk”. Then, click “Next>” to get a boot note which shows how to boot from the target disk, and users need to read the note carefully and click “Finish” to go back to the main interface below:
clone-disk-apply-changes
Now we can see disk 1 has been cloned to disk 2, so please click “Apply” button on the top to make all changes performed. However, if the source disk contains Windows OS which is running, we will be asked to restart the computer. Feel safe to do as told, because this is to protect data and system.


Once all changes are performed, the computer will reboot, and at that time we can say to clone disk in Windows 7 by using drive clone freeware is done. However, if you want to boot computer from the target or new disk, remember to set the very disk as the default first boot disk in BIOS. In addition, if you want to clone a single partition only rather than the entire hard disk, please see “Copy Partition” to get details.

Free data migration tool

Sometimes we need to migrate data from one disk to another disk, like transfer data from old disk to new disk or migrate data from small disk to large disk. And the data can be either user data or system files. In order to save time, most users choose to download a free data migration tool from the internet, which is indeed a good solution. However, during the process of transferring or after migrating, different types of errors may emerge. For example, the migration corrupts without us knowing the exact reason or Windows cannot boot from the target disk. All these are largely caused by using poor utilities. Therefore, we will introduce a free but powerful data migration tool and it is called MiniTool Partition Wizard.


In order to make system migration easy, MiniTol Partition Wizard offers the function “Migrate OS to SSD/HD Wizard”, which is a new feature added in the 9.0 version:
migrate-os-to-ssd-hd
It aims at transferring the currently running Windows OS from one disk to another disk, and the migrated OS is always bootable since boot parameters and configurations will be fixed and updated automatically during the process. If users want to boot Windows from the new disk successfully, they only need to change boot order in BIOS or choose the correct OS to boot in Windows boot manager. Moreover, only several steps are required, and the migration can be done in a short time.


However, if users do not want to migrate OS but hope to transfer user data, please employ “Copy Disk” or “Copy Partition” feature of this free data migration tool. The former is capable of copying all data saved in a disk to another disk while the latter clones data saved in one partition only. Compared with copying and pasting files, copying disk or partition can save users a lot of time and brings no damage to original data even if power outage emerges.


It is also very easy to copy disk or partition, and users only need to take several steps. Here, we take copying partition for example.


Firstly, launch MiniTool Partition Wizard to get its main interface below:
copy-partition-in-partition-wizard
Then, select the partition which needs copying and choose “Copy Partition” feature from the left side.


Next, choose an unallocated space to save the content of the source partition and click “Next>”. If there is no unallocated space, shrink one of existing partitions to get.


Then resize the newly created partition and click “Finish”.


At last, click “Apply” button on the top to apply all changes.


However, if you want to clone the entire hard disk rather than a single partition, please see Copy Disk to get details.

Backup data from one computer to another

Data saved on our computers may get lost due to different kinds of reasons, such as our mistaken operation, virus attack, and hardware damage. In order to restore the lost data in the shortest time, many users choose to backup data from one computer to another computer, which is indeed a good choice, but how to do such an operation?


It is not a wise choice to copy and paste data manually since a lot of time will be cost, and users had better employ a free data backup tool to make the backup. Here, we take the freeware MiniTool Partition Wizard for example to show users detailed steps.


How to Backup Data from One PC to Another PC


Since hardware components of PC are detachable, we can take out the hard disk of one PC and connect it to another PC. Then, make data backup on the second computer:
1. Once MiniTool Partition Wizard has been installed to the PC, please launch it to get its main interface below:
minitool-partition-wizard-main-interface
2. Select the disk or partition where important data are saved and then choose the corresponding function from the left side. To clone a disk, please choose “Copy Disk”. To backup a single partition, please select “Copy Partition”. Here, we take cloning partition for example to get the window below:
backup-data-from-one-computer-to-another-computer-select-unallocated-space
3. Choose an unallocated space from a different hard disk to save the copy of the source partition and click “Next>”. If there is no such space, we can shrink an existing partition to get with the function “Move/Resize Partition” of Partition Wizard.
backup-data-from-one-computer-to-another-computer-resize-partition
4. Resize the partition that saves the copy of source partition and click “Finish”.
backup-data-from-one-computer-to-another-computer-apply-changes
5. Click “Apply” to make changes performed since the source partition has been cloned to another disk.


However, if you want to backup data saved in one hard disk rather than a single partition, just make use of the function “Copy Disk” to clone the entire hard disk.


How to Backup Data from One Laptop to Another Laptop


It is easy to backup data from one PC to another PC, but steps to clone data from one laptop to another laptop are relatively troublesome. Since common users have difficulties in taking out hard disk of laptop, an external hard disk is needed. They have to clone the disk or partition of one laptop to external HDD, and then clone the partition on external HDD or the entire HDD to another laptop. But fortunately, steps to clone disk or partition are the same no matter on PC or on laptop.

Backup data to another disk

Most of you would have met the situation where important files got lost due to mistaken operation or without knowing exact reason, and have to do a lot of repeated work or even suffer from serious economic losses. Therefore, it is very necessary to make a backup for our important data, which can help complete recovery in a short time. Well then, how can we backup data to another hard disk in a fast way?


Windows built-in Backup and Restore function can help make such a backup, and detailed steps are as follows (here we take Windows 7 for example):
Go to Control Panel, choose View by large icons, and choose “Backup and Restore” to get the following interface:
set-up-backup-in-control-panel
Then, choose Set up backup to continue.
backup-system-choose-a-place-to-save-backup
Select a place to save the backup and click “Next”. Of course, you can save it on a network, but operations are relatively complex.
choose-things-to-backup
Then, choose things to backup. There are 2 options: Let Windows choose and Let me choose. If we select the first one, only Windows related files will be backed up. However, even if we select Let me choose, a lot of files will not be included in the backup, like files saved in FAT drive, program files, and Temporary files on drives smaller than 1 GB. If you don’t care about this, just go on operating according to wizards.


Actually, there is a much better solution, and it is to make use of free data backup tool. Here, we take MiniTool Partition Wizard for example.


How to Backup Data to Another Disk with MiniTool Partition Wizard


Firstly, launch the freeware and we can see its main interface shown below:
backup-data-to-another-disk-copy-partition
Here all disks and partitions are listed. If we want to backup data saved on a disk, just select the disk and choose “Copy Disk” feature from the left side. However, if we only plan to backup data saved in certain partition, select the partition and choose “Copy Partition” feature. It supports copying both FAT and NTFS partitions. Here, we take cloning partition D for example. Select partition D and click on “Copy Partition” to get the window below:
backup-data-to-another-disk-select-unallocated-space-to-save-copy
Here we need to choose an unallocated space on the second hard disk to save content on partition D. If there is no such space, please shrink an existing partition to get. Then, click “Next>”. After that, resize the partition and click “Finish” to go back to the main window:
backup-data-to-another-disk-apply-changes
Now we can see partition D has been cloned to disk 2 from disk 1, which shows all data have been backed up to another hard disk. At this time, please click “Apply” button to make all these changes applied.


Till now, all operations are done.

Clone Windows 10 to new disk

Attracted by new features containing in Windows 10, such as Cortana, Project Spartan, and Xbox Streaming, a lot of people have installed Windows 10 preview edition or plan to install Windows 10 full version. However, during Windows 10 use, users may need to clone Windows 10 to a new disk (a larger disk or SSD) for better experience. At this time, how can we complete a safe and easy clone?


Searching on the internet you may find a lot of cloning tools, but disappointingly most of them just provide solutions to copying the entire hard disk or certain partition. Some users think of cloning the Windows 10 partition to the new disk for system migration, but this may cause Windows unbootable most of the time, because boot information and parameters cannot be fixed or updated timely. Therefore, users had better turn to professional system clone software, and MiniTool Partition Wizard is a good choice.


It is a freeware for Windows home users, naturally including users running Windows 10, and the whole clone can be completed in several steps. More importantly, it brings no damage to any data. Detailed steps can be found here.


How to Clone Windows 10 to New Disk with MiniTool Partition Wizard


After the system clone software is installed, please launch it to get the starting interface and choose “Launch Application” module to get the window below:
minitool-partition-wizard-main-interface
Then choose the function “Migrate OS to SSD/HD Wizard” from the left side.
clone-windows-10-to-new-disk-select-the-new-disk
Next, choose the new disk to clone Windows 10 to and click “Next>”.
clone-windows-10-to-new-disk-resize-partition
Here we can change the size of partitions on the new disk via 3 ways. Please choose the most appropriate one and click “Next>” to get a note showing how to boot Windows 10 from the new disk. Read it carefully and click “Finish” to go on.
clone-windows-10-to-new-disk-apply-changes
At last, click “Apply” button to make all changes performed. Tip: as Windows 10 is running now, MiniTool Partition Wizard will ask users to restart computer. Please do as told, and it is to protect the system.


Once all changes are made and the computer boots as usual, we clone Windows 10 to new disk successfully.

Transfer encrypted partition to another drive

In order to prevent our important data from being seen by unauthorized eyes, we may encrypt certain hard disk or hard disk drive. To do such a kind of encryption, we can either make use of professional encrypting programs or employ Windows built-in feature BitLocker. Once the drive is encrypted, nobody can access files saved in the drive if they do not know the password. However, though this is a good way to protect valuable data, users may meet the situation where it is impossible to make a backup for the encrypted drive or transfer the encrypted partition to another drive. Considering this situation, we will give a good solution in this post.


On the internet, there is drive clone software which can help copy one partition or disk to another even if it is encrypted. However, if you have difficulties in finding an excellent program, try using MiniTool Partition Wizard, which is a freeware for users who are running Windows XP, Vista, 7, and Windows 8/8.1. For server users, they need to purchase the server edition.


Steps to Transfer Encrypted Partition to Another Drive


In my test, I’m going to transfer partition G which is encrypted via BitLocker:
view-encrypted-partiiton-in-windows-explorer
Firstly, we need to launch the drive clone software MiniTool Partition Wizard to get its main interface:
minitool-partition-wizard-main-interface
Now we can see used space of partition G becomes 32GB and the file system becomes other since it is encrypted. At this time, please select the partition G and click “Copy Partition” feature from the left side.
transfer-encrypted-partition-to-another-drive-mark-a-place-to-save-the-source-drive
Then, select a disk and mark a position to save content of the encrypted partition and click “Next>”. Here, we clone the partition to Disk 3.
transfer-encrypted-partition-to-another-drive-edit-partition
Here we can do nothing but click “Finish” button to continue, because the partition we are operating is an encrypted partition.
transfer-encrypted-partition-to-another-drive-apply-change
Now we can see partition G has been cloned to disk 3 from disk 2. At this time, please click “Apply” button and MiniTool Partition Wizard will perform changes automatically.


Therefore, when you want to clone a hard drive or partition no matter it is encrypted or not, the recommended drive clone software may help you a lot.