Author Archives: zxl123

Clone disk including all partitions

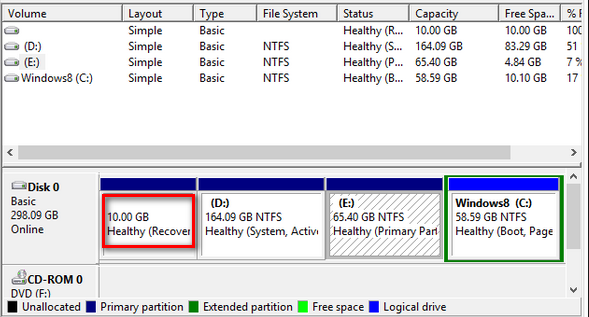
A hard disk is always containing multiple partitions. For example there are 4 partitions on my system disk, namely drive C:, D:, F:, and a recovery partition without drive letter. Owning more than one partition, we can save different data to different partitions, dual or multiple boot Windows, and prevent virus from attacking all data at a time. When the hard disk saves valuable information or files, most people choose to make a copy for the entire hard disk. So, what is a good way to clone disk including all partitions? Definitely, users need to download a piece of drive clone software from the internet, and here we suggest using MiniTool Partition Wizard.


4 Reasons for Recommending MiniTool Partition Wizard


1. It is free for Windows home users.
2. During the process of clone, data security can be ensured.
3. It not only can clone a small disk to large disk but can copy large disk to small disk as long as the small disk has enough space to save all content on the large disk.
4. Cloning disk just requires several steps no matter how many partitions are contained.


Clone Disk Including all Partitions with MiniTool Partition Wizard


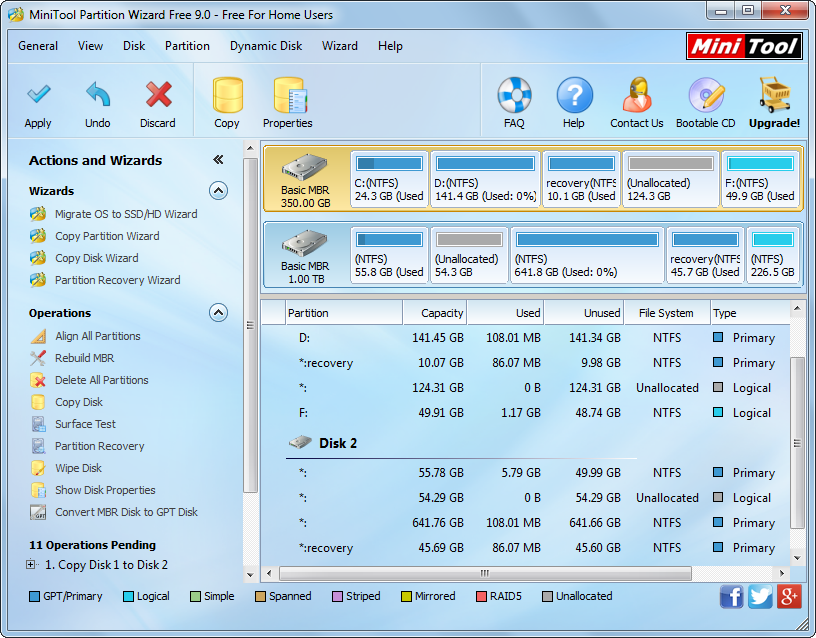
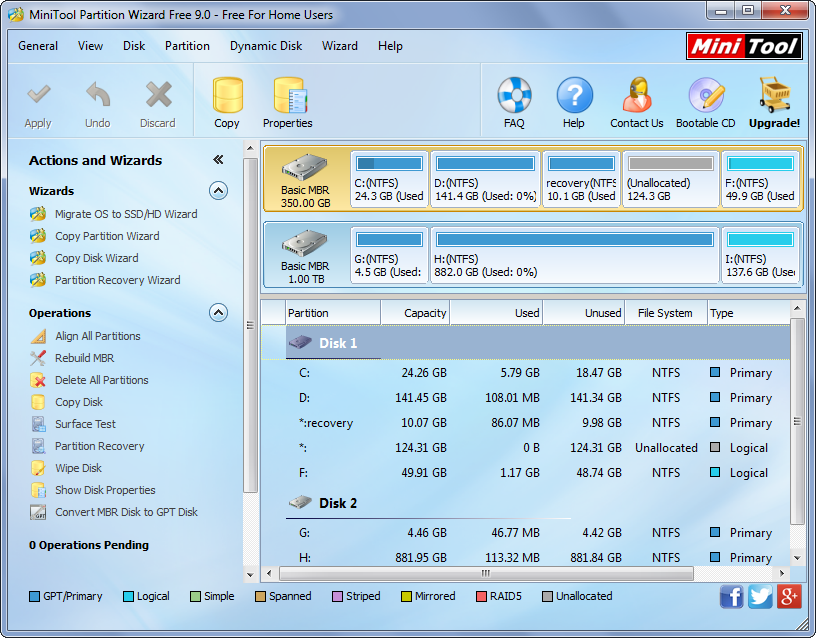
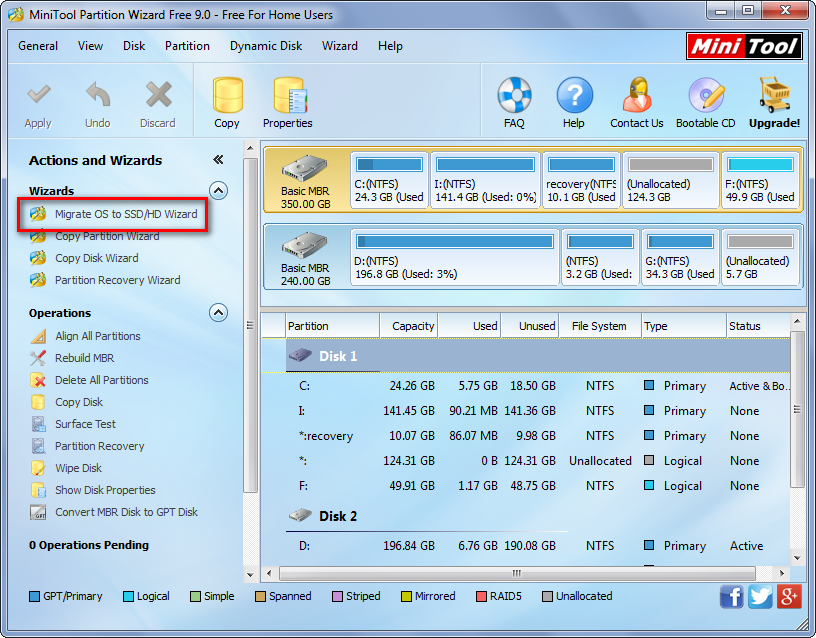
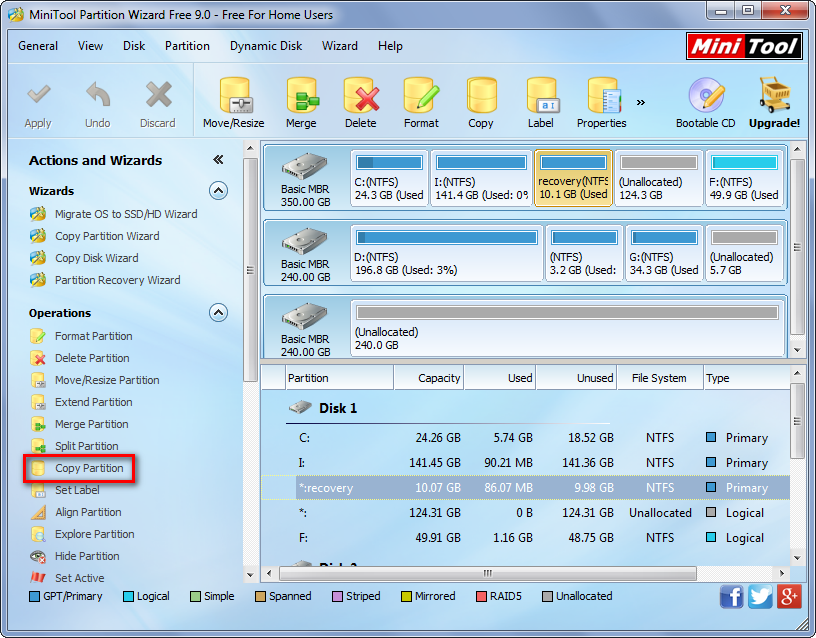
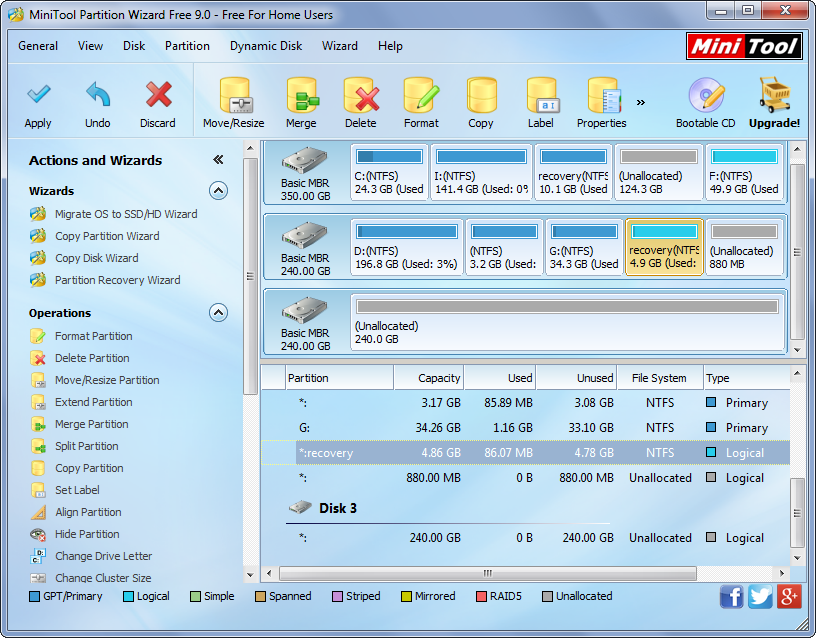
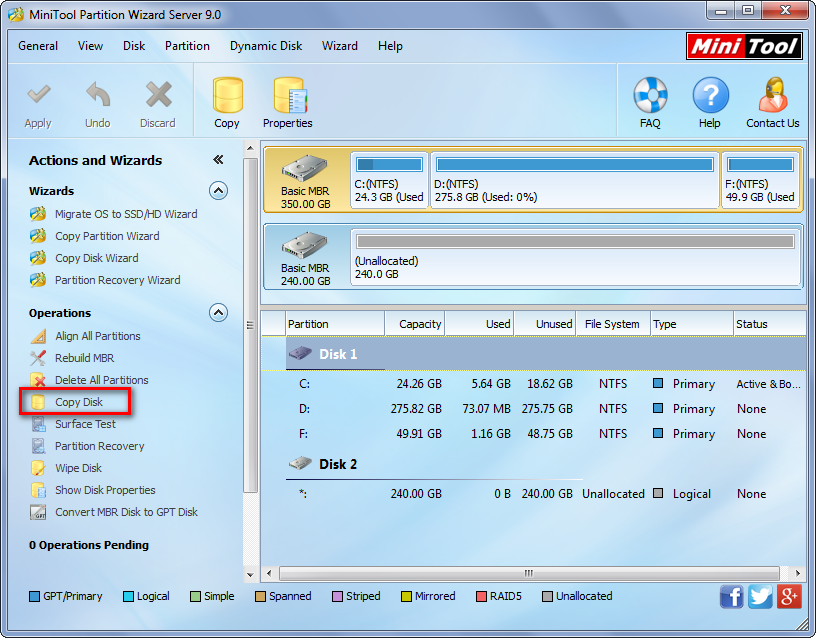
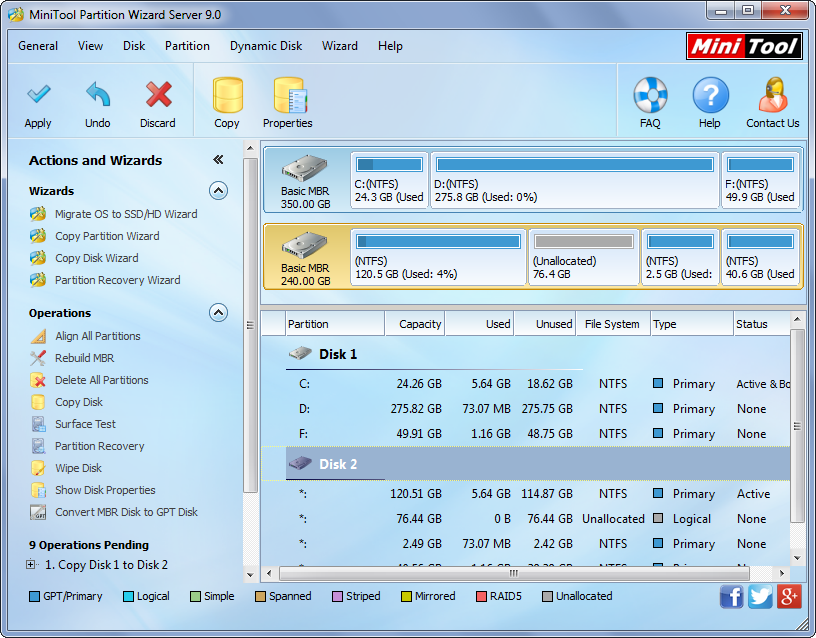
Once the drive clone software has been installed successfully, please launch it to get the main interface where all disks and partitions are shown:
minitool-partition-wizard-main-interface
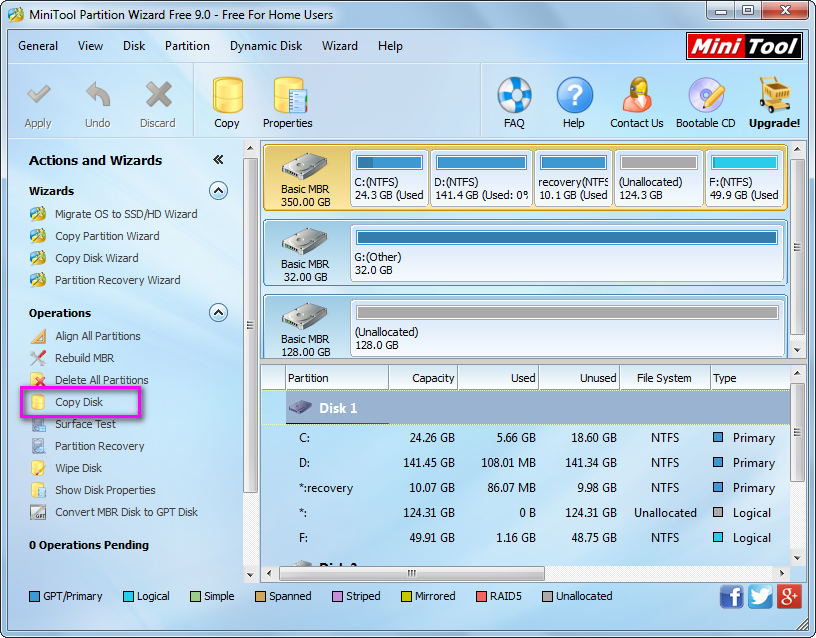
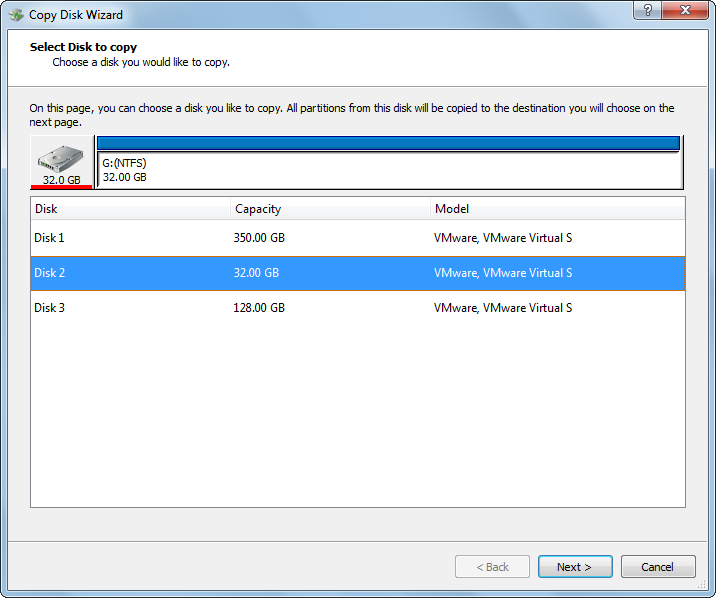
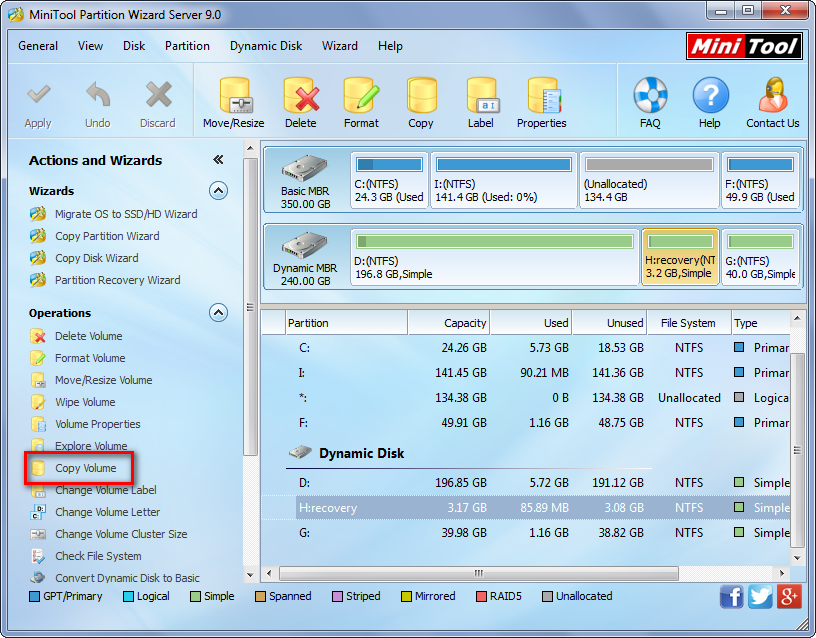
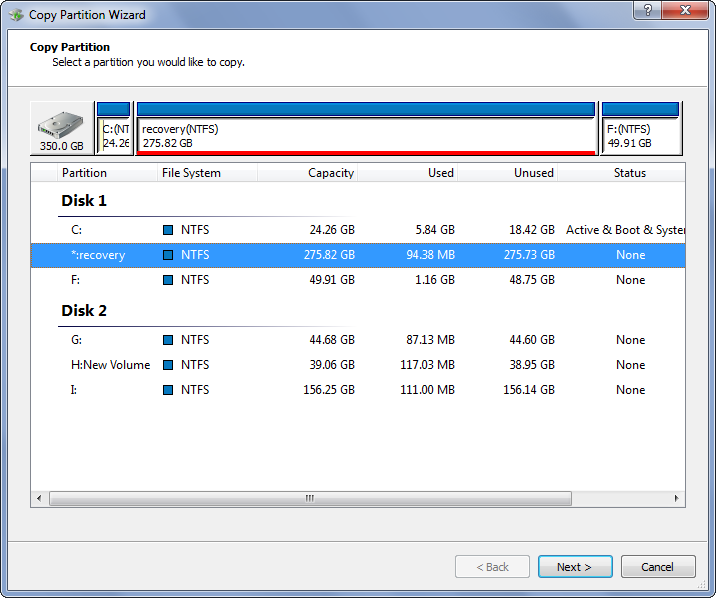
Since we plan to copy the entire hard disk, we need to select the source disk (the disk you want to clone) and choose “Copy Disk” feature from the left side.
clone-disk-including-all-partitions-select-target-disk
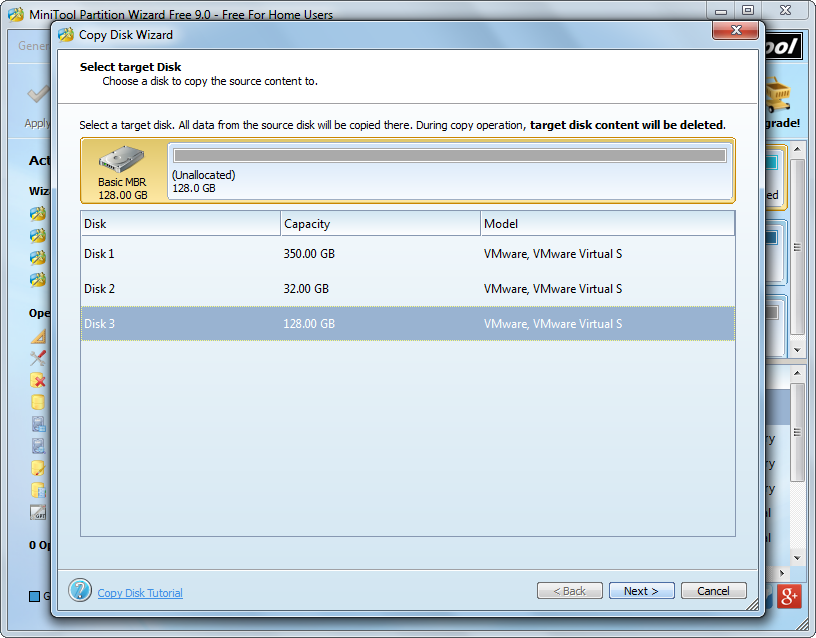
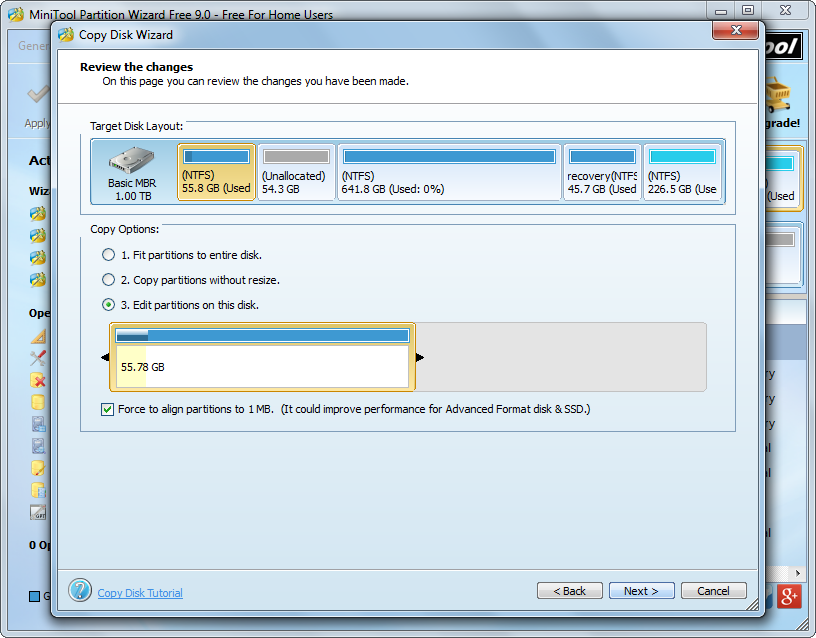
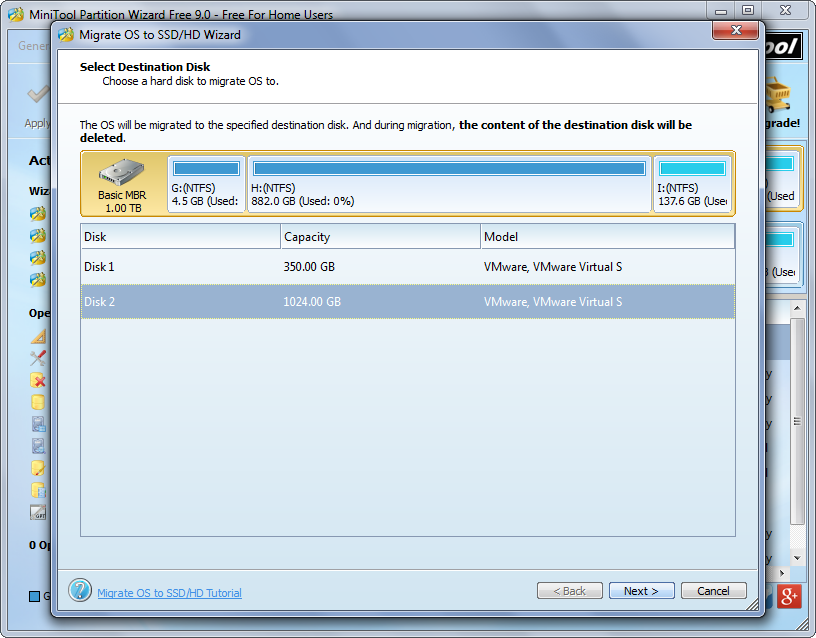
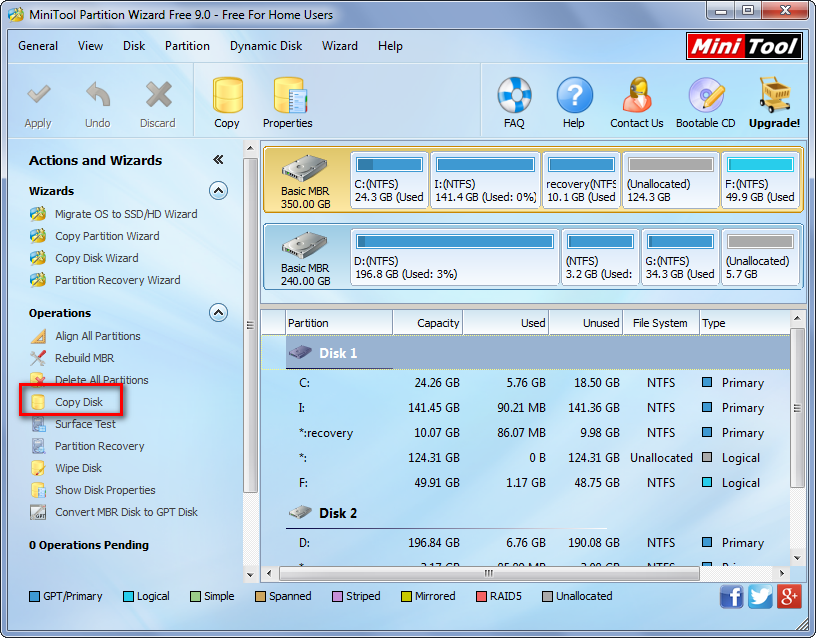
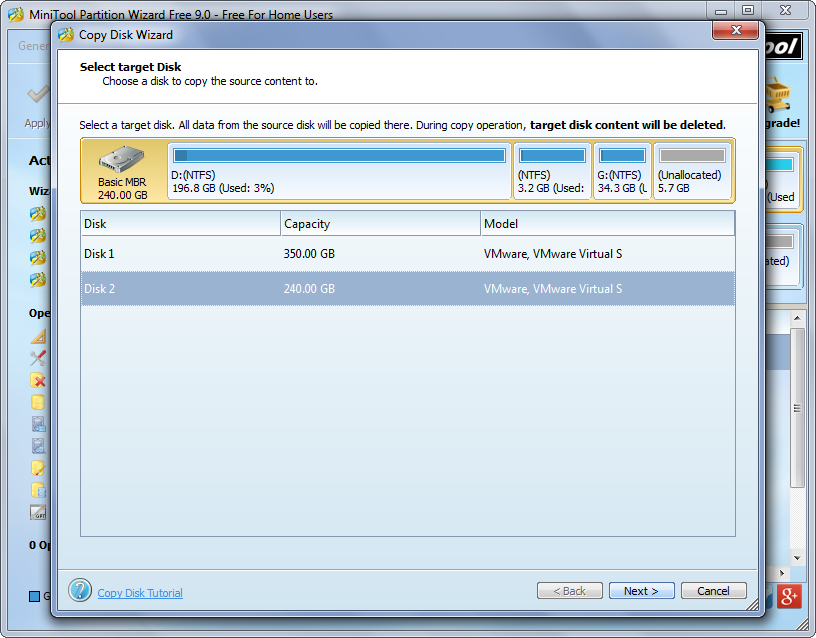
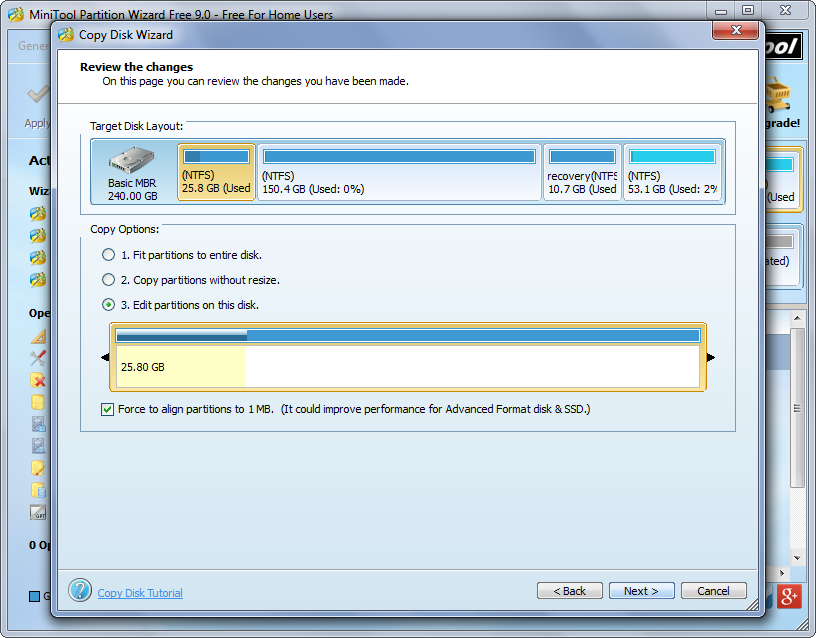
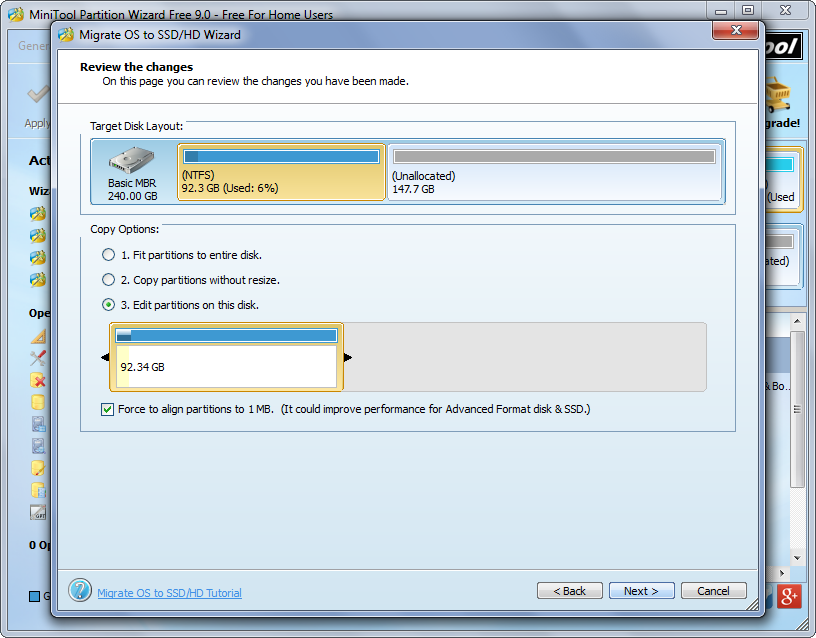
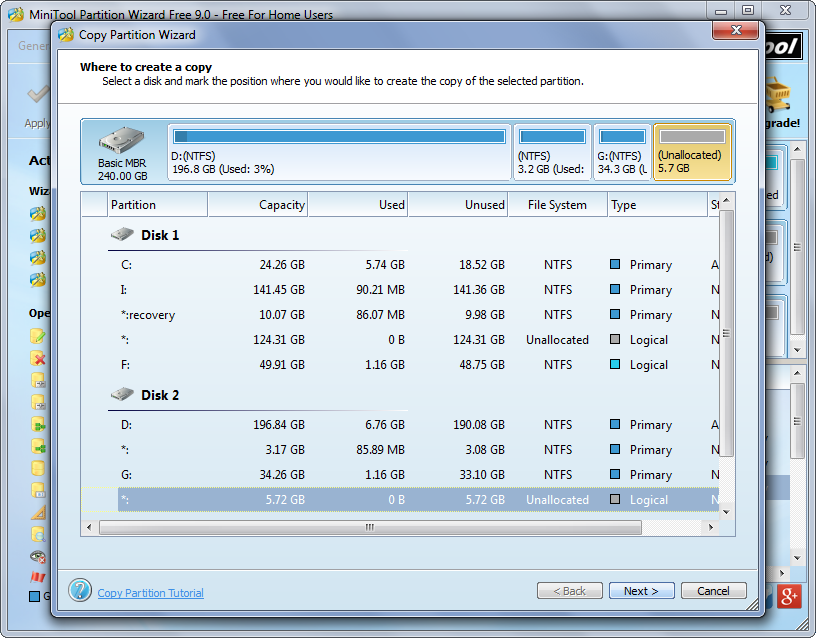
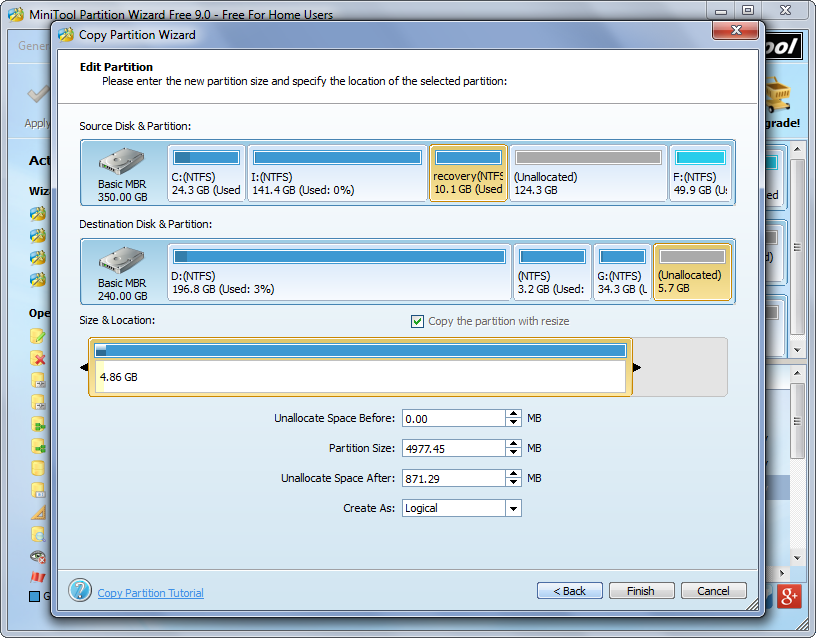
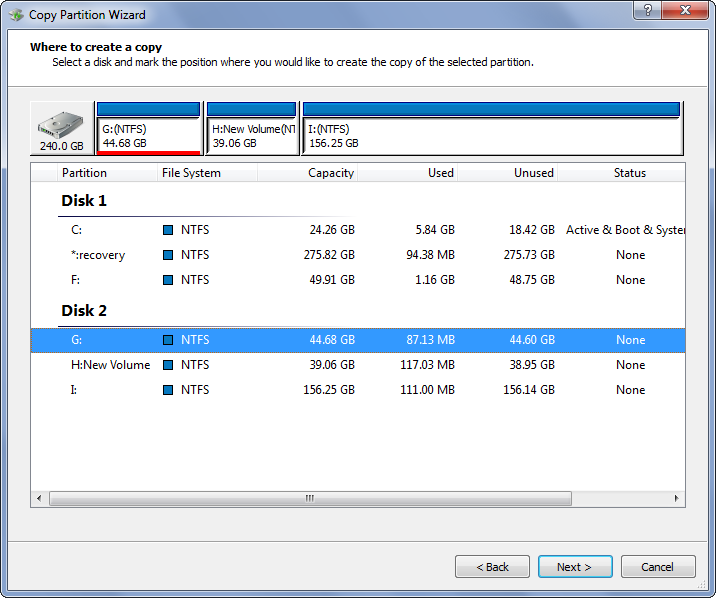
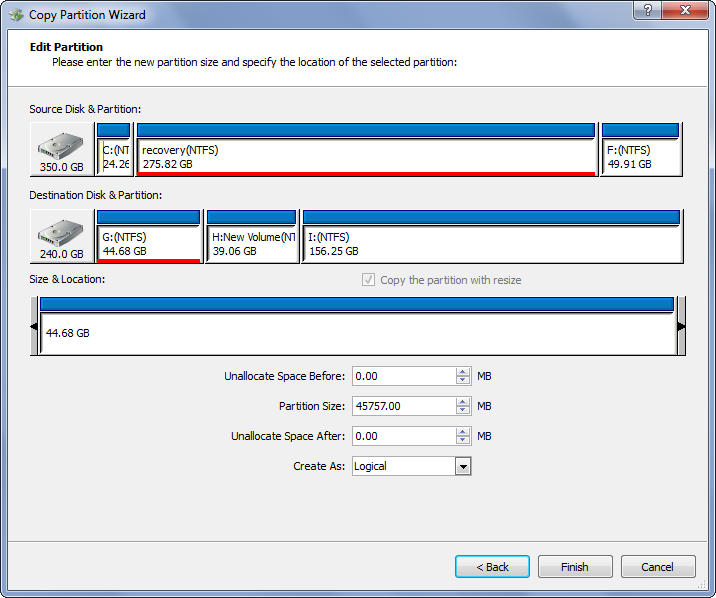
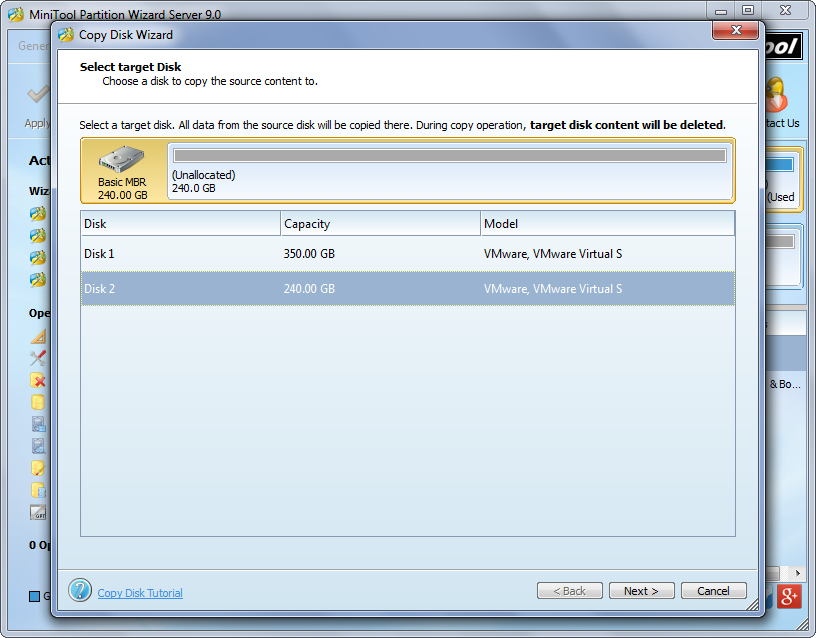
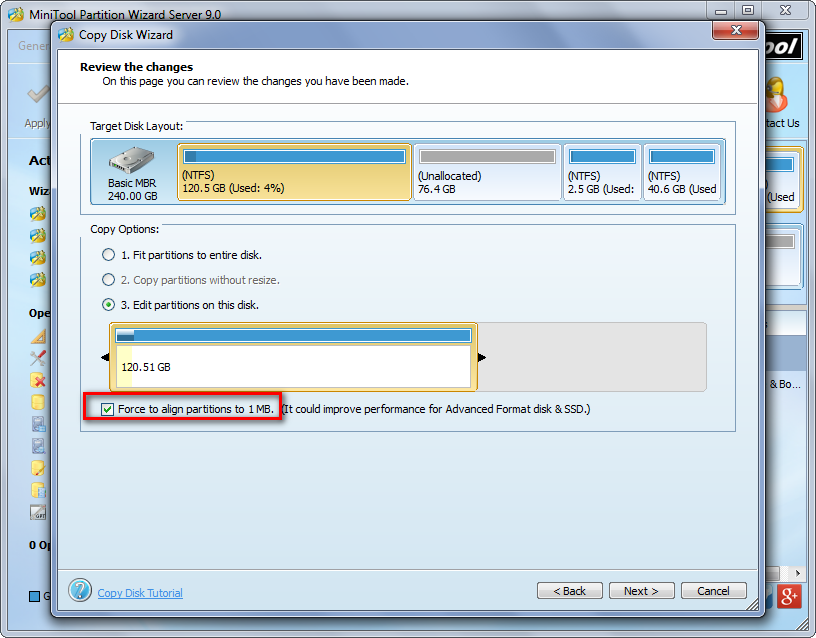
Then, select the target disk (the disk that will hold content on source disk) and click “Next>”. After these operations, we are able to change partition size on target disk:
clone-disk-including-all-partitions-resize-partition
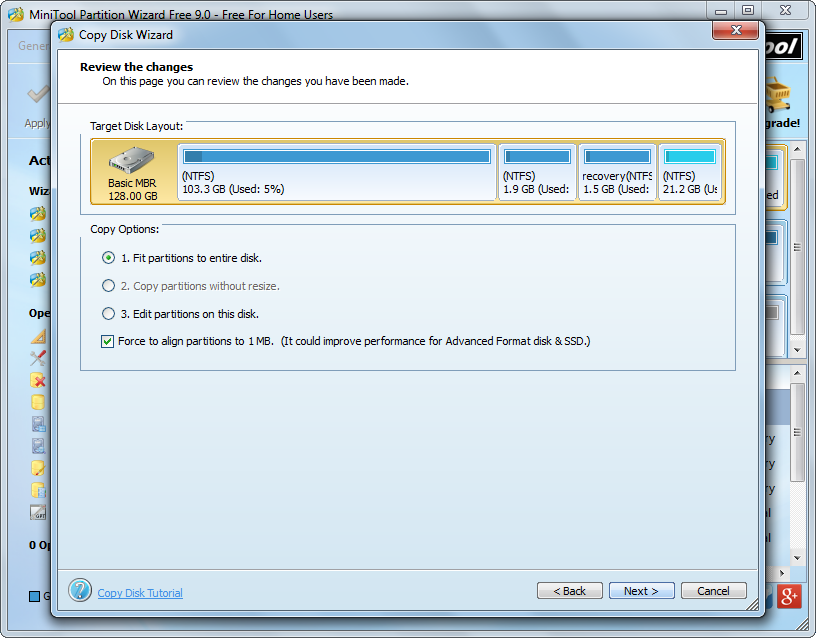
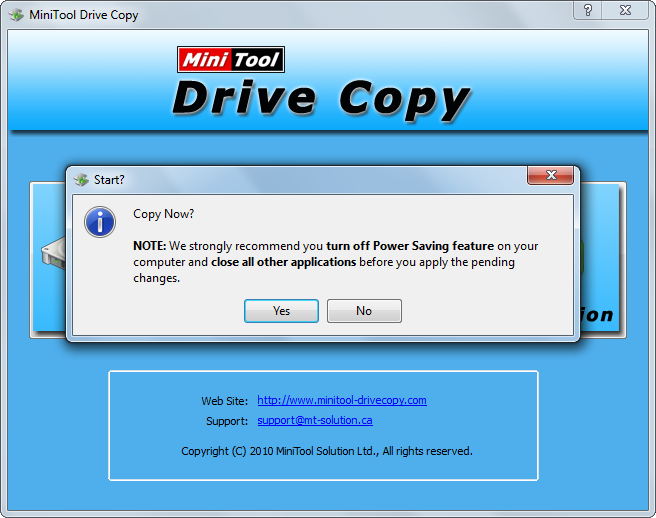
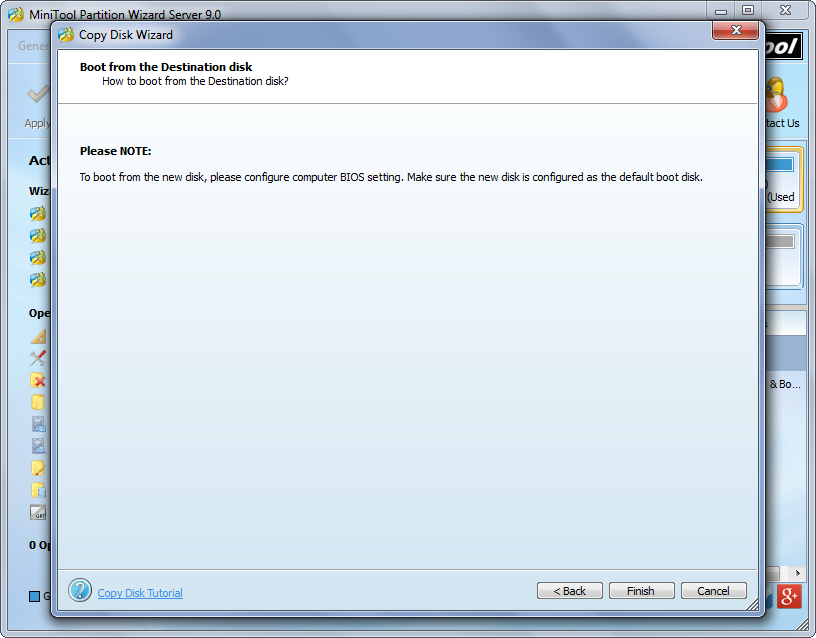
If the target disk is larger than source disk, we are able to change partition size according to our actual demands. However, it target disk is smaller than source disk, we will be not allowed to change partition size. Then, click “Next>” to get a boot note. Read the note and click “Finish” to continue.
clone-disk-including-all-partitions-apply-changes
At last, click “Apply” button to perform all changes.


Now we succeed in cloning disk, including all its partitions. For more details, please see the help tutorial Copy Disk.

Transfer all files to new SD card

As we know, SD (Secure Digital) card is the most widely used storage device on digital machines like digital camera and personal digital assistant, due to its huge capacity and high security. Nowadays we can even find a SD card larger than 100GB. Therefore, many people plan to upgrade their old card to larger one. Well then, how to transfer all files from old SD card to new card?


In many users’ eyes, copying and pasting is the only way to transfer files, so they cost a lot of time to do the transferring. Actually, if there are more than 10GB files to move, users had better clone the old SD card to new SD card, because all files will be copied at the same time and much time can be saved.


To do such a clone, users need to download a free drive clone program from the internet since Windows does not provide a good solution. However, if you do not know which one is available, try using MiniTool Drive Copy, which is free and works perfectly on Windows non servers.


Steps to Transfer All Files to New SD Card in MiniTool Drive Copy


Step 1: launch the program to get its startup interface below:
minitool-drive-copy-main-interface
Step 2: choose the module “Disk to Disk”. Of course, if there is only one partition on your old SD card, “Partition to Partition” is also OK.
transfer-all-files-to-new-sd-card-select-the-source-sd-card
Step 3: Select the old SD card and click “Next>”. Then, select the new SD card and click “Next>”. After these steps, you may get a interface where partition size can be resized:
clone-sd-card-resize-partition
Step 4: for full use of SD card space, please just click “Next>” to continue. Then, a boot note will appear. Please ignore the note and click “Finish”.

transfer-all-files-to-new-sd-card-confirm-all-changes

Step 5: click “Yes” to confirm changes made just now.


Once MiniTool Drive Copy shows it succeeded in cloning SD card, our work is done. Actually, this free drive clone program supports copying other storage devices apart from SD card, including memory card, memory stick, mechanical HDD, SSD, and so on. In addition to cloning a device, it can help wipe a device to avoid privacy leakage or recover lost partitions on hard disk. It’s a worthwhile program.

Backup hard drive of PC to external

Many of you would have heard of news that certain corporation suffered huge losses due to missing important business materials. Actually, apart from corporations, we common people may lose personal information due to different kinds of factors such as mistaken operation, virus attack, and hardware damage and have to face unnecessary troubles and losses. Therefore, it is very necessary to make a backup for all our needed files since this is the fastest and safest way to make recovery. Well then, how to backup hard drive of PC to external hard drive? Next, let’s see detailed steps.


How to Backup Hard Drive of PC to External Drive


Firstly, prepare an external hard drive which is large enough to hold all content on the local hard drive. Note: important data on the external drive will be erased after the backup is completed, so please transfer needed files out in advance.


Then, download a piece of drive backup software from the internet. You can find a lot of such programs on the internet, and most may work to your situation, but a lot of fees should be paid. Actually, there is freeware to do such a backup, and here MiniTool Partition Wizard Free is recommended. Tip: this edition is free for Windows XP, Vista, 7, and Windows 8 users. If you are running Windows Server, the server edition should be purchased, which is with high cost performance.


Next, connect the external hard drive with computer and launch the recommended drive backup software to get its main interface below:
backup-hard-drive-select-source-drive
Now we can see both external hard drive and local drive are displayed. Please select the local drive and click “Copy Disk” feature from the left side to get the following interface:
backup-hard-drive-select-external-drive
Then, select external drive to save content on the local hard drive and click “Next>”. After this operation, users are able to change partition size and location on external disk:
backup-hard-drive-resize-partition-on-external-drive
By choosing the third mode users can move and resize partition according to their own demands. Of course, since we are backing up data in this demo, there is no need to do these changes. Directly click “Next>” to get a note which shows how to boot from the external hard drive. Ignore the note and click “Finish” to continue.
backup-hard-drive-apply-changes
Now we can see all partitions and data have been cloned to external hard drive. At this time, please click “Apply” button to make all these changes performed.


For more information about backing up hard drive of PC to external drive, please Copy Disk.

Copy Windows to external hard drive

When there is no Windows installation disk, many users would like to copy Windows to external hard drive so as to make a backup once the system was installed, which is indeed a good solution. But unfortunately, the copied Windows OS is always unbootable. Next, let’s see the most possible reason.


Why Cloned Windows Cannot Boot


Generally, Windows system files will be installed in boot partition and its startup files will be saved to system partition. Of course, if users install Windows to a specified partition or install previous systems like Windows XP and Server 2003, boot files and system files will be saved to one partition. Therefore, most people choose to copy system partition and boot partition by using drive clone software to make a copy for Windows, but this is actually not a recommended solution. For successful copy, users had better resort to professional system clone software which can fix and update boot configurations and parameters like boot.ini on the external disk, while copying system partition and boot partition will not do fixing and updating, which is the most probable reason why the copied Windows is unbootable.


System Clone Software Recommendation


If you are using Windows XP, Windows Vista, Windows 7, Windows 8, or Windows 10, try using MiniTool Partition Wizard Free Edition since it is free to use. But for server support, please purchase the Server Edition. With this program users can make a copy for Windows in easy operations.


How to Copy Windows to External Hard Drive


Once the program has been installed, please run it to get its startup interface and then click “Launch Application” module to get the window below:
minitool-partition-wizard-main-interface
Here please choose the function “Migrate OS to SSD/HD Wizard”.
copy-windows-to-external-hard-drive-select-external-drive
Then, select the external hard drive and click “Next>”.
copy-windows-to-external-hard-drive-resize-partition
Next, change the location and size for partitions on the external hard disk and click “Next>” to get a boot note. After getting this information, please click “Finish” to continue.
copy-windows-to-external-hard-drive-apply-change
Now we can see MiniTool Partition Wizard performed a lot of operations rather than copy system and boot partition only. At this time, please click “Apply” to perform all pending changes.


Tip: since “Migrate OS to SSD/HD Wizard” copies Windows which is running currently, MiniTool Partition Wizard will ask users to restart computer, which is to protect system and other data. Please do as the system clone software tells.

transfer everything to new hard drive

Question: there are several GB space left on my 250GB old hard drive, which was bought several years ago, so I bought a new 1TB WD disk and want to deprecate the old one. However, all files (including Windows OS and user data) saved on old disk are important so that I want to transfer everything to new hard drive. But I know it will cost a great number of time to do the transferring if I migrate them by copying and pasting, since there are more than 200 GB files. Is there a time-saving solution?


Transferring files directly is indeed a time-consuming solution, and instead we can clone the entire old hard drive to new hard drive, which saves about half of the time. In addition, Windows is always unbootable from the new disk even if all Windows files have been migrated at the same time, because boot configurations and parameters on the new disk should be updated while copying files does not make such an update.


To do this kind of transferring, we need the help of drive clone software. Here, MiniTool Partition Wizard is recommended due to its outstanding performance. Next, let’s see detailed steps.


How to Transfer Everything from Old Hard Drive to New Drive


After the drive clone software has been installed on our computer, please run it to get the starting interface and then choose “Launch Application”.
minitool-partition-wizard-main-interface
We have said we can clone the entire drive to new hard drive for data transferring, so we need to select the disk which needs cloning and choose “Copy Disk”.
clone-old-hard-drive-to-drive-select-the-new-drive
Then, choose the new disk to save the clone of the old drive and click “Next>”. After that, we are able to change partition size on the new disk:
transfer-everything-from-old-drive-to-new-drive-resize-partition
By choosing the third mode we can resize every partition on the new disk, and then click “Next>” to get a boot note. If you are planning to boot Windows from the new disk, pay attention to this note and click “Finish”.
transfer-everything-from-old-drive-to-new-drive-apply-changes
Now we can see the old hard drive has been cloned to the new hard drive, which means everything has been transferred to new hard drive. At this time, please click “Apply” button to make all changes.


If you also want to transfer data in a fast way, this would be a good solution. However, if you only want to transfer data in one partition, please see Copy Partition to get details.

Clone Windows installation to new drive

At the beginning of time, our computer might be configured with the unique hard disk, and definitely Windows was installed on this disk. But after a period of time we may find the old disk is tool small to save new files. At this time most of you would want to replace the old one with a new disk, but the problem how to clone Windows installation from old drive to new drive troubles a lot of users especially when there is no installation disc.


Actually, it will be quite easy to do such an operation as long as users find the right solution. Currently, there is system migrating software to help migrate Windows OS from one hard disk to another hard disk, and we can ask this kind of programs for help. However, the problem that Windows cannot boot from the cloned hard disk appears from time to time, and this is largely because boot information is modified or damaged during cloning. Nowadays, much system migrating software will not update boot configurations and parameters. Therefore, MiniTool Partition Wizard Free Edition is introduced here.


Tip: this program is free for Windows home users only. If you want to get server support, please purchase MiniTool Partition Wizard Server Edition, which is cheap.


How to Clone Windows Installation to New Drive


Firstly, we need to launch the freeware MiniTool Partition Wizard to get its main interface shown below:
minitool-partition-wizard-main-interface
Then choose “Migrate OS to SSD/HD Wizard” feature from the left side. Tip: this function migrates the OS which is running now.
choose-new-disk-to-save-the-Windows-installation
Next, select the new drive to save the clone of the Windows installation and click “Next>”.
migrate-windows-to-new-disk-resize-partition
Now users are able to change the size of the partition which saves Windows installation on new drive, and then click “Next>” to get a boot note. If you are planning to boot computer from the new drive which was initialized to MBR, pay much attention to this note, and then click “Finish” to go back to the main interface:
clone-windows-installation-to-new-drive-apply-changes
From the main interface we can see volume C has been cloned to the new disk. Actually, if there is system reserved partition or EFI system partition, these partitions will be cloned since all of them are related to Windows. At last, click “Apply” button on the top to make all changes applied.


For more details of cloning Windows installation to new drive, please see Migrate OS to SSD/HD.

Move recovery partition from SSD to HDD

Due to the excellent performance of solid state drive (SSD), many users would like installing Windows on a SSD, and nowadays a lot of laptops are with OS installed on SSD. However, after installing Windows 7, Windows 8, or other later released Windows OS they may find one or more recovery partitions are created, and the largest one may take up dozens of GB space. At this time, many people hope to move recovery partition from SSD to HDD since space of SSD is precious, but unfortunately most of them have no idea of this operation. Aiming at this situation, we are going to introduce a good solution in this post.


In Disk Management of Windows we can see the recovery partition:
view-recovery-partition-in-disk-management
This recovery partition occupies 10GB space, but we can delete it to free up SSD space after moving it to HDD. For faster and safe move, we had better ask drive clone software for help. Here, you can try using MiniTool Partition Wizard Free Edition if you are running Windows XP, Windows 7, Windows 8, or other Windows NON Server operating systems. For server support, pleas purchase MiniTool Partition Wizard Server Edition. Detailed steps to migrate recovery partition will be shown in the following content.


How to Move Recovery Partition from SSD to HDD


Firstly, launch the free drive clone software MiniTool Partition Wizard to get its starting window and choose “Launch Application” to enter the interface below:
minitool-partition-wizard-main-interface
Then, select the recovery partition and click “Copy Partition” feature from the left side.
move-recovery-partition-from-ssd-to-hdd-mark-a-place-to-save-copy
Then, choose an unallocated space on the HDD to save the copy of the recovery partition and click “Next>”. If the entire HDD does not have unallocated space left, you can shrink an existing partition to get.
migrate-recovery-partition-resize-partition
Next, change the size of the partition which saves content of recovery partition and click “Finish” to continue.
move-recovery-partition-from-ssd-to-hdd-apply-changes
Now we can see the recovery partition has been migrated to HDD. At this time, please click “Apply” button to make all previous changes performed.


After MiniTool Partition Wizard shows it succeeds in copying partition, we can delete the recovery partition on SSD.

Backup data before deleting dynamic volume

Question: I have a hard disk which was converted to dynamic disk by accident, and now I want to revert it to basic again. So I searched solutions on the internet but Microsoft asks me to delete all existing volumes. However, there is a volume saving dozens GB of files, and all of them are important. Who can show me the fastest way to backup data before deleting the dynamic volume? I don’t want to copy and paste them one by one, because it will cost me a lot of time.


This kind of questions are often asked on the internet since any of you would be unwilling to lose significant files. Currently, the fastest way to do this operation is using third party program. However, most data backup tools are so expensive that many users don’t want to purchase it. Considering this situation, we recommend MiniTool Partition Wizard Professional edition for Window non-server users while Server edition for Windows server users. Both of them are economical. In addition, this program backs up data by cloning the entire dynamic volume rather than copying data, which saves much time. Next, we take the server edition for example to show users steps to backup data before deleting a dynamic volume.


How to Backup Data by Using MiniTool Partition Wizard


Firstly, launch the program to get its main interface:
minitool-partition-wizard-main-interface
Now we can see all disks, partitions, and volumes. Please select the dynamic volume which needs cloning and then choose the function “Copy Volume” from left action panel.
backup-data-before-deleting-dynamic-volume-choose-a-place-to-save-backup
Next, choose an unallocated space from another hard disk (both dynamic disk and basic disk are OK) to save the copy of the source dynamic volume, and then click “Next”. However, if there is no unallocated space, you can shrink an existing volume or partition via the function “Move/Resize Partition” to get.
clone-dynamic-volume-resize-volume
At this time we are able to change the size for the partition which saves data backup. After getting desired size, please click “Finish” to go back to the main interface.
backup-data-before-deleting-dynamic-volume-apply-changes
Now we can see the source dynamic volume has been cloned to another hard disk. At this time, we need to click “Apply” button to make all changes performed. However, to protect data and system, MiniTool Partition Wizard will ask us to restart computer, and we only need to do as told.


Once the computer restarts successfully, we can say the work to backup data before deleting a dynamic volume has been done. Just try this solution when necessary.

Backup recovery partition before deleting

After we clean install Windows 7 or Windows 8, one or more recovery partitions may be generated. They are reserved by manufacturers and save files that can help restore system to the factory state. However, a recovery partition may take up space from several hundred of MB to dozens of GB, which is a big waste especially for hard disks which are limited in capacity, like solid state drive. Therefore, many users hope to delete them to release free space. However, it is very necessary to backup recovery partition before deleting it. After all, it can help restore our computer from crash. Well then, how to clone a protected recovery partition in Windows? Next, we will show users detailed steps.


Preparations:
1. Prepare a hard disk or external storage device, which will be used to save the backup of the recovery partition, and then connect the device with computer.
2. Download a piece of drive clone software from the internet, and then install it on computer. If you do not know which program to download, try using MiniTool Drive Copy.


After all preparations are done, please do as the following example shows.


How to Backup Recovery Partition with MiniTool Drive Copy


Firstly, launch the drive clone software to get its starting interface below:
minitool-drive-copy-startup-interface
Then, choose “Partition to Partition” module to backup a single partition. Of course, if you want to clone the entire hard disk, choose “Disk to Disk”.
backup-recovery-partition-select-the-recovery-partition
Next, select the recovery partition and click “Next>”.
backup-recovery-partition-mark-a-place-to-save-the-backup
Then, choose an unallocated space or existing partition to save the copy of the recovery partition and click “Next>”. Note: if an exiting partition is selected, all files saved in it will be lost, so please backup important ones.
backup-recovery-partition-resize-partition
Now we can change the size of partition that saves content of recovery partition and then click “Finish”.


At last, click “Yes” to start cloning, and MiniTool Drive Copy will make all changes automatically. Please wait for a while.


Do you want to backup recovery partition before deleting it on HDD or SSD? Try using the recommended drive clone software.

Make a copy for Server disk

Files saved on servers are threatened by a lot of factors, like our mistaken operation, virus’s malicious deletion, and hardware damage. Once important files get lost due to these factors, users have to suffer great losses if there is no backup. Therefore, it is very necessary to make a copy for server disk. In addition, when they want to upgrade an old small hard disk to a new larger one, cloning old hard disk to new disk helps complete the upgrade without losing any data. Well then, how can we copy one disk to another disk in easy operations?


For fast server hard disk clone, we had better employ a drive clone program, but the program should be with high security since server users pay most attention to data security. Moreover, if the source disk saves Windows OS, the program should be powerful enough to make the cloned system bootable, which requires it is capable of fixing boot information. Considering these requirements, we suggest using MiniTool Partition Wizard Server Edition.


Actually, there is another big reason for recommending this program – by using it, we can extend a small partition to larger, recover lost partitions, wipe a partition to avoid data overwriting, etc. Next, we will show users how to clone server hard disk.


How to Make a Copy for Server Disk


After the drive clone program has been installed, we need to launch it to get the main window shown below:
minitool-partition-wizard-main-interface
Then, select the disk that will be cloned and choose “Copy Disk”.
make-a-copy-for-server-disk-select-a-disk-to-save-the-copy
Next, select a disk to save the copy of the source disk and click “Next>”. After these steps, we are able to change partition size on the disk:
clone-server-disk-resize-partition
We can change the length of the handle to resize partitions. Moreover, there is an option “Force to align partitions to 1MB” checked by default, which helps improve the performance of solid state disk and advanced format hard disk. Then, click “Next>” to get a boot note:
boot-note
It shows how to boot from the new disk. If the disk you are cloning saves Windows OS, do as the note tells when restarting computer. Here please click “Finish” to go back to the main window:
make-a-copy-for-server-disk-apply-changes
At last, click “Apply” button to make all changes performed. However, if the disk saves Windows which is running, we will be asked to restart the computer, and all operations will be made in boot mode. Please do as told to protect system.


Once all changes are done, our computer will reboot. And at this time we can say to make a copy for server disk has been completed.