Author Archives: zxl123

Clone EFI system partition

As we know, a EFI system partition may be generated after we install a Windows operating system on a GPT disk. It should be formatted with FAT32 since UEFI firmware cannot recognize a NTFS partition, and we cannot delete it in Disk Management for Windows boot files are saved in it. When a computer is powered on, UEFI firmware (Unified Extensible Firmware Interface) will load boot files saved in EFI system partition to start Windows OS since this partition contains the boot loader programs for all installed operating systems. If the partition gets lost or files saved in it are missing, all installed Windows OS may be unbootable. Therefore, it is very necessary to make a backup for this partition. In this post, we will introduce the fastest way to clone EFI system partition though it is hidden.


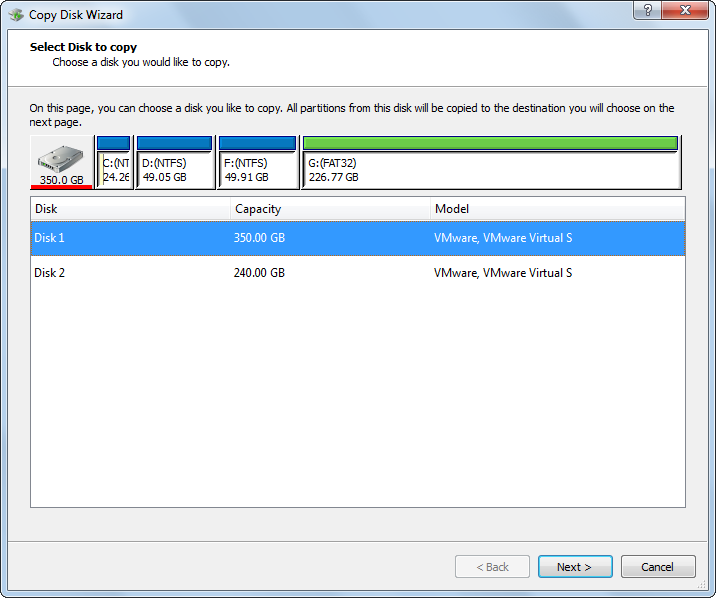
Considering the fact that many drive clone tools do not support cloning hidden partitions, we recommend using MiniTool Partition Wizard. By using this program, we can clone the EFI system partition to either hard disks (both external and internal) or removable devices to make a backup. For detailed steps to backup EFI system partition, please see the following demonstration.


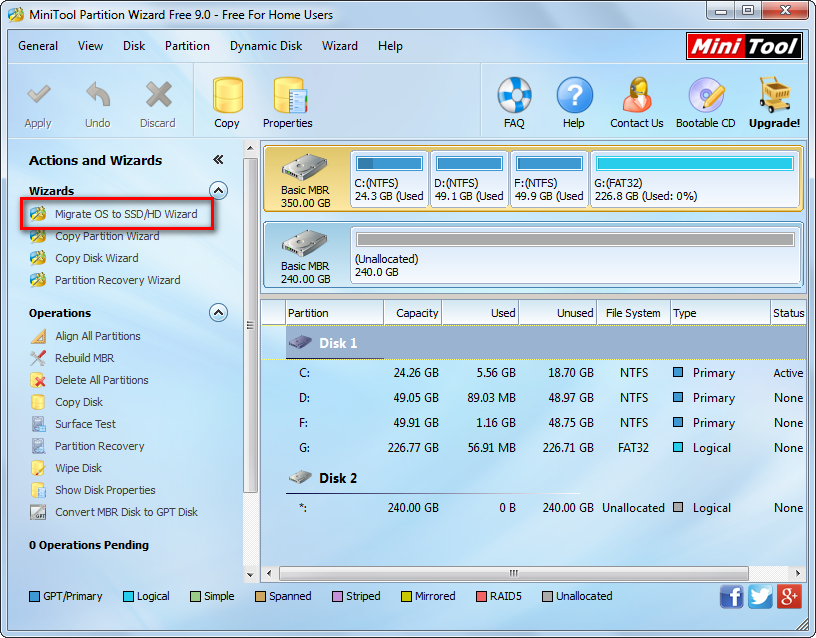
How to Clone EFI System Partition with MiniTool Partition Wizard


Firstly, run this free drive clone tool to get its starting interface and choose “Launch Application” to enter the window below:
minitool-partition-wizard-main-interface
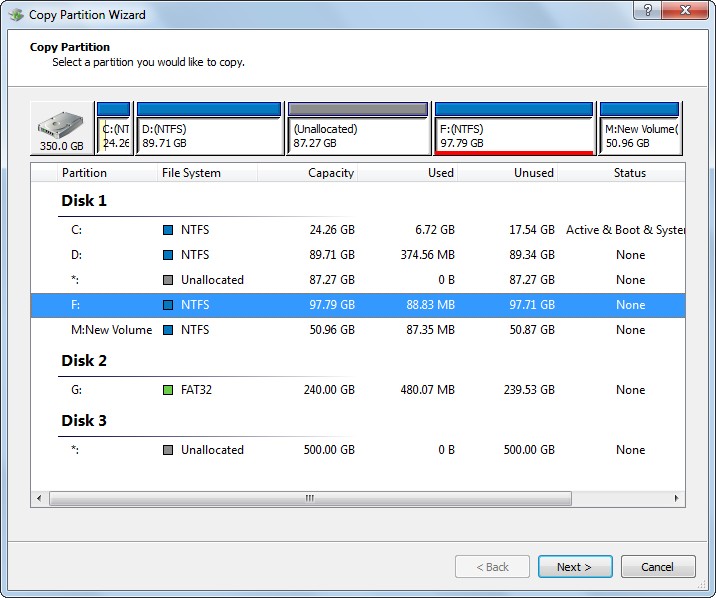
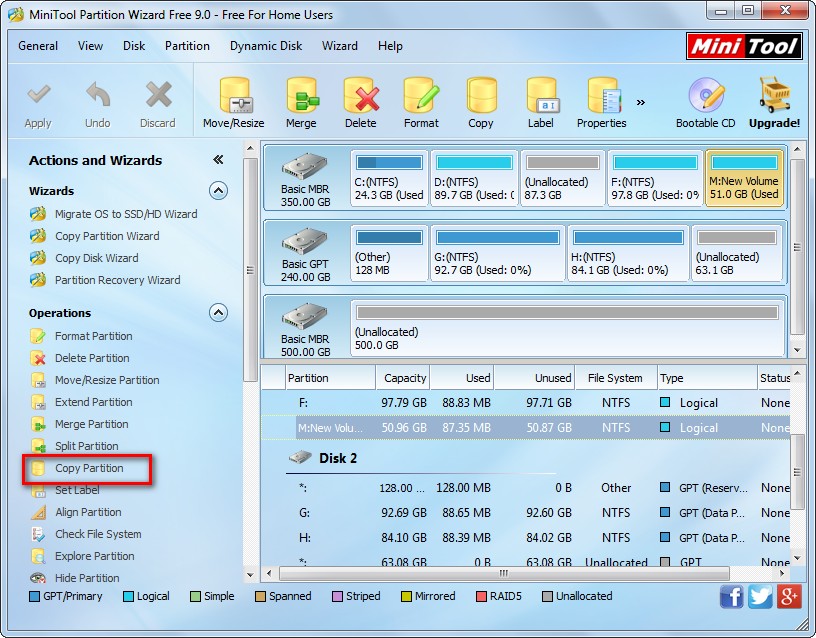
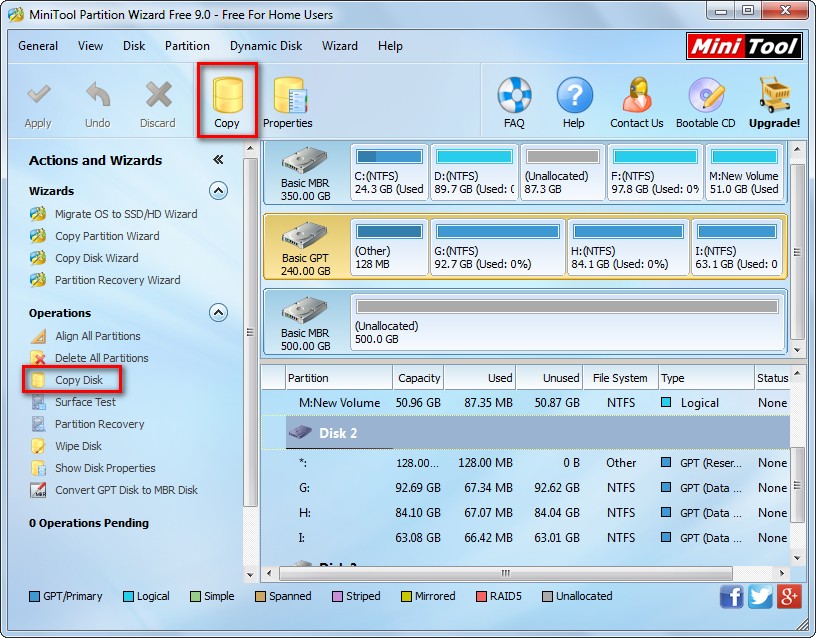
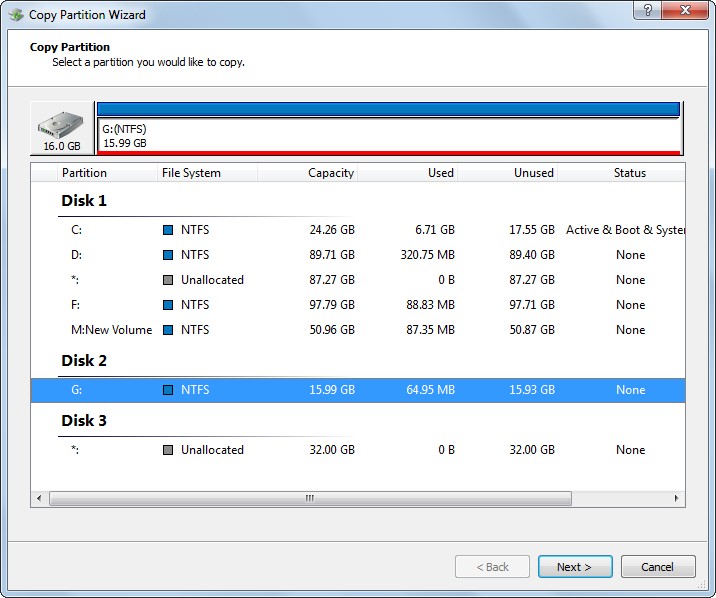
Then, select the EFI system partition (ESP) and click “Copy Partition” from the left side.
copy-efi-system-partition-mark-a-place-to-save-the-copy
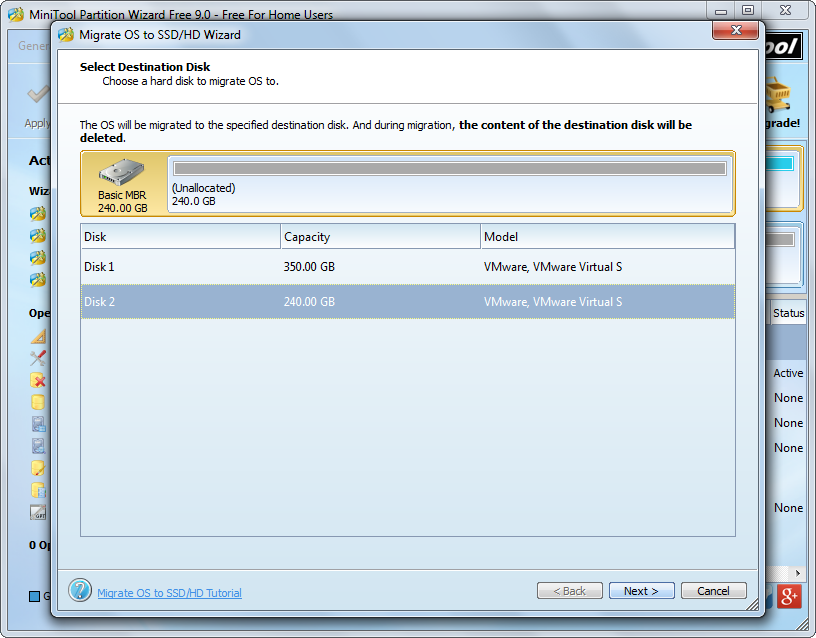
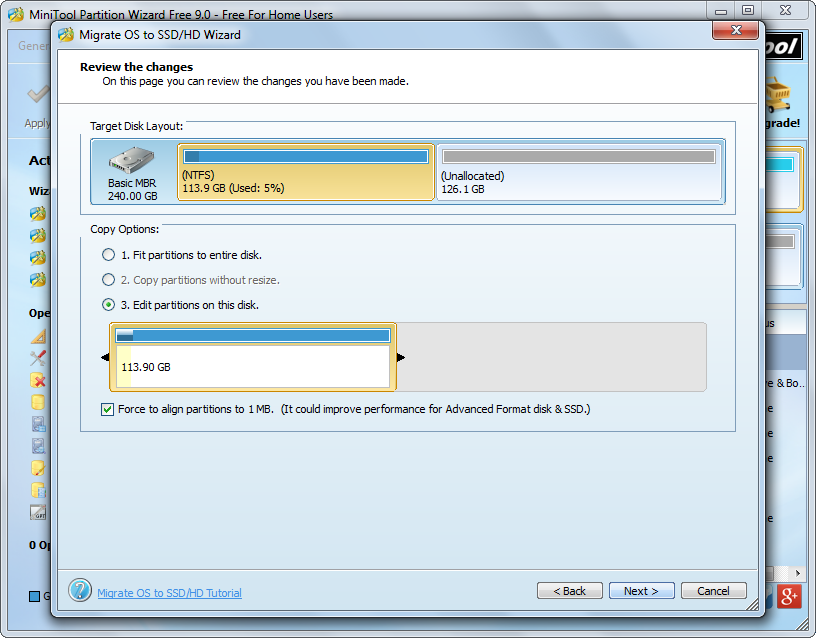
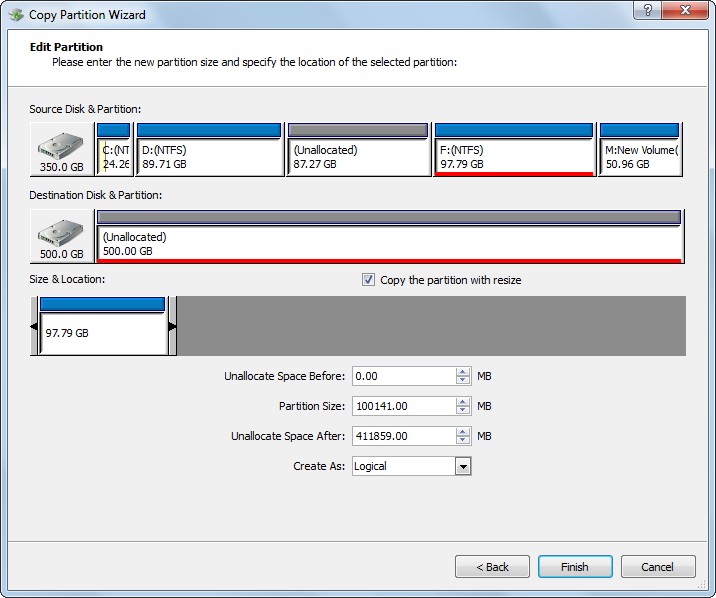
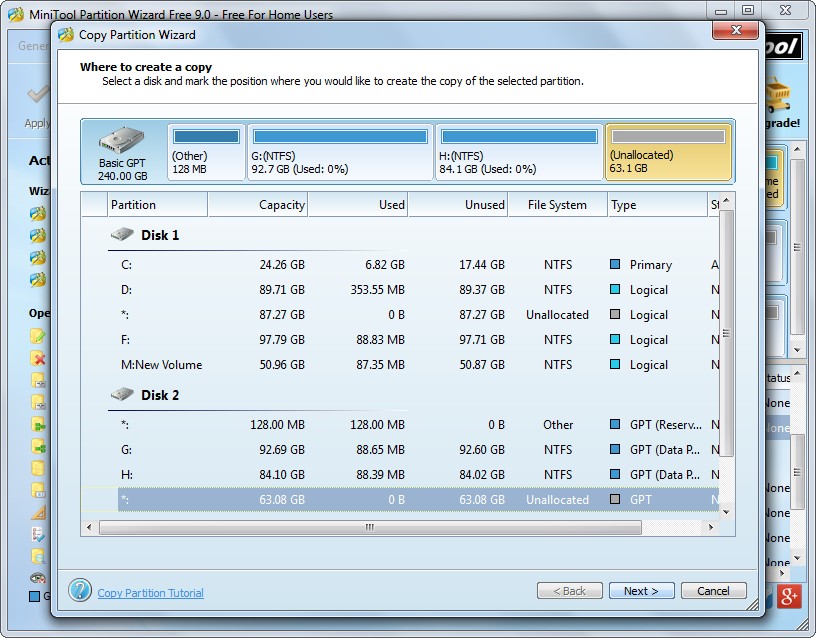
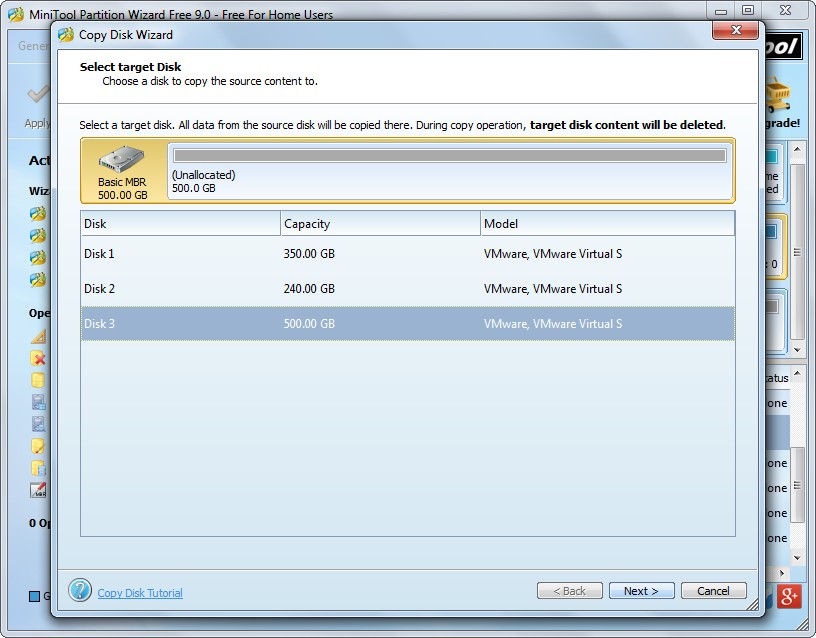
Next, choose an unallocated space to save the copy of EFI system partition and click “Next>”. If there is no such unallocated space, shrink an existing partition or delete a partition to create. Here, we image ESP to a USB flash drive.
copy-efi-system-partition-resize-partition
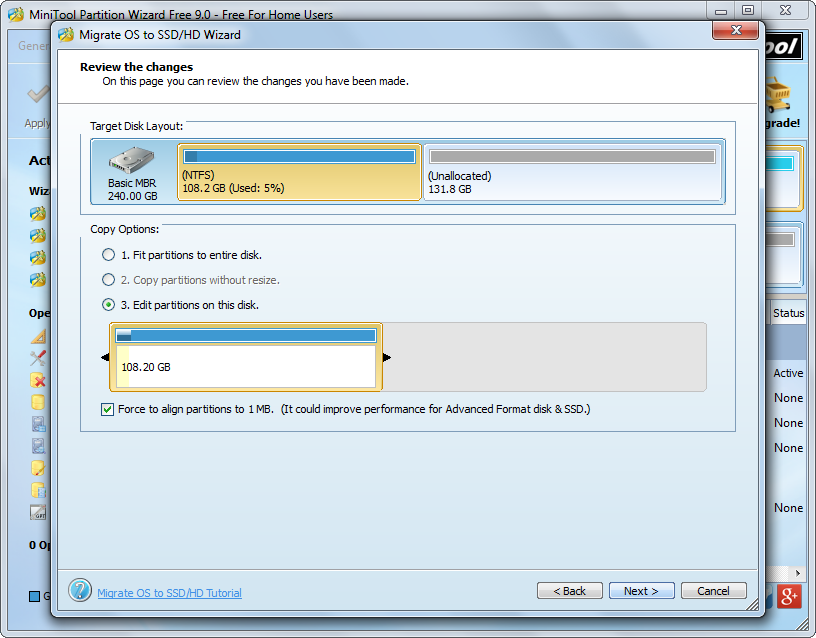
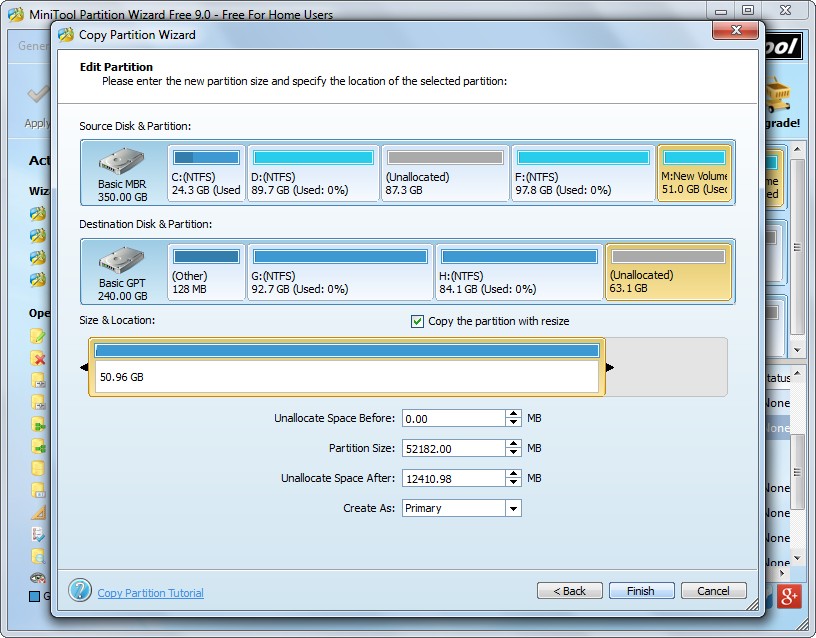
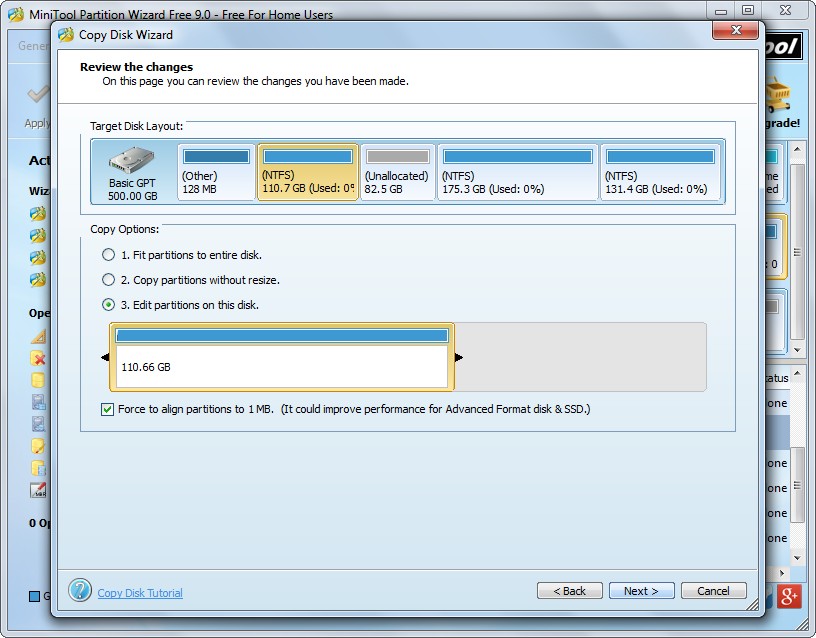
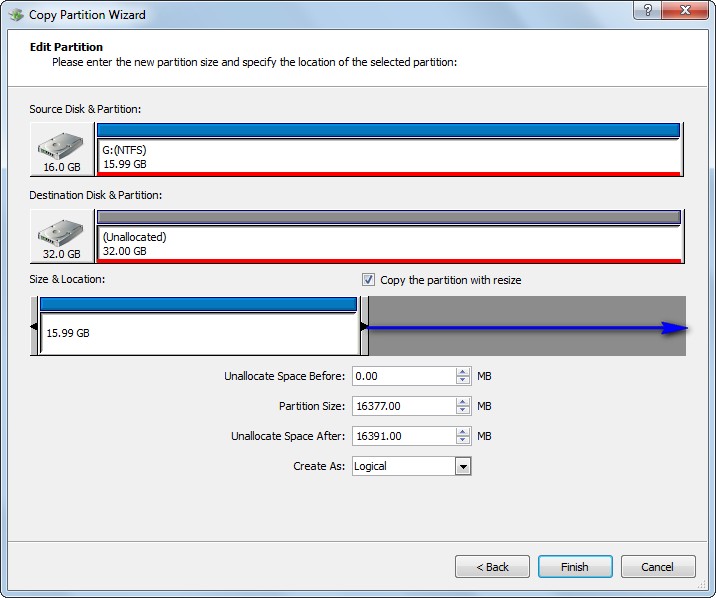
Now we can resize partition on USB flash drive by changing the length of the sliding handle, and then click “Finish” to go back to the main window:
copy-efi-system-partition-apply-change
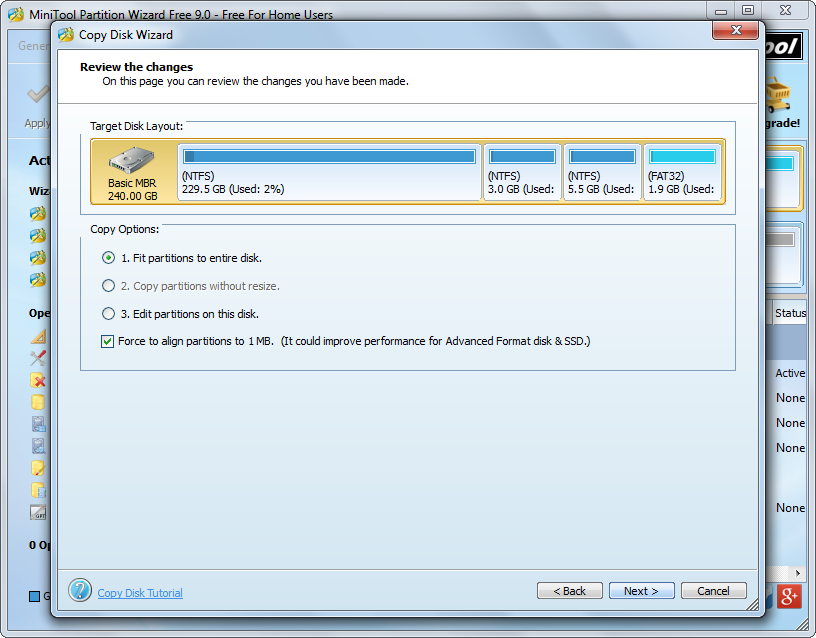
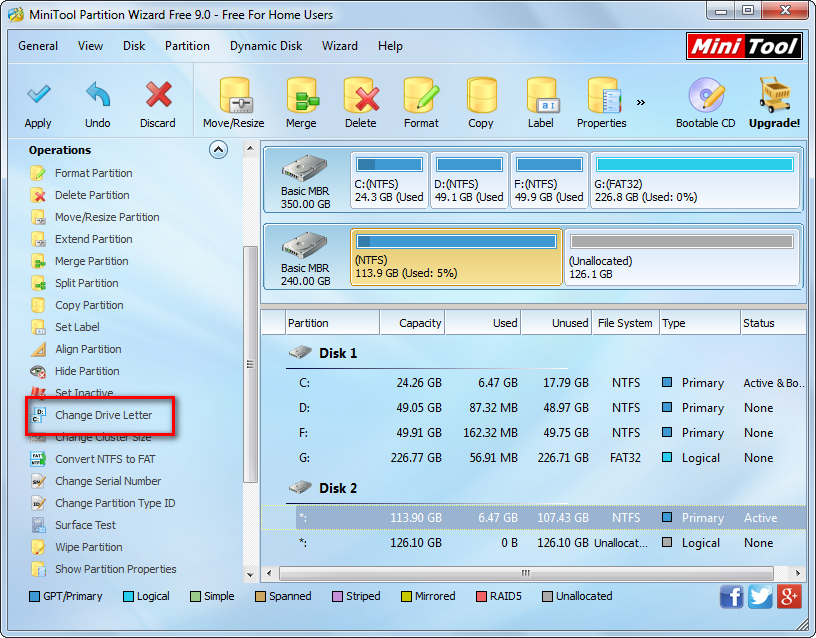
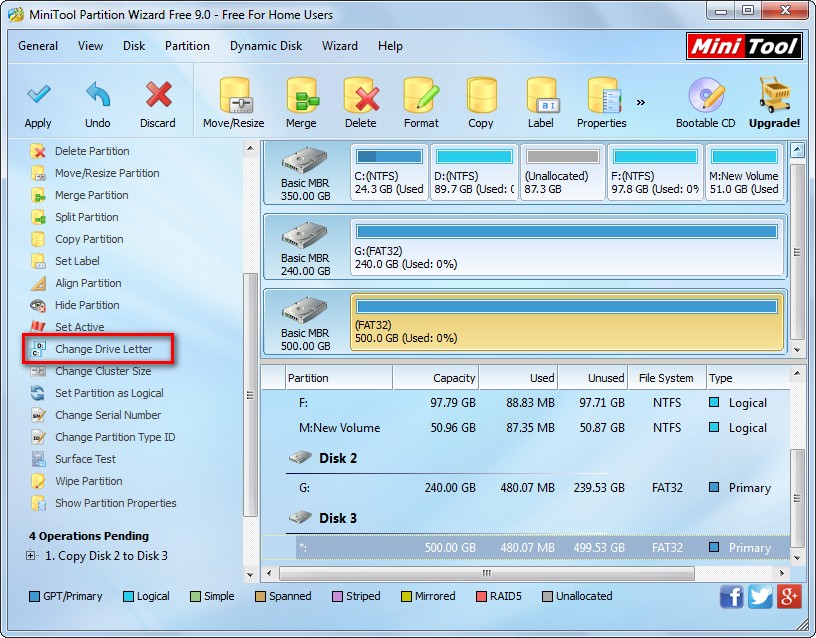
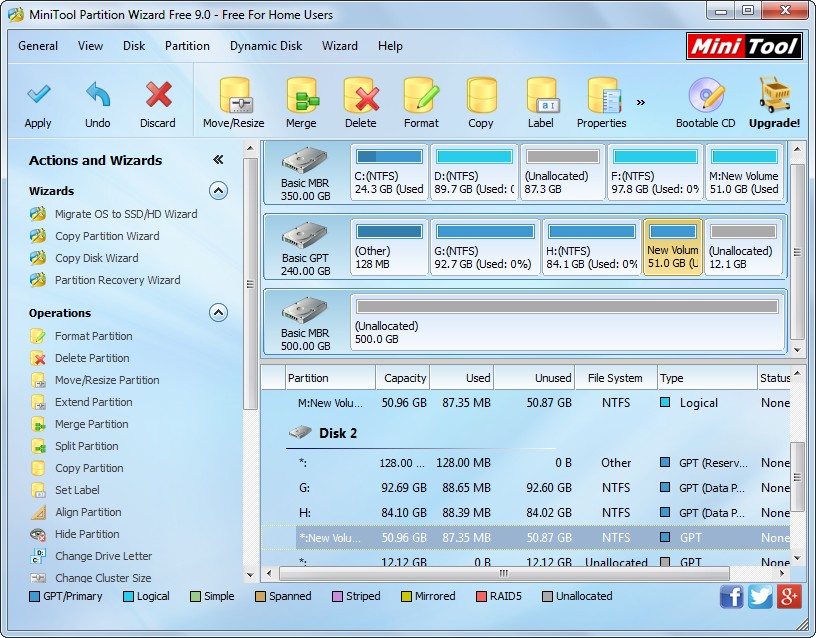
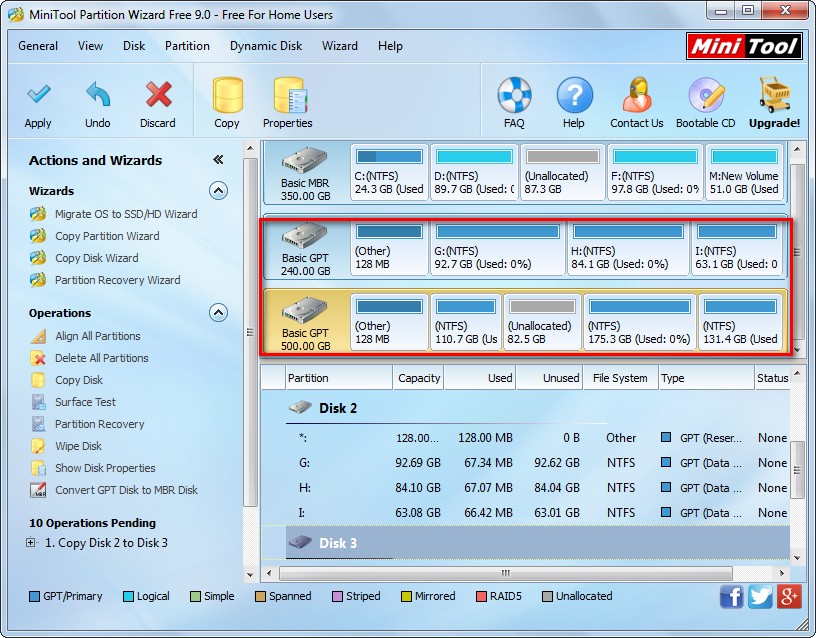
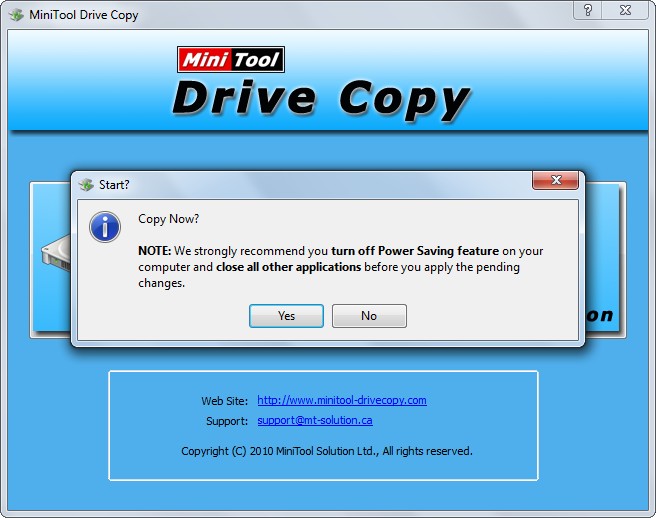
Now we can see the EFI system partition has been cloned to the USB flash drive, but it is a preview effect only. At this time, as long as we click “Apply” button on the top, we can get the real effect.


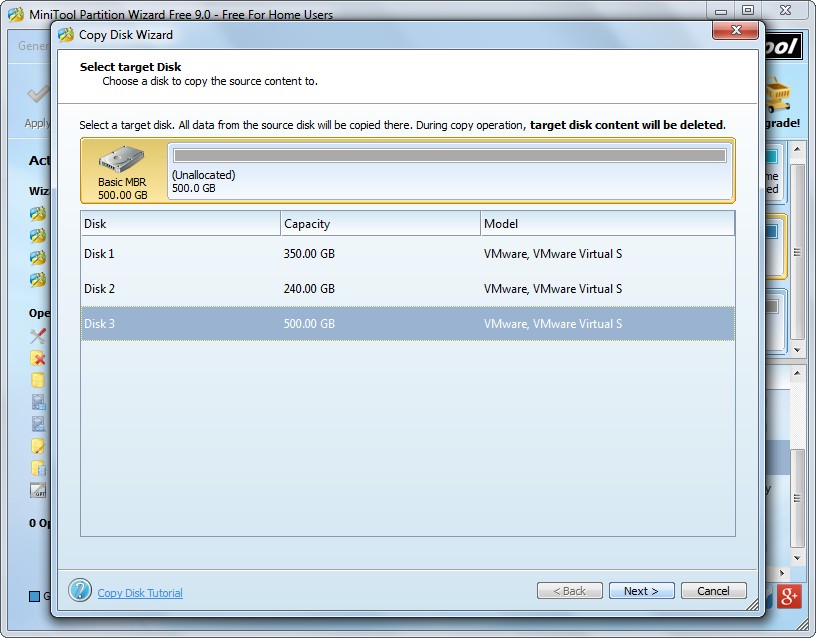
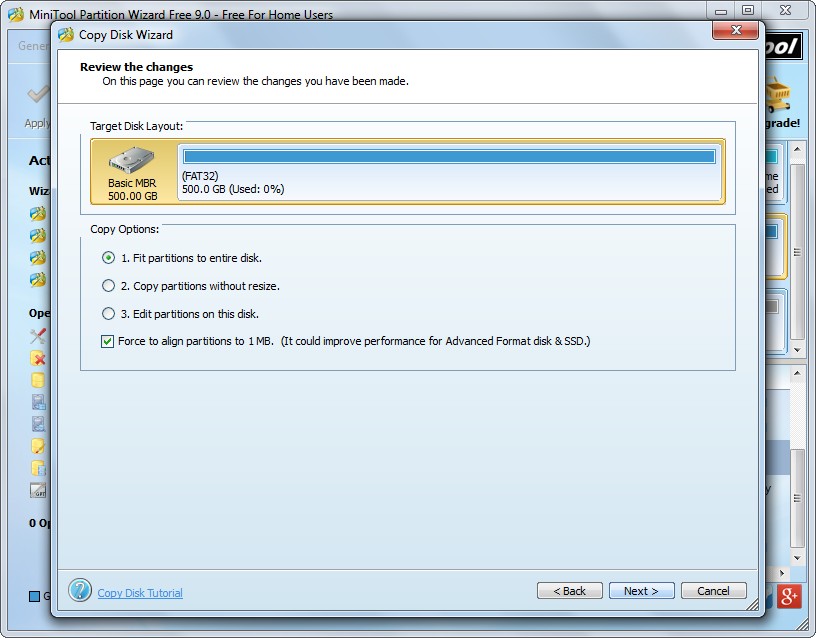
Actually, apart from the EFI system partition, MiniTool Partition Wizard is capable of cloning all other partitions, such as the partition which saves Windows OS. In addition, it also supports cloning a hard disk. If you are planning to backup a disk or partition in Windows, try this free drive clone software out. It is free for all Windows non-server users.

Copy hard disk of virtual machine

Like physical hard disk, virtual hard disk (VHD) can also be used to save different types of files, like Windows OS, word documents, photos, and videos. If files saved on VHD are rather important, we believe most people would like to make a backup for this disk. Well then, how can we copy hard disk of virtual machine?


Actually, cloning virtual hard disk is like copying physical hard disk, and we only need to download a piece of disk clone software from the internet. Of course, you can download it in either real computer or virtual machine. However, if the network for virtual machine does not work smoothly, download in real computer, and then copy and paste to virtual machine. We believe most of you would have installed VMware Tools which makes it possible to share files between real machine and virtual machine.


Nevertheless, much disk clone software on the internet cannot run well in virtual machine. Considering this situation, we suggest using MiniTool Drive Copy. If you are doubtful about this program, the following example will help get you out of trouble.


Copy Hard Disk of Virtual Machine with MiniTool Drive Copy


Before running the virtual machine, we need to add a hard disk to save the backup of source disk: open the target virtual machine in VMware workstation, select “Hard Disk” under “Devices” menu, click “Add”, and then tap on “Next>”, “Next>” …, click “Finish”, and at last click “OK” to apply all settings. After that, we can power on this virtual machine to clone its hard disk.


Firstly, launch the program to get the window below:
minitool-drive-copy-main-interface
There are 2 functional modules: “Disk to Disk” and “Partition to Partition”. To clone the entire hard disk, we need to choose the former one. To copy a single partition, we can choose the latter one. Since we are copying hard disk of virtual machine, we need to choose “Disk to Disk” module to get the following interface:
clone-virtual-hard-disk-select-source-disk
Next, select the disk which needs copying and click “Next>”. Then, choose a disk to save the copy of the source disk and click “Next>”. After these operations, we are able to choose a copy mode:
copy-hard-disk-of-virtual-machine-choose-copy-mode
Choose a desired mode and click “Next>” to get a boot note. Tip: if you want to change partition size according to actual demands, please see Copy Disk to get details. Read this note and click “Finish”.


At last, click “Yes” to start copying the hard disk in virtual machine. Tip: you may need to restart the virtual machine. Please do as told to protect system.


Now all work to clone virtual hard disk is completed, and you can try using this disk clone software next time.

Move Windows to a different hard drive

Question: I have a 500GB Seagate hard drive with Windows 7 installed, and several days ago I bought a 1TB one. Now I want to migrate Windows 7 from old disk to the new disk since the latter is full of free space. Can somebody tell me what is the fastest way to move Windows to a different hard drive?


Searching Migrate Windows to Another Hard Drive on the internet, users will find most people suggest copying the entire system disk to another hard disk. It is indeed a solution but lots of time will be cost. Actually, there is no need to migrate everything, and we can move Windows OS only. To do this operation, users just need to download a piece of free system migrating software. However, if you are worried about software security, MiniTool Partition Wizard is recommended here. A lot of tests show this program can help move Windows OS to a different hard drive in a short time, and the migrated OS will be bootable. For detailed steps, please see the following example.


Move Windows to Different Hard Drive with MiniTool Partition Wizard


Successfully launching the program users will see the following interface:
minitool-partition-wizard-main-interface
The function boxed by red line is specially designed to migrate Windows from one disk to another hard disk, but it moves the one which is running. Tip: if you have more than one OS, make use of the function “Copy Disk” to migrate. Directly choose this function to get the window below:
move-windows-to-a-different-hard-drive-choose-disk-to-save-copy
Here select the disk that will save the migrated Windows and click “Next>”.
move-windows-to-a-different-hard-drive-resize-partition
In the window above users are able to change partition size on the new hard drive. Then, click “Next>” to get a boot note. If the source disk is MBR formatted, read the note carefully and click “Finish” to go back to the main interface of the system migrating software. If the disk was initialized to GPT, just ignore it and click “Finish”.
migrate-windows-to-another-hard-disk-apply-changes
From Operations Pending area we can see MiniTool Partition Wizard will update boot configurations and parameters on disk 2, which makes the migrated OS bootable. At last, click “Apply” button to make all pending changes performed.


Tip: since Windows we are moving is loaded now, system migrating software will ask us to restart computer, which is to protect system.


If you have bought or plan to buy a larger HDD or SSD and want to migrate Windows to this new drive, take this solution, and it will help save much time.

Upgrade hard drive to solid state drive

Many of you would have heard of advantages of using solid state drive, and I ever saw a test which shows the average transmitting speed of SSD nearly doubles that of traditional hard disk. Attracted by these amazing features, a lot of people including me plan to upgrade their hard drive to solid state drive. Well then, how to complete the upgrade without losing any previous information?


Lossless disk upgrade means all files, including OS, installed programs, user data, etc., should be transferred from old disk to new disk with ensuring data integrity. Currently, there is disk clone software to clone one disk to another disk, but most of them focus on common data and give no protection to operating system. As a result, OS saved in the cloned hard drive may be unbootable. Under such circumstances which cloning program should users download?


Here, we recommend MiniTool Partition Wizard for Windows users, which has helped a lot of people upgrade traditional hard drive to solid state drive or advanced format hard drive without losing any information. Moreover, there is a automatic alignment feature configured in this disk clone software, which helps align partitions on SSD to maximize performance. And you can clone one hard disk to another hard disk in easy operations.


Upgrade Hard Drive to Solid State Drive with MiniTool Partition Wizard


Firstly, please download and install the program to computer. If you are running Windows XP/Vista/7/8/10, download the free edition. However, if you are a server user, please purchase the server edition. Then, run it to get its starting interface and choose “Launch Application” module.
minitool-partition-wizard-main-interface
This is the main window of the disk clone software. To clone one disk to another disk, we need to select the source one and then click on the feature “Copy Disk”. However, if you plan to transfer Windows only, please employ the feature “Migrate OS to SSD/HD Wizard”.
upgrade-system-disk-to-ssd-select-ssd
Then, select the new disk to save the copy of source disk and click “Next>”. Tip: all files saved in the new disk will be overwritten by content on source disk, so please transfer important ones out in advance. After these operations, we are able to edit partition on SSD:
edit-partition-size-on-ssd
Here we can edit partition size by changing the length of the handle or edit partition location by moving the entire handle. After this step, a boot note will pup up. Please read it and click “Finish” to go on.

upgrade-system-disk-to-ssd-apply-change
Now we can see all information has been moved to the new hard disk except drive letter. Please appoint these partitions with new drive letters respectively via the function “Change Drive Letter“, and finally click “Apply” button on the top to make all these changes applied.


Tip: if the hard drive we are operating saves Windows OS which is running, the disk clone software will ask us to restart computer. Do as it tells and then all operations will be performed in boot mode. Once all changes are made, MiniTool Partition Wizard will reboot. During this time please enter BIOS and make the SSD as the first boot device. For steps to change boot order in BIOS, you may get information from the article Clone Hard Disk.


Do you want to upgrade current hard drive to solid state drive? With this program you can help accomplish the upgrade without reinstallation.

Upgrade system disk without Windows DVD

If the current system disk is small in size, we may want to upgrade it to a new larger one. If it is the traditional HDD, we may plan to upgrade it to SSD. To do this kind of upgrade, most users choose to reinstall Windows on the new disk, but what if there is no Windows installation disc? Actually, the best way to upgrade system disk without Windows DVD or CD is to migrate Windows from old disk to new disk, and there is freeware to help complete the migration with ease.


To migrate a OS, we had better use professional system migrating software since this kind of software is capable of upgrading and fixing boot information. Nevertheless, professional software is always expensive, and many users are unwilling to employ chargeable program. Therefore, we suggest using MiniTool Partition Wizard in this post, which is free for all Windows XP, Windows Vista, Windows 7, Windows 8, and Windows 10 users. Next, let’s see how this free system migrating software helps upgrade system disk without Windows installation DVD.


How to Migrate Windows from Old Disk to New Disk


Like using any other software, we need to download and install the program to our computer at first. Then, run it to get the startup interface and choose “Launch Application”.
minitool-partition-wizard-main-interface
The feature “Migrate OS to SSD/HD Wizard” is specially provided to transfer the current running Windows from one disk to another disk. If you have more than one operating system, please transfer them one by one. Choose this function and we can see the interface below:
transfer-os-to-new-disk-selet-the-new-disk
Then select the new disk to save Windows OS and click “Next>”.
resize-partition-on-new-disk
Here we can change the size of partitions on the new disk by choosing the third copying method, and then click “Next>”.
mirgate-windows-boot-note
This is a note showing how to boot from the new disk. If your hard disk is initialized with MBR, please remember to set the new disk as the first boot device in BIOS when restarting. But here we just need to click “Finish” button.
upgrade-system-disk-add-drive-letter-for-each-partition-on-new-disk
Now we can see the system partition has been cloned to disk 2, but it does not have a drive letter. Please add a letter for this partition via the function “Change Drive Letter“, and finally click “Apply” button to perform all changes. In addition, since we are migrating Windows OS which is running now, the system migrating software will ask us to restart computer. Just do it, which brings no damage to both user data and system. After all operations are performed in boot mode, our computer will reboot. At this time, we need to enter BIOS and set the new disk as the first boot device.


So far, our Windows OS has been migrated from old disk to new disk. If you want to upgrade system disk to a larger one but there is no Windows installation CD or DVD, this solution may be useful for you. However, if you are planning to clone the entire hard disk, please see Copy Disk to get detailed operations.

Backup files before clean Windows installation

In order to reparation the hard disk, many users would like to make a clean Windows installation, but this requires deleting all partitions or volumes on the hard disk. That is to say all files will be deleted. So how to backup important files before clean Windows installation? In this post we will introduce a good solution.


For most users, they choose to copy all needed files, and then paste them to another device (either hard disk or removable device). This is indeed a solution, but the process may last for several hours if there are a great number of files to backup. Actually, as long as these files are saved in one or several partitions, we highly suggest copying partitions to backup files rather than copying files directly, because the former solution may help save half of the time. Moreover, no damage will be brought to original data even if power outage or other accidents happen.


Now that cloning partition is a good way to backup files before clean Windows installation, how can we complete this kind of clone? Firstly, a piece of disk clone software is needed. In addition, there must be a hard disk or external device which has enough space to save all important files. For cloning software, try using MiniTool Drive Copy which is free for Windows non-server users. For server support, Partition Wizard Server is available.


Backup Important Files before Clean Windows Installation


After the disk clone software has been installed, please run it to get the starting interface:
minitool-drive-copy-main-interface
Then choose “Partition to Partition” module to copy a single partition. Of course, you can also choose “Disk to Disk” module to clone the entire hard disk, but it will cost much more time since uneless files are copied.

backup-files-before-clean-windows-installation-select-source-partition-to-copy
Then, select the partition we want to clone and click “Next>”. Next, choose an unallocated space or partition from another hard disk to save the copy of the source partition and click “Next>”. After that the following window will appear:
clone-partition-resize-partition
Here we are able to resize partition by changing the length of the partition handle. After getting desired partition size, click “Finish” to continue.


At last, click “Yes” and the free disk clone software will perform all changes automatically.


Now we succeed in copying one partition. If there is more than 1 partition to backup, we just need to clone them one by one via the same solution. Once all desired partitions are cloned, we can say all important files have been backed up before clean Windows installation. Try MiniTool Drive Copy out when you have such a need.

Transfer PS3 games to new hard disk

As we know, PS3, namely PlayStation 3,is the third generation game machine released by Sony Corporation. And we can play games from both external and internal hard disk on PS3. However, have you ever met the situation where the old hard disk has no more free space to save new game records or new games? Under this situation, we believe most users would like to replace the old hard disk with a new larger one, but they have to face the problem how to transfer all PS3 games to new hard disk. In this post we will show users detailed steps.


Transfer PS3 Games from Old Internal Hard Disk to New Disk


An external hard disk is needed since we cannot transfer games between 2 internal disks directly.


Tip: the external hard disk should be formatted with FAT32. If not, PS3 cannot recognize the disk. In addition, if there are files larger than 4G, we need to split them via splitting tool, like OpenSplit, since files larger than 4GB cannot be saved to a FAT32 partition. Of course, if we backup games via MultiMan, large files will be split automatically.


Firstly, backup all games to the external hard disk: navigate to Settings, then choose System Settings, and next press on enter-button button.
copy-hard-disk-in-PS3
Then, go to Backup Utility and press on enter-button button.
Next, choose Back Up from 3 options to backup all games to external hard disk.
When the backup is completed, we can shut down PS3 to replace the old internal hard disk with a new larger one. After replacement, start PS3 and format the hard disk to the format PS recognizes.
Next, hook the external hard disk to PS3, go to Backup Utility, and choose Restore to restore data to the new internal hard disk of PS3.


So far, we succeed in transferring PS3 games from old internal hard disk to another internal disk.


Transfer PS3 Games from Old External Hard Disk to New Disk


To do this operation, we need a computer running Windows OS. Then, download and install the free disk clone software MiniTool Partition Wizard. Next, connect both old external hard disk and new external hard disk with computer. After that, launch the program to get its starting interface and click “Launch Application”:
minitool-partition-wizad-main-interface
Here please select the disk which needs cloning and choose “Copy Disk” module.
transfer-games-to-new-external-hard-disk-mark-a-position-to-save-copy
Then select the new external hard disk and click “Next>”. After this step, we are able to change partition size on the external hard disk:
transfer-games-to-new-external-hard-disk-maximize-partition-size
Here please choose the first copying method to maximize partition size  since PS3 can only recognize one partition on external hard disk, and then click “Next>”. After these operations, a boot note will appear, and we only need to click “Finish” button to continue.
transfer-games-to-new-external-hard-disk-apply-changes
Now we can see the old hard disk has been cloned to the new disk. That is to say all games saved on the old external hard disk have been transferred to new external hard disk. However, the partition on external hard disk does not have a drive letter, so we need to make use of the function “Change Drive Letter” appoint the partition with one letter. Finally we need to click “Apply” button to make all these changes applied.


If you also want to upgrade old external or internal hard disk to a larger one, take these solutions to transfer all needed games.

Clone partition to a different hard disk

Sometimes we plan to clone one partition to a different hard disk so as to make a backup for important data, transfer files out from a wrong partition, migrate Windows OS, etc. Well then, is it possible to do such a kind of operations? If the answer is yes, how to complete the clone easily and safely?


Definitely, as long as the second hard disk has enough free space to save content stored in the source partition, we are able to clone partition from one disk to a different hard disk. Actually, the so called cloning a partition is just to copy all its files as well as partition attributes like file system and cluster size to another disk, which is different from imaging, so operations are relatively simple. And the fastest way is using drive clone software. However, considering the situation where most of you would like to employ freeware, we suggest using MiniTool Partition Wizard whose free edition can be compatible with all Windows non-sever operating systems.


Tip: if you are planning to migrate Windows OS from old small disk to new larger disk or to solid state drive, it is highly suggested that you not clone Windows partition, because it may cause Windows unbootable. Instead, please employ “Migrate OS to SSD/HD Wizard” function in MiniTool Partition Wizard, because all boot information and parameters will be updated.


Steps to Clone a Partition to Different Hard Disk


1. Launch the free drive clone software MiniTool Partition Wizard to get its starting interface and choose “Launch Application” module.

minitool-partition-wizard-main-interface
2. Select the partition which needs copying and click “Copy Partition” feature from the left pane.

clone-partition-to-a-different-hard-disk-mark-a-position-to-save-the-clone

3. Choose an unallocated space on a different hard disk to save the clone of source partition. Then, click “Next>” to continue. If there is no unallocated space, please shrink an existing partition to create via the feature “Move/Resize Partition” in Partition Wizard.

clone-partition-to-a-different-hard-disk-resize-partition

4. Here the free drive clone software gives us chance to resize the partition which saves contents on the source partition, which is good for optimizing disk space use ratio. Then, click “Finish” button to get the window below:

clone-partition-to-a-different-hard-disk-apply-change
5. Now we can see the source partition has been copied to the second hard disk, so finally we need to click “Apply” button to make all these changes applied.


These are all steps to clone one partition to a different hard disk. Pretty simple operations are required, right? If you are planning to make a backup for an important partition or want to migrate Windows to another disk, try MiniTool Partition Wizard out.

Sector-by-sector copy of GPT disk

Compared with MBR disk, GPT disk supports capacity larger than 2TB and supports creating more than 4 primary partitions (up to 128 in Windows). Therefore, a lot of Windows users have initialized their hard disk to GPT or converted MBR disk to GPT. However, no matter what style of hard disk they are using, to create a copy for the disk which saves vital files is definitely a wise choice since it is the fastest way to perform data disaster recovery. And in order to confirm 100% data integrity, many users hope to make sector-by-sector copy of GPT disk. In this post, we are going to introduce how to complete this kind of clone.


To save time, we can turn to third party drive clone software. And considering costs, we had better download freeware. Nevertheless, in most people’s opinion, freeware may bring damage to their data so that they do not dare to use this kind of software. Actually, there is free drive clone software with high security, and MiniTool Partition Wizard Free Edition is a good choice. During the process of disk clone, users are able to change partition size on the new disk. For specific operations, please review the following demonstration.


Tip: since we are making sector-by-sector copy of GPT disk, source disk (the disk we want to clone) and target disk (the disk that will save content on the source disk) should be with the same sector size. If one disk is formatted with 512 sector while the other disk is with 4096 sector, the copy will be impossible.


Detailed Steps to Make Sector-by-sector Copy of GPT Disk


1. Run MiniTool Partition Wizard Free Edition to get its starting interface and choose “Launch Application” to get the window below:

minitool-partition-wizard-main-interface

2. Select the GPT disk which needs copying and click “Copy Disk” module which is on the left action panel. Of course we can also click “Copy” module on the top.

sector-by-sector-copy-of-gpt-disk-choose-a-target-disk-to-save-the-copy

3. Choose a target disk to save content on the source disk, and the target disk can be either MBR disk or GPT disk, because the MBR disk will become GPT disk after the clone is completed. Then click “Next>” to continue.

sector-by-sector-copy-of-gpt-disk-edit-partition-size-and-location

4. Now we need to choose a method for sector-by-sector copy of GPT disk, and generally users are suggested choosing the third one which allows them to edit partition size according to actual demands. Then click “Next>” to go on operating. After that, a boot note showing how to boot computer from the new disk will appear. Please view it carefully and click “Finish”.

sector-by-sector-copy-of-gpt-disk-apply-changes

5. Click “Apply” button to perform all changes we made just now.


Now sector-by-sector copy of GPT disk is completed, and you can take the same way to make a backup for your hard disk. The free drive clone software MiniTool Partition Wizard Free Edition will help you a lot.

Copy everything to new memory stick

Memory stick is firstly developed and manufactured by Sony Corporation, and it is widely used on Sony’s PSP/PSX game machines, digital camera, mobile phone of Sony Ericsson, and even laptop to save data. However, with more and more files like photos, videos, and game records saved, the original memory stick is often run out of space especially when it is with limited capacity. At this time, many users especially game lovers would want to purchase a large one to replace the current small one, but they have to face the problem how to copy everything to new memory stick. If they copy and paste files directly, a lot of time will be cost. So is there a fast way?


Actually, there is no need to copy files one by one, and instead cloning the entire memory stick by using professional drive clone software saves a lot of time. But which program is available? If you are a Windows user and your computer is not configured with server, try using MiniTool Drive Copy, which is free to use. Everything including all files, file system, cluster size, and so on will be copied to the new memory card. For detailed steps, please see the following example.


How to Copy Everything to New Memory Stick


Firstly, connect both memory sticks with Windows computer via card reader and then launch the drive clone software to get its starting interface:
minitool-drive-copy-main-window
Now please choose “Partition to Partition” module to clone the partition of memory stick since there is always one partition on a removable device.
clone-old-memory-card-to-new-memory-card-select-source-partition
Next, select the partition of old memory stick and click “Next>”. Then choose the partition of new memory stick and click “Next>”. After these operations we can see the window below:
copy-memory-stick-resize-partition

Here we can change partition size. Tip: users had better lengthen the partition handle to take up all space, because the remaining space will be wasted. Then click “Finish” to go on operating.

copy-memory-stick-perform-changes
At last, click “Yes” to perform all previous changes.


After all operations are made by this drive clone software, everything saved in the old memory stick will be copied to the new memory stick. Therefore, when you want to replace the old memory stick, clone the entire memory stick to the new stick for data transferring.