Author Archives: zxl123

Copy Only OS to SSD

Recently, when I browsed Windows forum and Windows seven forum, I find a hot topic: cloning only OS to SSD. Let’s see an example from Tom’s.

I recently bought an SSD that I would like to use along with my current hard drive. Is there a way I can clone only Windows 8 to the SSD, leaving all of my other stuff the way it is? The hard drive would be used for storage, and is much larger than the solid state drive, so I cannot clone the whole disk.

In this case, what should Tom do? Is it possible to copy only operating system to SSD?

Migrate OS to SSD

As a matter of fact, there is one thing Tom needs to do: migrating OS to SSD/HD. In general, in order to shorten the boot time and enhance the performance of computer, a growing number of users choose to transfer the operating system from normal hard disk to SSD/HD. However, how to migrate OS to SSD? Can we effectively complete this task?

Common users may have no idea on how to fix this issue since they know a tiny mistake may do great harm to OS. Taking this into account, we recommend MiniTool Partition Wizard, which can effectively and quickly migrate OS to SSD because of its excellent performance and simple operation.

How to Copy Only OS to SSD

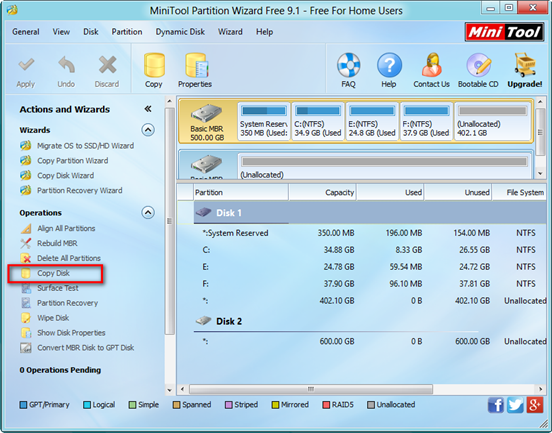
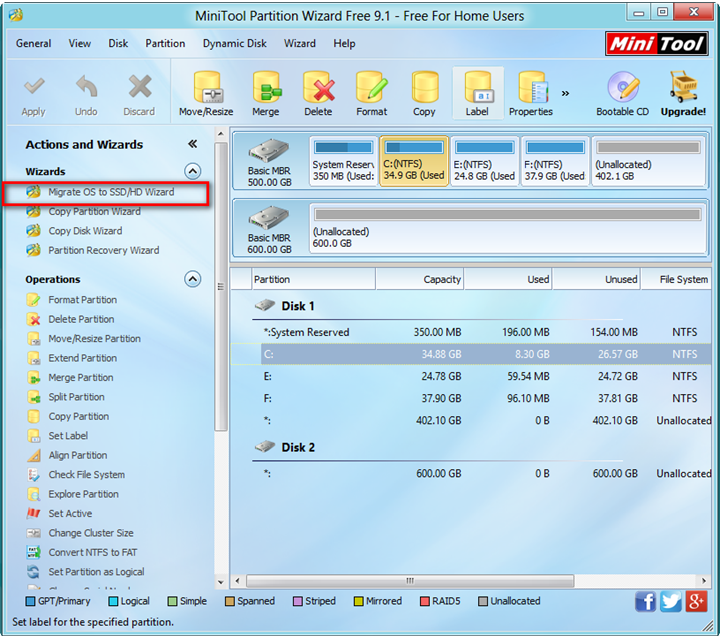
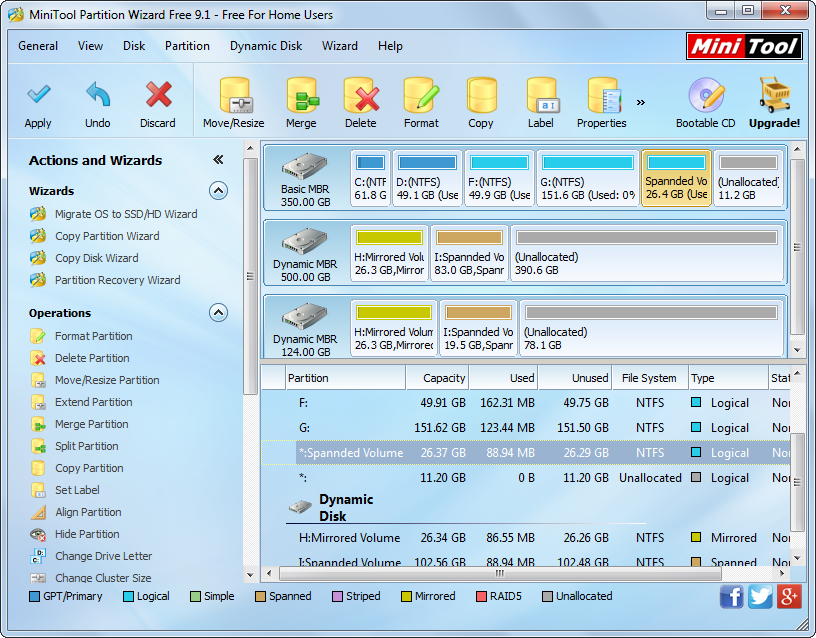
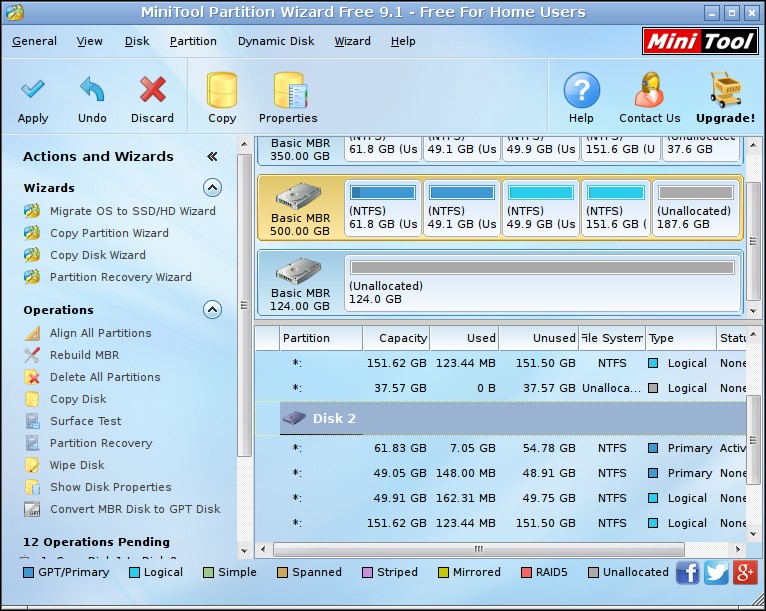
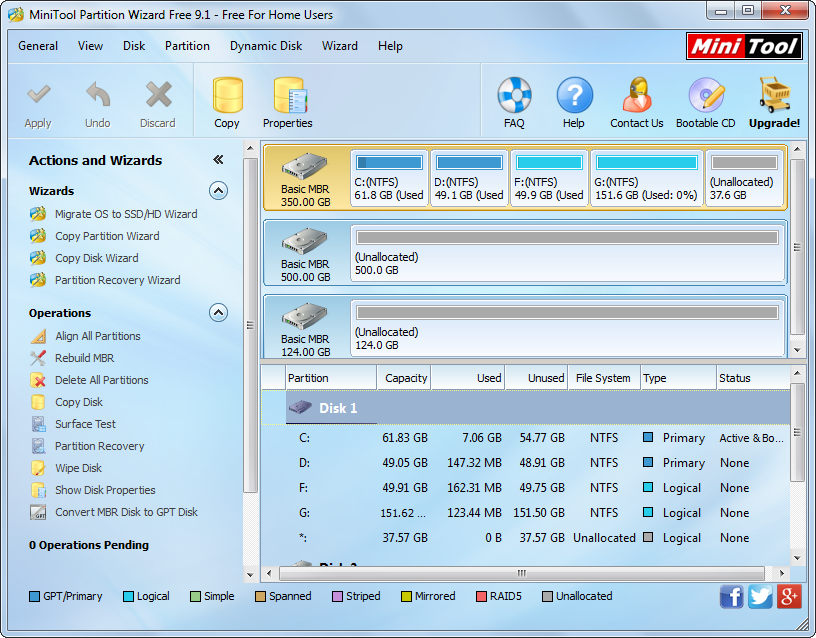
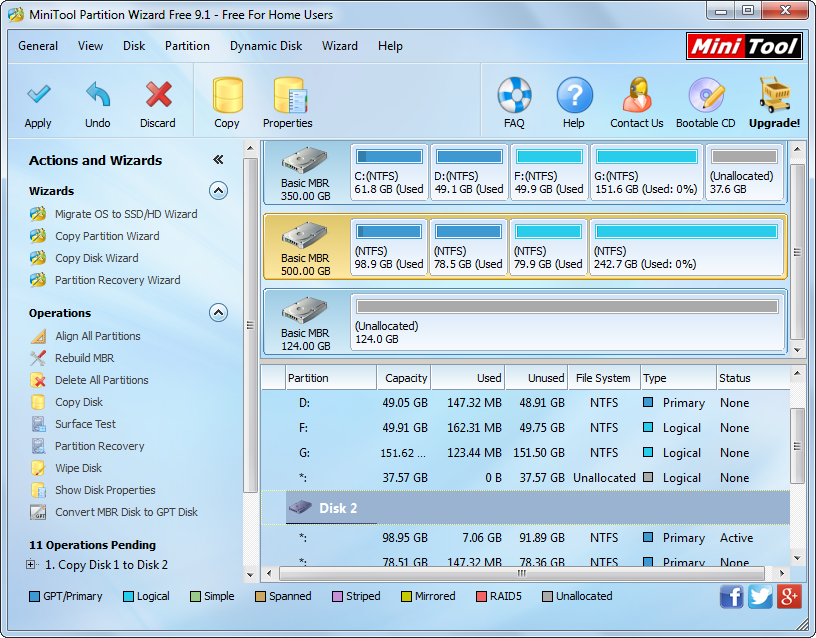
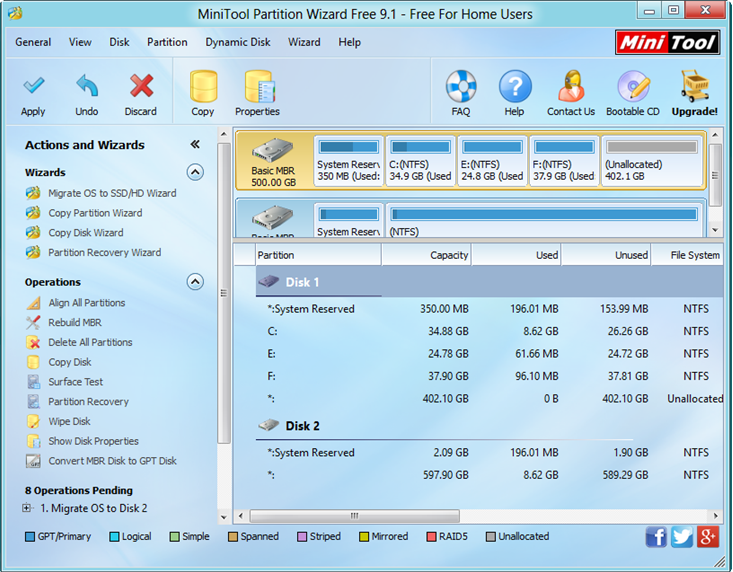
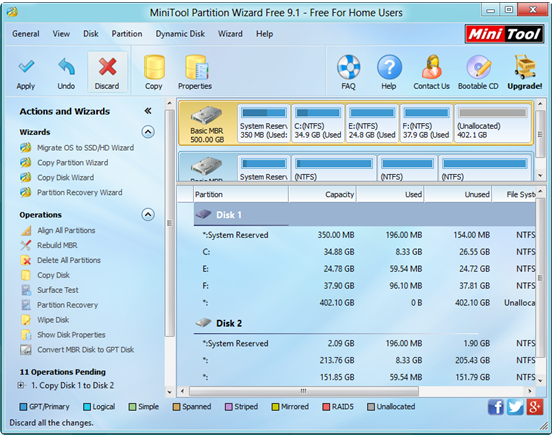
First, users need to click here to download MiniTool Partition Wizard, then install it on computer and launch it to open its main interface.

main

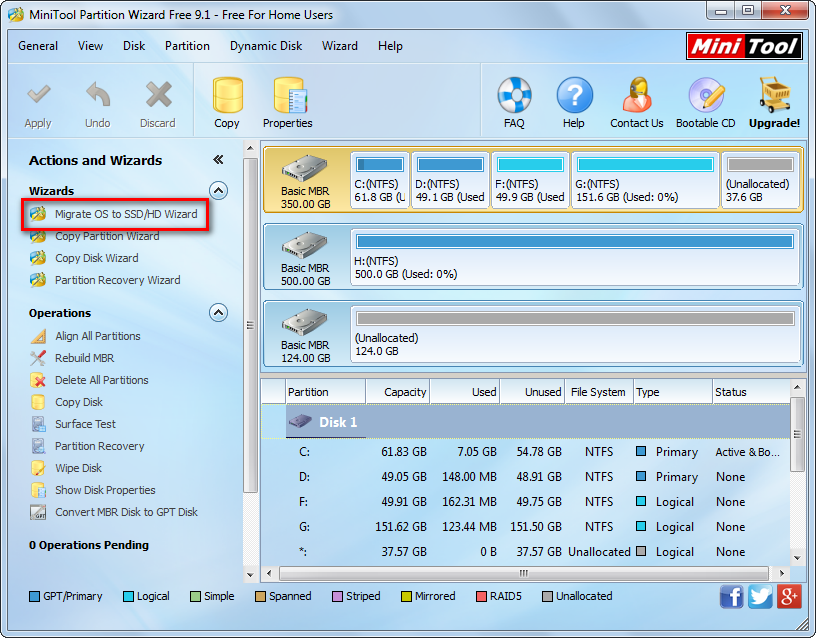
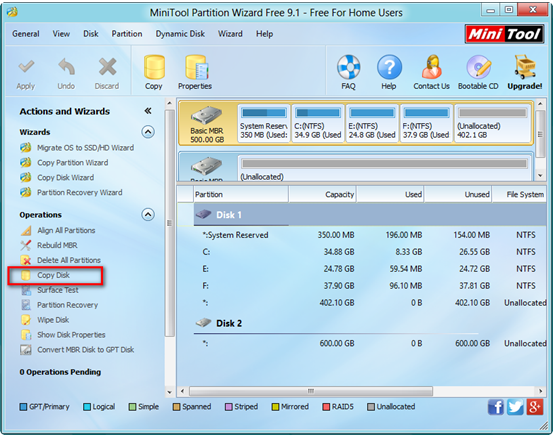
In this window, to copy only OS, users can click on “Migrate OS to SSD/HD Wizard” from left Wizards column.

destination disk

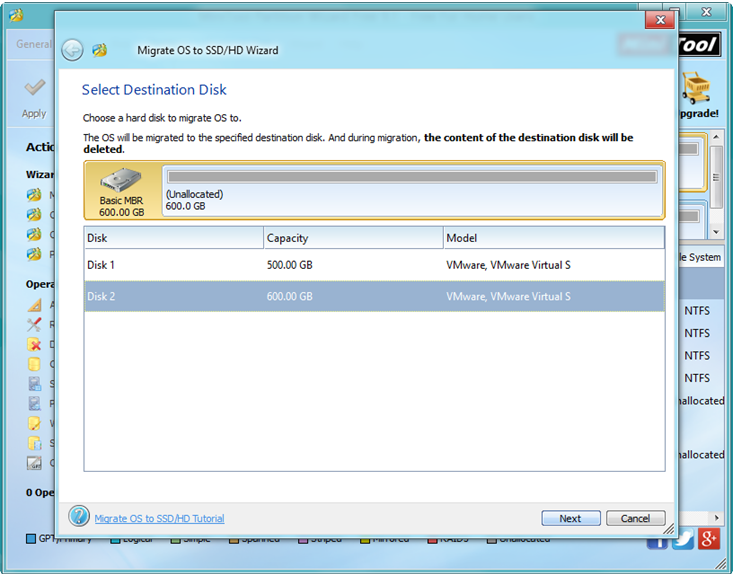
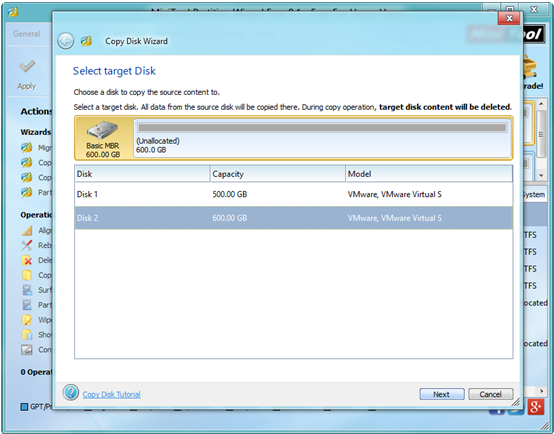
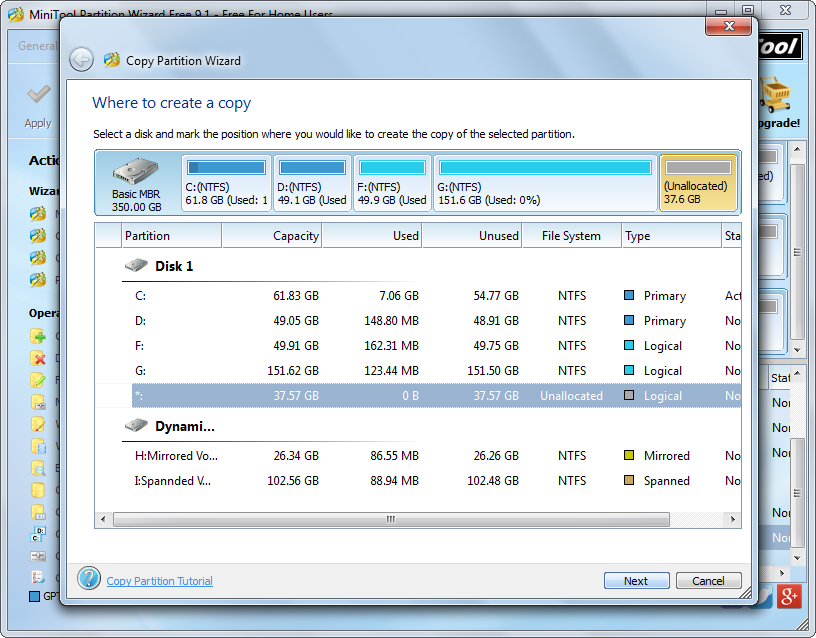
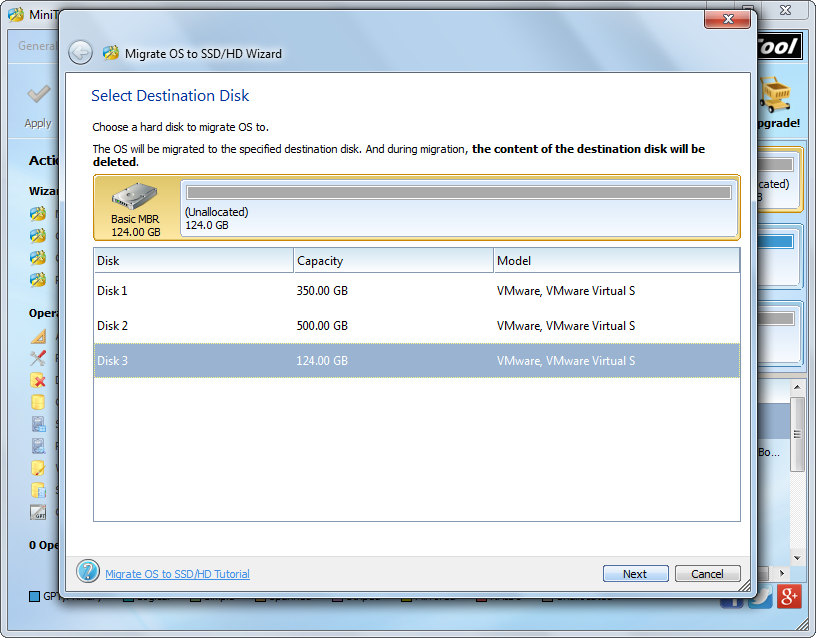
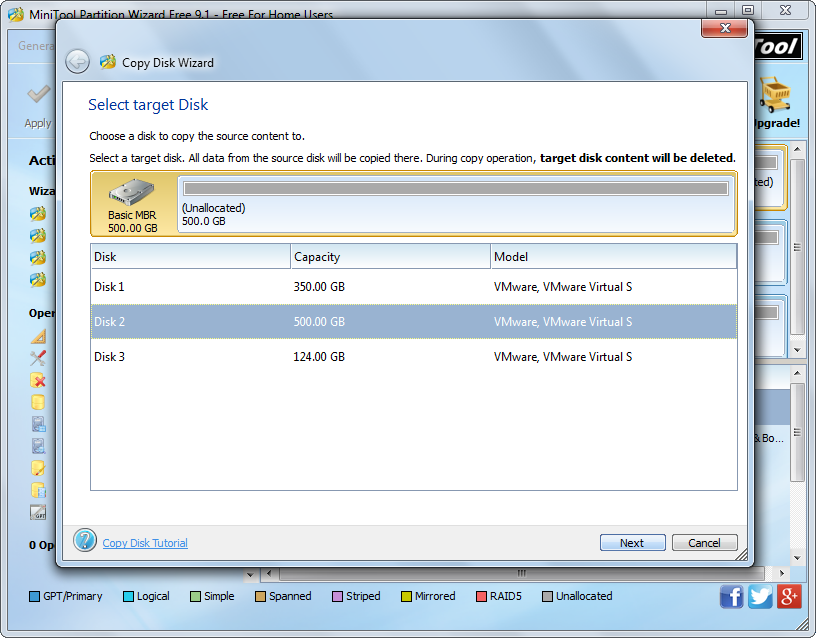
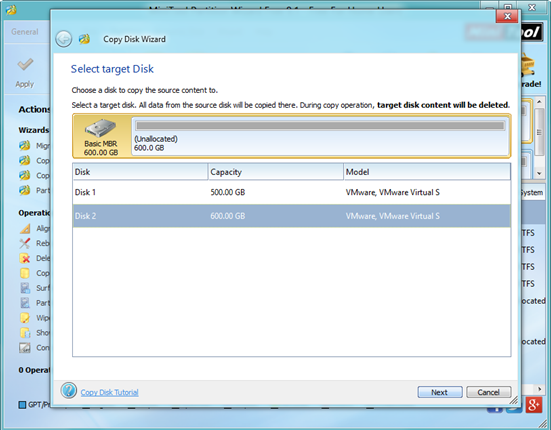
Next, select the SSD and then click on “Next” to move on.

changes

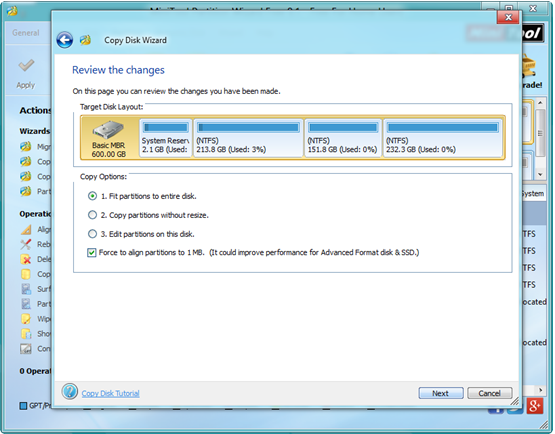
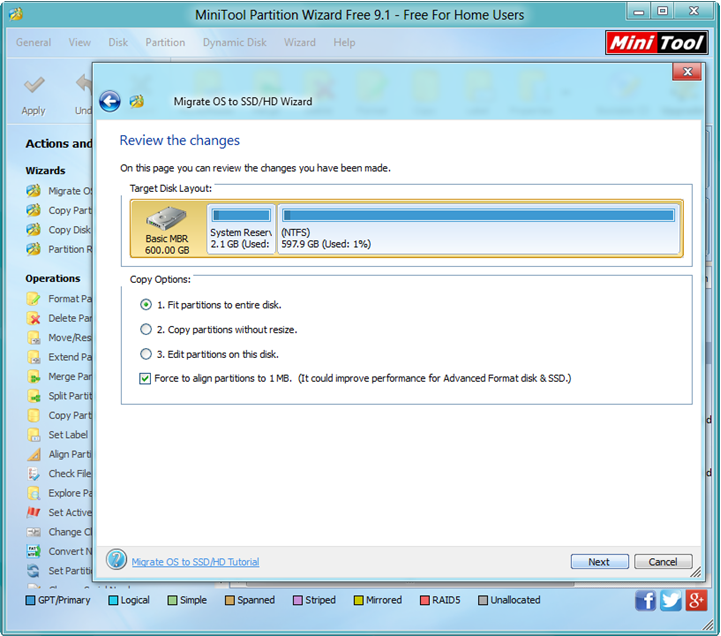
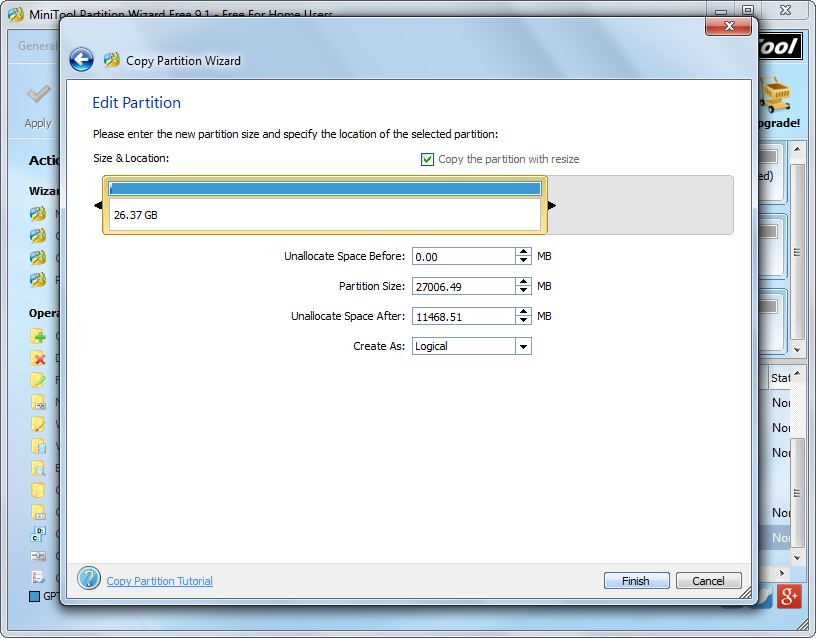
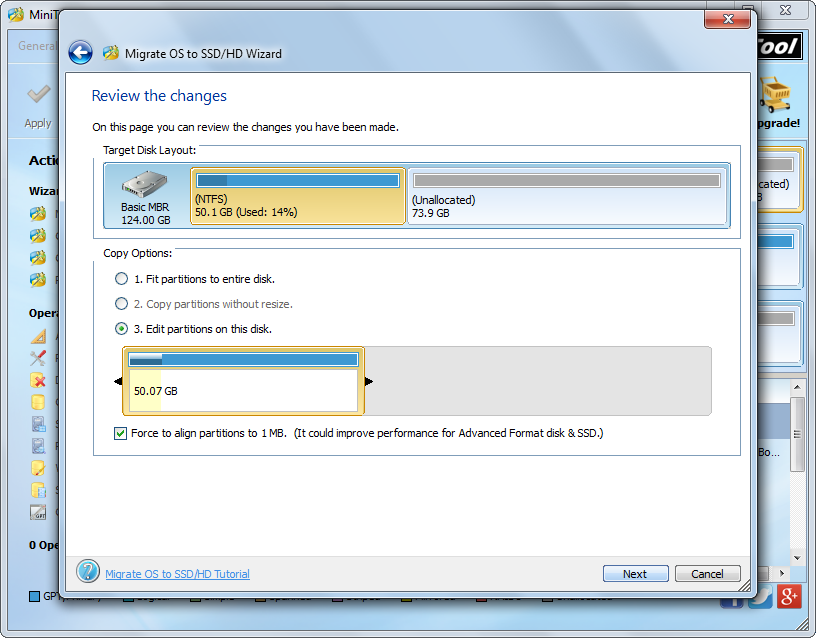
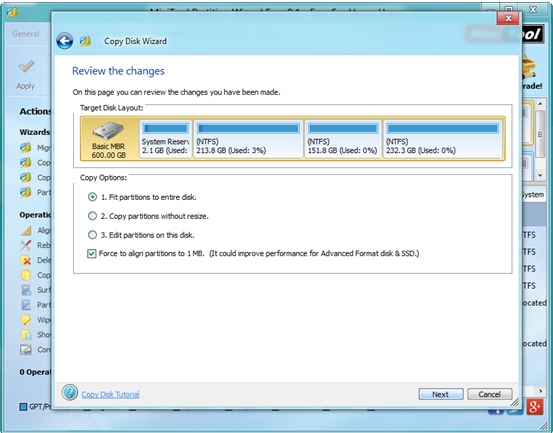
Now, choose a suitable way to migrate OS and click on “Next” button.

After that, read note information and click on “Finish” to go back to the main window.

apply

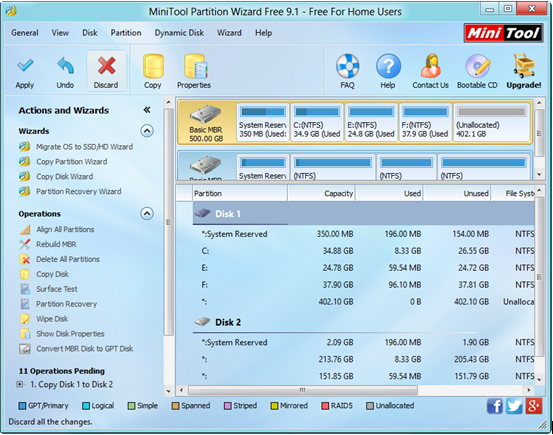
Finally, tap “Apply” in the left side of toolbar and tap “Yes” in pop-up prompt window to carry out pending operations.
Thus, users have finished copying only OS to SSD.

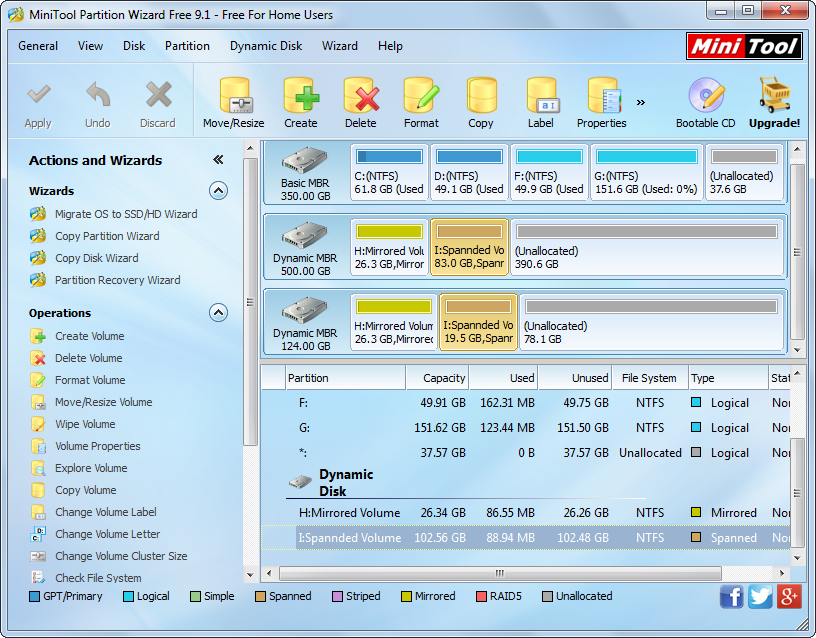
In addition to Migrate OS to SSD/HD Wizard, MiniTool Partition Wizard offers some other excellent features including copy disk, partition recovery wizard, move/resize partition, extend partition, wipe disk, etc. to help users perfectly manage their hard disk as well as partitions.

Clone Hard Drive to Increase Its Capacity

In the information age, a lot of users store more and more important data on their hard drive instead of paper. Nevertheless, with the development of hard drive technology, more and more users want to increase their capacity of hard drive to store more data and programs. But, how to complete this task easily and quickly?


Clone Hard Drive


In general, clone a small hard disk to a larger one is a wise choice for increasing hard drive capacity. Users can easily and effectively transfer all data saved on the old to a new drive without affecting the original data.
However, how to clone hard drive? Here, you can try using MiniTool Partition Wizard if you don’t have any ideas. Developed by a famous software development company based in Canada, this tool can easily clone hard drive.


How to Clone Hard Drive


First, users need to click here to download MiniTool Partition Wizard. Then, install it on computer according to prompts. After that, launch it to open its main interface as follows.


hard disk


The main window lists all disks and some features. To clone hard drive, users need to select the target drive and then choose “Copy Disk” feature from the left action panel to get the following window.


select


Now, select an disk where the copy will be created and then click “Next” button. Note: this disk should be large enough to hold all content on target disk, and users also need to backup all important data on this disk in advance. Otherwise, all its data will be deleted.


copy option


In this window, choose a copying method (fit partitions to entire disk, copy partitions without resize, and edit partitions on this disk) to decide the layout of target disk and then click “Next”. If users choose the first one, all space on the target disk will be taken up. By using the second method, all partitions will be copied to the selected disk without changing their size. By choosing the third method, users are able to change partition size.

Tips: it is highly suggested that SSD and advanced format HDD users keep checking the option “Force to align partitions to 1MB”.

Next, read the note carefully which shows how to boot from target disk, and then click “Finish” button to go back to the main interface.


apply

Finally, click “Apply” button on the top left corner to apply all pending operations. Note: If users are copying system disk, please click “Restart Now” button to perform all changes.

See, with MiniTool Partition Wizard, we can easily and quickly clone hard drive to increase its capacity. Furthermore, in the following situations, users may need to use the “Copy Disk” feature to clone hard drive:
1.Plan to upgrade small old hard disk to larger newer one without reinstalling Windows and all other installed programs.
2.Make a backup for the disk which saves significant files.

Clone Windows Hard Drive to Upgrade Disk Level

The Importance of Clone Windows Hard Drive


images
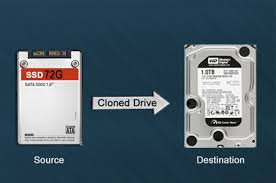
In the information age, computers play an important part in our life and work. And, we store lots of data on our computer hard drive every day. As time goes by, we will find there are massive important data occupied our disk space and this disk is running out space. At this moment, the best way is to buy a new large disk and clone the old one.

But how to complete this task effectively?


Windows Hard Drive Clone Tool


If we search “clone Windows hard drive” on Google, we will find various tools can help us to complete this task. However, which one is the best? Here, if you don’t have any ideas, you can try using MiniTool Partition Wizard.

As a green, professional, concise yet fee partition management tool developed by MiniTool Solution Ltd., MiniTool Partition Wizard can help to easily and quickly copy hard drive without affecting the original data. Besides, this tool offers detailed operating prompts and simple interface. Thus, even a new user can easily handle this tool to copy disk. Furthermore, this tool supports various operating systems including Windows Vista/XP, Windows 7/8/10 and Windows Server 2008/2013.

Next, let’s see the detailed steps of disk clone.


How to Copy Windows Hard Drive


At first, users need to download MiniTool Partition Wizard from its official website. And then, install it on computer according to prompts. After that, launch it to get its main interface as follows.


copy disk


In the above interface, users can see all disks, partitions and some features. Here, select the disk which needs copying and activate “Copy Disk” feature on left pane to get the following interface:


2sorce


At this time, select the disk that will save the copy of the source disk as the target disk and then click “Next”. Note: the target disk should be large enough to hold all content on source disk, and users also need to backup all important data on this target disk in advance, because all its data will be deleted.


3option


In this window, choose a copying method to decide the layout of target disk and then click “Next”. Note: it is highly suggested that SSD and advanced format HDD users keep checking the option “Force to align partitions to 1MB”. After that, click “Finish” button to go back to the main interface.


4apply


Finally, click “Apply” button to perform all changes. Note: If users are copying system disk, MiniTool Partition Wizard will ask them to restart computer. Just click “Restart Now” button.

Are you still troubled by Windows hard drive clone? Now, you can easily copy disk to backup all important data via MiniTool Partition Wizard.

Clone Windows Cannot Boot, Try This way

Recently, I heard lots of people are talking they cannot boot from SSD after Windows partition cloning. Here, let’s see an example from George.
I cloned my system partition to a SSD disk. However, I could not boot my OS from it. How can I make Windows boot from my new SSD? Who can help me?

From the above example, we can see George hadn’t successfully cloned his OS and system information from his old disk to SSD. Here, he should know what is system reserved partition at first.

As we know, some Windows like Windows 7 Windows 8 and Windows10 create a special “System Reserved” partition when users install them on a clean disk. This partition contains two important things: the boot manager and boot configuration data, and the startup files used for BitLocker drive encryption. However, Windows doesn’t assign a drive letter to this partition. As a result, users will only see it when they use Disk Management or similar utility. In this case, users who only copy the system partition (C drive) to another new disk cannot start their OS from the new disk.

In this situation, as a matter of fact, users can easily turn to “Migrate OS to SSD/HD” feature of MiniTool Partition Wizard to quickly transfer the operating system from normal hard disk to SSD/HD.

Next, we will show how to successfully copy OS via a free tool.


Clone Windows with MiniTool Partition Wizard


Step 1: users need to download this professional yet free partition management tool, and install it on computer. Then, launch it to get its main interface as follows.


main


Step 2: click on “Migrate OS to SSD/HD Wizard” from left Wizards column.
Step 3: select the destination disk and then click on “Next” to move on.


2016-03-04_131642


Step 4: choose a suitable way to migrate OS and click on “Next” button.

Step 5: read note information and click on “Finish” if users want to continue.

Step 6: tap “Apply” in the left side of toolbar and tap “Yes” in pop-up prompt window to carry out pending operations. Tip: to clone a running Windows OS requires a reboot, and users just need to do as told.

Now, you might know to successfully and easily copy Windows via MiniTool Partition Wizard. In fact, this tool also offers “Copy Disk” feature to help to quickly and effectively clone Windows as well all data saved on the old disk to a new one for free.

How to Copy Dynamic Volumes? Here Are Detailed Steps

Generally, there are 5 types of dynamic volumes, including simple volume, mirrored volume, striped volume, spanned volume, and RAID 5 volume. Among all these types of volumes, mirrored volume and RAID 5 volume have the feature of fault tolerance. That is to say, there is at least one copy for data saved in these volumes to help restore from crashes. But for other volumes, such as striped volume, spanned volume, and simple volume, users have to create a backup manually if they fear of accidental data loss. Aiming at this situation, we will introduce how to copy dynamic volumes in this post.

Firstly, a piece of drive clone software is needed. Nevertheless, when searching such a kind of programs on the internet, you may find most of them are chargeable, and some of them are even expensive. Well, do you want to use a freeware to clone your dynamic volumes? If your answer is yes, keep on reading the post.

MiniTool Partition Wizard, a free program working on Windows non-server platforms, can help copy different kinds of dynamic volumes to either dynamic disks or basic disks, and all files saved in these volumes will be cloned at the same time. More importantly, no complicated operations are required, and detailed instructions will be given in every step. For detailed steps to clone dynamic volumes, please see the following demonstration.

How to Copy Dynamic Volumes with MiniTool Partition Wizard

After downloading and installing the free drive clone software successfully, please start and launch it to get its main interface:
how-to-copy-dynamic-volume-select-source-volume
Here, all dynamic volumes are shown. Please select the volume you want to clone and choose “Copy Volume” feature from the left action panel.
how-to-copy-dynamic-volume-select-mark-a-place-to-save-the-copy
Then, mark a place to hold the copy of the source volume, which could be space on basic disk and dynamic disk, and then click “Next”. Tip: if you want to clone the volume to basic disk, there must be an unallocated space on basic disk. If there is no such space, please shrink an existing partition to create. For steps to shrink a partition, please see Move/Resize Partition.
how-to-copy-dynamic-volume-select-edit-partition-size
Next, you are able to edit the size and location for the partition or volume that holds the copy of source volume. After getting desired values, please click “Finish” to go back to the main window:
how-to-copy-dynamic-volume-select-apply-changes
At last, click “Apply” button to make all changes performed.

And so far, we have created a copy for a specific dynamic volume as well as its data. Are you still troubled by how to copy dynamic volumes? The free drive clone software MiniTool Partition Wizard could help you a lot.

How to Upgrade Existing Hard Drive in Few Steps and without Data Loss

For users who are seeking for performance, they would like to run Windows on solid state drive. And for users who are still using hard disks with small capacity, eyeing the falling price of mechanical hard disk, they would like to replace the current disk with a new larger one. But most of the time, they hesitate to do this, because they are unwilling to backup documents/settings/ personal files, install Windows OS/applications, and restore everything to their original states after installation. Actually, there is no need to do these operations, and next we will show users how to upgrade existing hard drive without installing anything.

There are 2 choices available:
1. Clone the existing hard drive to new drive. If you choose this method, all information, including Windows OS, system settings, and all other files, will be cloned to the new drive. Nevertheless, it will take a longer time to complete the task, because much more data should be cloned.
2. Migrate OS to new hard drive. This just copies partitions required to boot Windows to new hard drive, so it will cost less time compared with the first solution. And the current hard drive can be used as a data disk.

You can choose the best method by considering the actual demands. Well then, how can we clone hard drive or migrate OS to upgrade existing hard drive? A piece of drive clone software is needed. For Windows non-server users, we suggest using MiniTool Partition Wizard Free, but for server support, please see Server Partition Manager to get details. Next, we take migrating Windows for example to show users how to operate this program.

Migrate OS to New Hard Drive with MiniTool Partition Wizard

Firstly, download and install the program to your existing computer, and then launch it to get the main interface shown below:
how-to-upgrade-existing-hard-drive-choose-correct-function
Then, choose the “Migrate OS to SSD/HD Wizard” function from the left pane.
how-to-upgrade-existing-hard-drive-select-new-hard-disk
Next, select the new hard disk to hold the copy of Windows OS and click “Next”.
how-to-upgrade-existing-hard-drive-edit-partition-size-on-new-disk
Then choose a copying method and click “Next” to get a boot note. Read the note and click “Finish” to continue.
how-to-upgrade-existing-hard-drive-apply-changes
At last, click “Apply” button to make all changes performed, which will require a restart.

Once the migration is made by this drive clone software, you can enter BIOS (for Legacy BIOS users) to set the new hard disk as the default first boot device, and then Windows on this disk will be bootable. Only several simple steps are required, right? However, if you want to clone the entire hard drive to new disk, please see Copy Disk to get detailed steps.

It Can Be Easy to Clone Hard Drive without Loading Windows

“Several days ago, my laptop which has been used for 4 years crashed and Windows 7 is no longer bootable. However, there are still a huge number of files saved on it so that I’m eager to transfer them out. Is there any good idea to do this?”.

Have you ever encountered such a kind of situation? Did you find an effective solution? In this post, we will show users a method which can help transfer data out from a crashed computer in easy steps and without data loss. That is to clone the internal hard drive to an external drive without loading Windows, and there is free drive clone software to help you complete the work with ease. Here, we suggest using MiniTool Partition Wizard Bootable CD, which is a bootable program so that it is capable of copying a specific partition or the entire hard disk to another disk without starting Windows. For detailed steps, please see the following demonstration.

How to Clone Hard Drive Without Loading Windows

Firstly, users need to download MiniTool Partition Wizard Bootable CD, which is an iso file, and then burn the iso file to CD, DVD, or USB flash drive. If you are not very clear of burning disc, please see How to Build Free Bootable Partition Manager with Pwfree91.iso to get some suggestions.

Then, make the target disk connected properly, start computer, insert bootable disc, then restart computer, enter BIOS, set the bootable disc as the first default boot device, and boot computer from the disc to get the main window of the program. Tip: if you are employing GPT + UEFI boot mode, there is no need to set boot order.
clone-hard-drivewithout-loading-windows-select-source-drive
Here, all disks are shown clearly. To clone the source hard drive, please select the drive and choose “Copy Disk” function from the left side.
clone-hard-drivewithout-loading-windows-select-target-drive
Then, select the target disk to copy source disk to and click “Next”.
clone-hard-drivewithout-loading-windows-choose-copying-method
Next, choose a copying method and click “Next” to get a boot note. Read the note and click “Finish” to go back to the main interface:
clone-hard-drivewithout-loading-windows-apply-changes
At last, click “Apply” button to make all changes performed.

Once the disk clone is completed by MiniTool Partition Wizard Bootable CD, all data saved on the source disk are cloned, and there is no need to worry about data loss. Is this an easy way to transfer data out from a crashed or corrupted computer?

A Step-by-Step Guide on Backing up Your Windows PC

It is believed that lots of Windows users haven’t backed up their PC, mostly because this will take them much time. Nevertheless, have you ever thought of the situation where the entire PC crashes or lots of files get lost without a backup to use? That would be a big disaster. Therefore, it’s time to backup your Windows PC. But how to this? Next, we will give a step-by-step guide.

How to Backup Windows PC

Preparations: a second hard disk is required to save the backup of the computer. In addition, a piece of drive backup software is needed. Here, we suggest using MiniTool Partition Wizard, which is free for Windows non-server users and easy to use.

Detailed steps:
Step 1: download and install the recommended program to computer. Then, start and launch it to get the main interface:
minitool-partition-wizard-main-window
Step 2: choose an appropriate function.
MiniTool Partition Wizard provides users with 3 functions to backup data, and here we just talk about 2 functions, which are Migrate OS to SSD/HD Wizard and Copy Disk.

Migrate OS: it creates a backup for Windows OS, system settings, installed apps, and personal files to another hard disk. When original system crashes, users just need to set the backup disk as the first boot disk in BIOS, and then Windows installed on this disk will be bootable.

Copy Disk: it creates a copy for all files saved in the source disk, including Windows OS, system settings, apps, personal files, and all other user data. And the backup can be used without restoring.

Here, we choose Copy Disk to get the window below:
backup-windows-pc-select-target-disk
Step 3: select a target disk to copy source disk to and click “Next”.

Step 4: choose a copying method and click “Next” to get a boot note. Read the note and click “Finish” to go back to the main windows.
backup-windows-pc-apply-changes
Step 5: click “Apply” button to make all changes performed. Tip: MiniTool Partition Wizard will require a restart if the source disk saves Windows OS which is running. Please restart your computer by following instructions.

Now a backup for the source disk has been made, which means you can restore your Windows PC from a crash or corrupt by using the backup in a short time.

Can’t Copy Files Larger Than 4GB to USB Drive? Here Are Solutions

Yesterday, one of my friends failed to copy files which are larger than 4GB to his 16GB USB flash drive and asked me for help. Since I’m a little bit experienced in this field, I helped him solve the problem in several minutes. However, considering that some other people may meet the same problem, I’ll show the specific reason for this error as well as give the corresponding solutions.

When copying files over 4GB to a USB flash drive, you may receive such an error message: File is too large for the destination file system. Under this situation, what’s the cause and how can we fix the error and go on saving or transferring our files?

Actually, the cause for this error is that your USB flash drive is formatted with FAT32 rather than NTFS. A FAT32 partition can only hold a file smaller than 4GB (including 4GB). If we want to break this limit, converting FAT32 to NTFS is a good solution. Next, I’ll show users detailed steps to change file system.

How to Convert File System from FAT32 to NTFS

Here, we mainly introduce 2 ways, both of which bring no data loss.

Convert FAT32 to NTFS in Command Prompt

First of all, call out Command Prompt. Different versions of Windows may require different operations, so here we just take Windows 7 for example. Then, click Start, type command prompt in Search box, and run this program as administrator. Next, type convert drive letter: /fs:ntfs in command prompt window. For example, if we want to convert partition G from FAT32 to NTFS, we need to type convert G: /fs:ntfs.
convert-fat32-to-ntfs-in-command-prompt

Convert FAT32 to NTFS in MiniTool Partition Wizard

Firstly, download and install the program (freeware for Windows non-server users) to computer. Then, start and launch it to get the main interface:
convert-fat32-to-ntfs-in-minitool-partition-wizard
Next, select the FAT32 partition and choose “Convert FAT to NTFS” feature.

At last, click “Apply” button on the top left corner to make the change performed.

After converting file system of the USB flash drive from FAT32 to NTFS, you can copy files larger than 4GB to USB drive.

Tip: if you want to copy lots of files from one drive to a USB flash drive, we suggest copying the entire drive, which saves much time. And the Partition to Partition feature in MiniTool Drive Copy can help complete the operation with ease.

Clone and Image Windows OS: Advantages and Disadvantages

Restoring Windows from a backup is undoubtedly the fastest way to get your computer out of a crash or corrupt, and both cloning and imaging can help us create such a backup. Well, which method should we choose?

Clone Windows OS vs. Image Windows OS

Clone:
When we are cloning Windows, everything, including system files, settings, apps, and so on, will be copied without changing their size and properties. When original OS crashed or corrupted, to use the backup, you only need to set the computer boot from the target disk, and no other operations are required. It is very easy to handle this method, thus saving us much time. Nevertheless, another hard disk and the same capacity are required to save the clone, which wastes storage space to a large extent.

Image:
Both Windows itself and third party software can help create such a kind of images, and the image can be saved to the same hard disk as well as a different drive. Compared with cloning Windows OS, imaging is more like creating a .zip file (compress file size) rather than copying files with the same size so that lots of space can be saved. In addition, on one hard disk we can create multiple images, which would be economical. However, to use this kind of backup, you need to boot from your backup program’s emergency boot disc, and restore the drive’s contents from the backup, or restore from an installation disc, repair disc, or pre-installed options. Much more time and operations are needed.

Summary: different ways have different advantages and disadvantages, so users had better choose the most appropriate one by considering actual demands.

Next, we are going to show users how to copy Windows OS by using the freeware MiniTool Partition Wizard.

Clone Windows OS with MiniTool Partition Wizard

After running and launching the free drive clone software successfully, we can see its main window:
minitool-partition-wizard-main-window
Here, to copy Windows OS, we can choose the function “Migrate OS to SSD/HD Wizard”. Of course, if you want to clone the entire hard disk, “Copy Disk” is needed.

Then, select the target disk to clone Windows to and click “Next” After that, 3 copying options are shown:
clone-windows-os-choose-copy-methods
Just select the desired one and click “Next” to get a boot note. Read the note and click “Finish” to go back to the main window:
clone-windows-os-apply-changes
At last, click “Apply” button to make all changes performed. Tip: to clone a running Windows OS requires a reboot, and users just need to do as told.

Now 2 ways to create a backup for Windows OS have been introduced. If you need to make a backup for your system, just choose the needed one in accordance with practical situations.