Author Archives: zxl123

Copy hard disk in boot mode

For inexperienced users, when their computer failed to boot after repeated restart, they would plan to send it to be repaired. However, most of the time they have to worry about data security since they do not know what will happen on their files. At this time, to copy hard disk in boot mode is a good choice since it will create a backup for all files. In addition, even if Windows is bootable, users can also clone a hard disk in boot mode, because all data and volumes will be protected under this mode. But an extra hard disk should be prepared to save the copy of the source disk.


Well then, how can we complete this kind of clone? A bootable disk clone software is needed. This kind of software is configured with startup files so that it can boot computer without loading OS. Here, we suggest using MiniTool Partition Wizard Bootable CD. There are 3 reasons for recommending the program. Firstly, it is free for Windows XP, Windows Vista, Windows 7, and Windows 8 users. Secondly, operations are so simple that inexperienced users can do it easily and successfully. At last, all data are under great protection. For detailed steps to copy hard disk in boot mode, please look at the following demonstration.


Copy Hard Disk in Boot Mode with MiniTool Partition Wizard


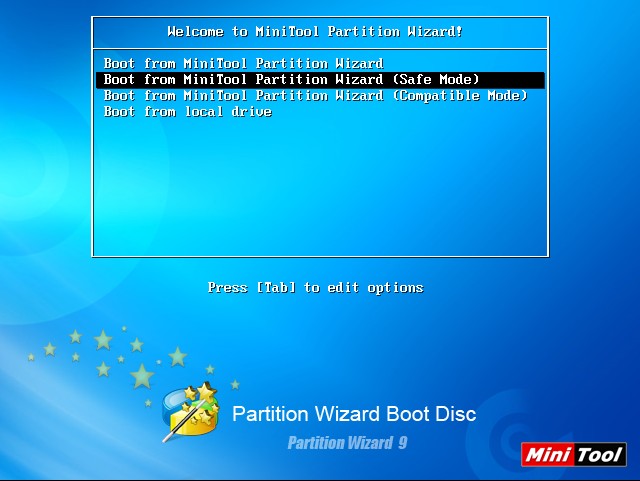
Since MiniTool Partition Wizard Bootable CD is an iso file, we should burn it to CD or DVD on another computer at first. Then, connect the extra disk with computer and boot computer via the bootable disc to get the following interface:
minitool-partition-wizard-bootable-cd-welcome-interface
Note: if your Windows is bootable, you may not get this interface. That is because your hard disk rather than CD/DVD enjoys the boot priority. To boot from CD-ROM, we should set CD-ROM as the first boot device in BIOS.


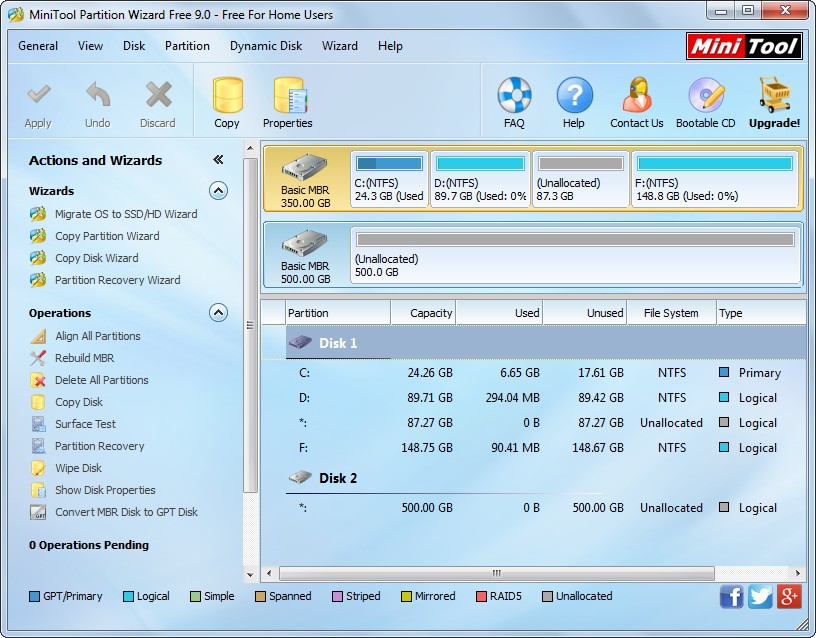
There are 4 boot modes for us to choose, and we can select one of the first three to boot computer. Then, choose a display resolution to get the window below:
minitool-partition-wizard-main-interface
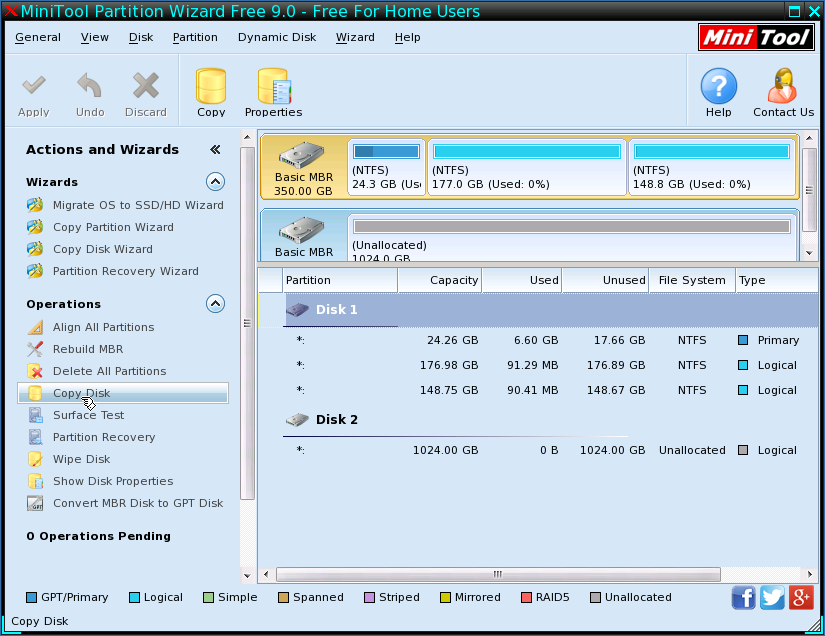
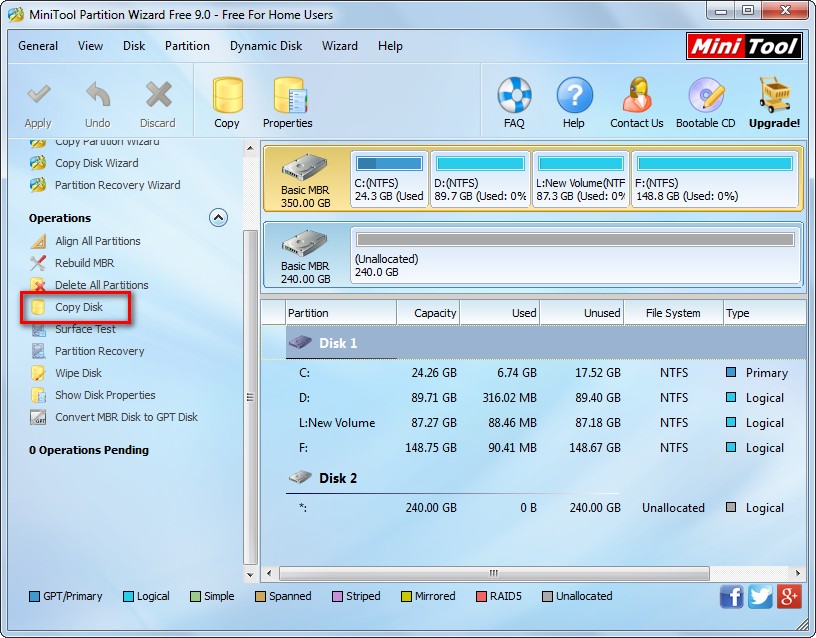
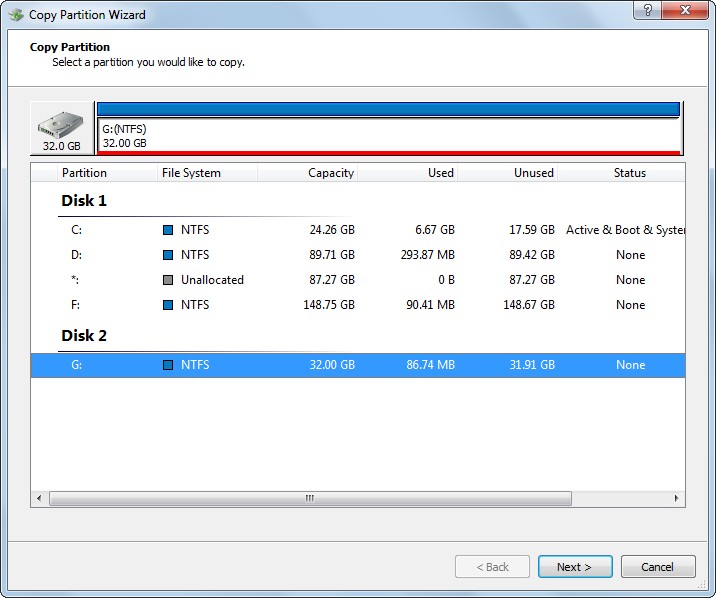
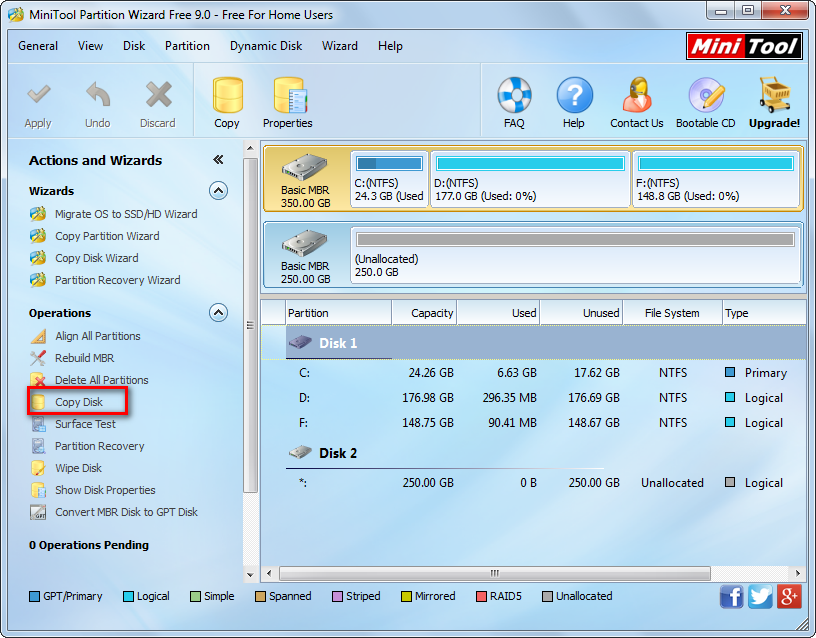
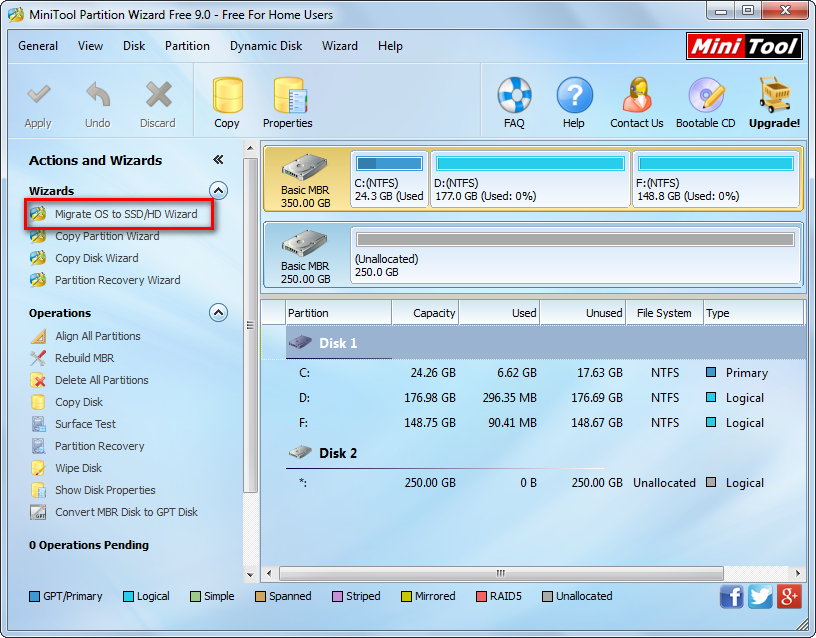
All disks are listed by MiniTool Partition Wizard Bootable CD, and now we need to select the hard disk which needs cloning and choose “Copy Disk” module.


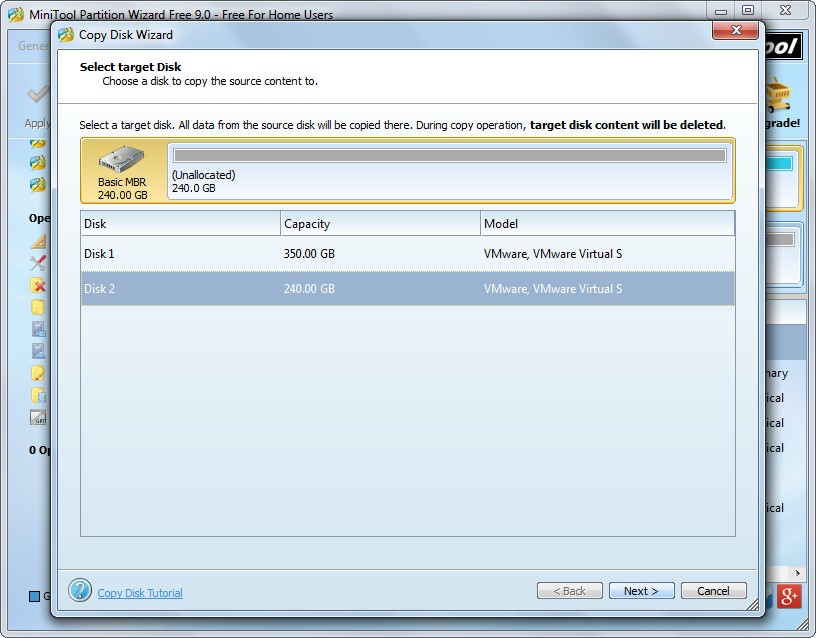
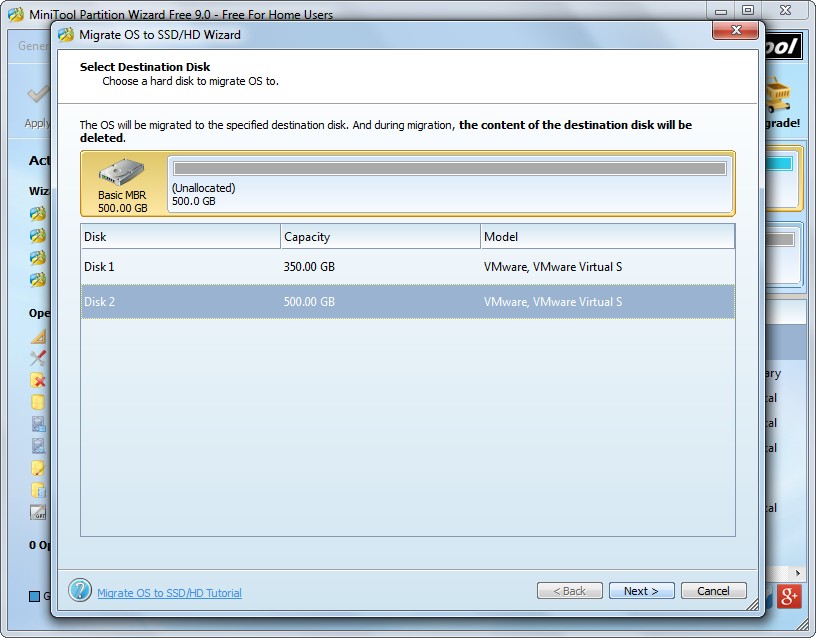
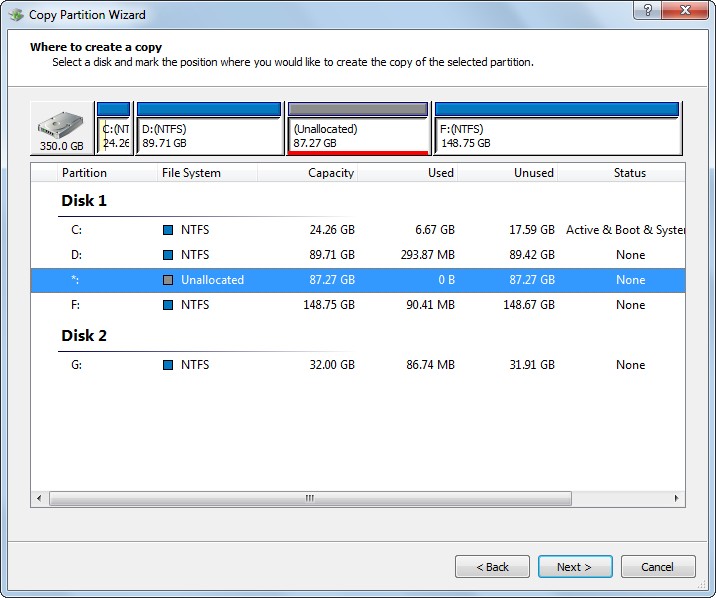
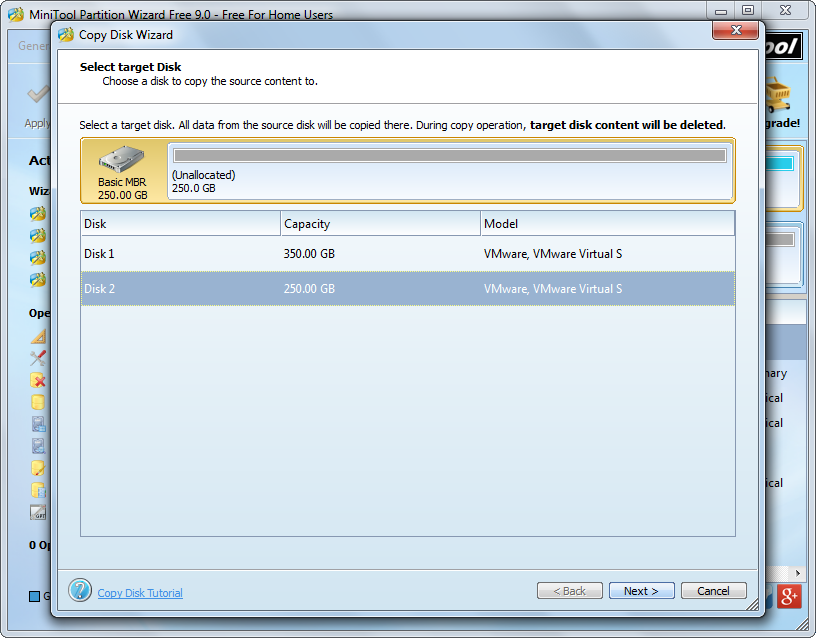
Next, select a disk to save the copy of the source disk and click “Next>”.


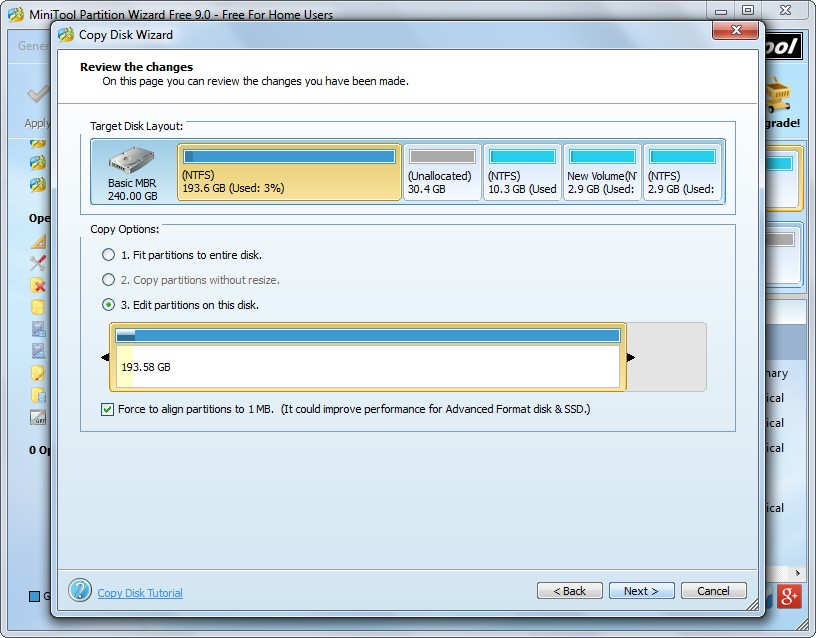
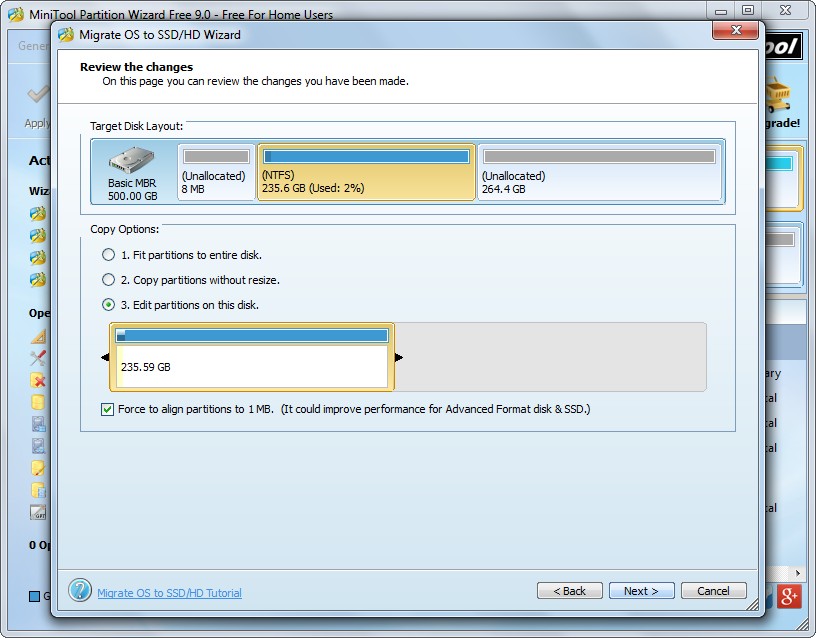
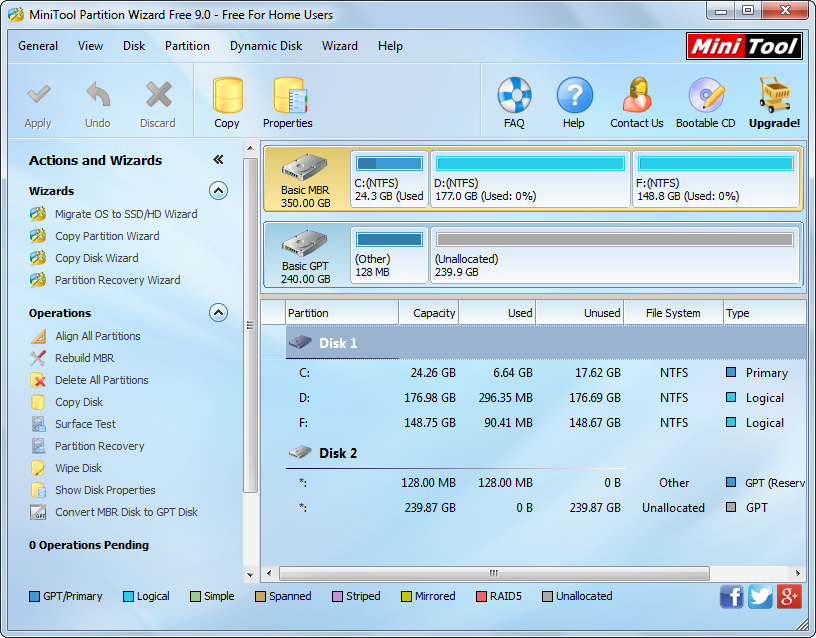
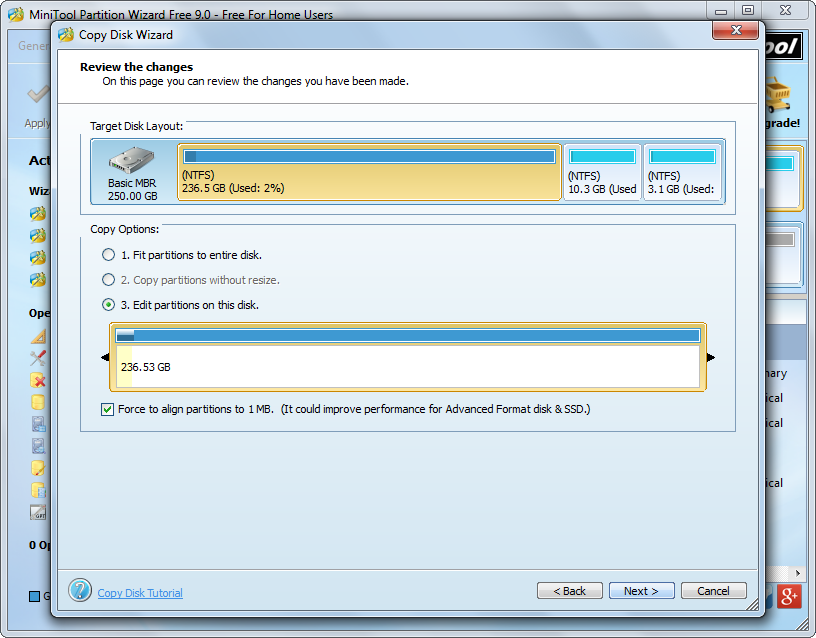
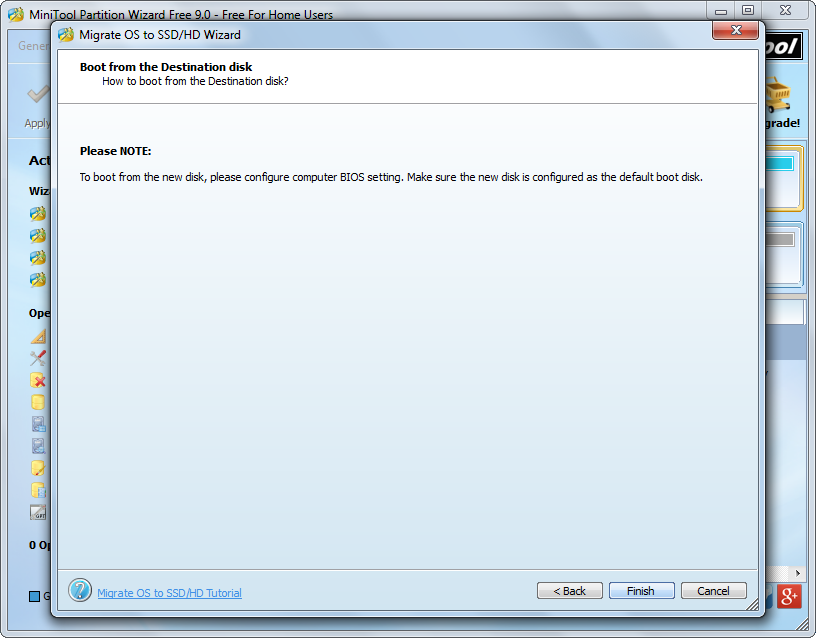
Then, change partition size and location. Of course, we can do nothing here. After that, we will get a boot note which shows where to set the target disk as default boot disk. Read it and click “Finish” to go back to the main interface:
copy-hard-disk-in-boot-mode-apply-changes
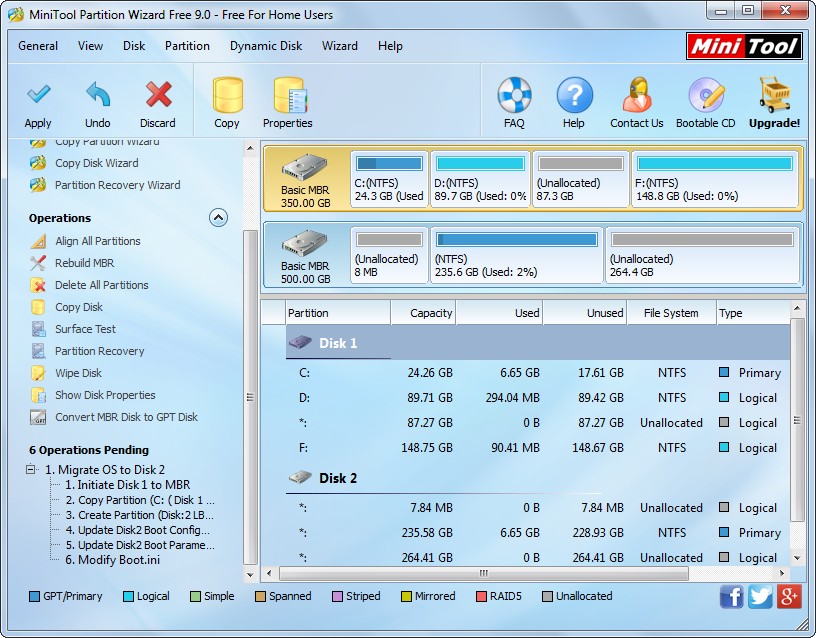
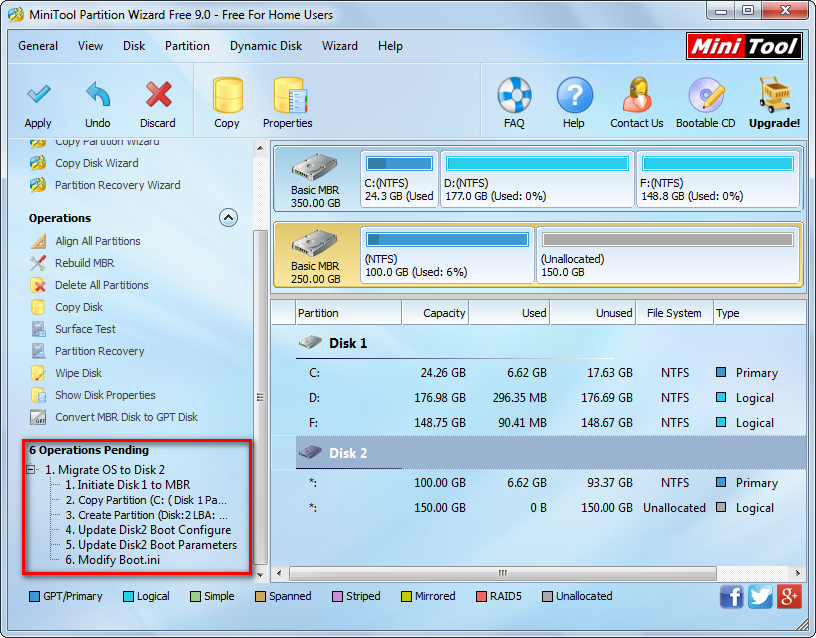
Now we can see the source hard disk has been cloned to another hard disk in boot mode, but this is just for preview. Therefore, please click “Apply” button to make all changes applied. Once all changes are made, we can say to copy hard disk in boot mode is completed.


However, if your important data are saved in a partition, there is no need to copy the entire hard disk. Just clone the specified partition with the function “Copy Partition”.

Clone system disk to external disk

System disk mainly refers to the disk which saves Windows OS and OS boot files. When an operating system as well as all necessary programs are installed successfully, many users would want to create a backup for this disk on external disk in case the source disk crashed or got damaged, and cloning disk is a good way to do the backup. Well then, what is the fastest and most economical way to clone system disk to external disk?


Here, we suggest using free disk clone software, which is available for both experienced and inexperienced users. It is believed that many users have used such a kind of software to backup system disk, but many of them have met problems. For example, Windows cannot boot from the cloned disk; some apps or programs on the cloned disk cannot work. The main reason is that cloning software they employ failed to fix and update boot information or damaged important files. Therefore, to clone system disk to external disk, users had better download the highly reliable tools.


In this post, we suggest using MiniTool Partition Wizard. It is capable of copying all files and partitions from one disk to another disk. If the disk saves OS, it can also migrate and fix boot information as well as boot configurations. Simply speaking, Windows on the cloned disk will be bootable. More importantly, to backup system disk can be completed successfully in several steps.


How to Clone System Disk to External Disk


After running the free disk clone software MiniTool Partition Wizard successfully, we need to click “Launch Application” to get its main interface shown below:
minitool-partition-wizard-main-interface
Then, select the system disk and click “Copy Disk” feature from the left side.
clone-system-disk-to-external-disk-select-external-disk-to-save-the-copy
Next, select the external disk to save the copy of the system disk and click “Next>”. After that, we are able to edit partition size and location in the following interface:
clone-system-disk-to-external-disk-edit-partition
If we choose the first method, all space of the external disk will be occupied. If we select the second one, all partitions on the external disk will be shrunk to the largest extent. Generally, the third method is suggested since it allows users to change partition size and location according to actual demands. Changing the length of the handle will resize partition while changing the location of the handle will move partition position. After getting desired partition size and location, please click “Next>” to get a boot note:
clone-system-disk-to-external-disk-boot-note
If you want to boot from the cloned disk, set this disk as the default boot disk in BIOS when the computer is rebooting. If not, ignore the note and click “Finish” to continue.


At last, click “Apply” button on the top, and the program will backup system disk automatically. Note: MiniTool Partition Wizard will ask us to restart computer if we are operating Windows which is running. Please do as the disk clone software requires, because it is to protect our system. However, if you want to do it without rebooting computer, there is also a solution. That is make use of MiniTool Partition Wizard Bootable CD.


Once all changes are made and Windows boots successfully, we can say the system disk has been cloned to external disk. When you also want to make such a clone, try taking this method.

Copy SD card to another SD card

SD (secure digital) memory card is widely used among portable devices, such as digital camera, smart phone, and multimedia player. There are 3 levels of capacity for SD card:
Common SD: up to 2GB
SDHC: from 2GB to 32GB
SDXC: from 32GB to 2TB


At the beginning of the time, you might purchase a 32GB SD card. However, as time goes by, you may find the 32G card is easy to run in low disk space since files like photos and videos become larger and larger. Under this situation, many people would want to purchase a 64GB or larger SD card to replace the current one. Well then, how to transfer these 32GB files to new SD card in an easy way? After all, 32GB is not a small number. Actually, the best way is to copy one SD card to another SD card, which can save much time and avoid damage to original data. But how to complete this kind of clone?


Currently, there is drive copy software which can help clone one device, like SD card, CF card, and MMC, to another device or clone to computer, but users should select the one which is easy to use and safe enough. Here, we suggest using MiniTool Drive Copy, which is free for non-server Windows users. For detailed steps to copy a SD to another SD card, please look at the following example.


Note: both old SD card and new SD card should be connected with computer in advance.


How to Copy SD Card to Another SD Card with MiniTool Drive Copy


First of all, please launch the drive copy software to get its starting interface shown below:
minitool-drive-copy-starting-interface
Then, choose “Disk to Disk” module to continue. After that, all devices will be shown:
copy-sd-card-to-another-sd-card-select-source-sd-card
Next, select the SD card which will be cloned and click “Next>” button.


Then, choose the new SD card to save the copy of the old SD card and click “Next>”. After this operation, users are able to edit partitions on the new SD card


Changing the length of the handle is to resize partition while moving the position of the handle is to change partition location. Actually, users are not suggested to do such operations, because it may reduce available space of the device. As we know, only one partition is allowed to create on SD card or other removable devices. That is to say the reduced space cannot be used to create other partitions. Therefore, users only need to click “Next>” button to go on operating.


Then, a boot note will appear. Since all our operations are not related to boot, just ignore the note and click “Finish”.


At last, click “Yes” and MiniTool Drive Copy will perform all changes made just now automatically.


When all changes are completed, we can say the old SD card has been copied to another SD card. If you have such a need, try resorting to the recommended drive copy software.

Make a copy for usb flash drive

Due to great portability and plug-play feature, USB flash drive is widely used to save different kinds of files, such as word documents, excel charts, photos and videos. However, after a USB flash drive has been using for a long time, we had better make a copy for the device in case it gets damaged due to aging. In addition, even if the flash drive is newly bought, we still need to backup it as long as a lot of important files are saved, because frequently operating such a kind of devices may damage its file system or other important attributes, thus making it inaccessible.


To make a copy for USB flash drive is the process of cloning all files saved on this device, but it will save nearly half of the time compared with copying files directly, which is the main reason for recommending this solution. Moreover, even if power is suddenly off during the process of cloning USB flash drive, there will be no damage to the source data.


Well then, how to make a copy for USB flash drive? Downloading a piece of free drive clone software is needed. Here, we suggest using MiniTool Drive Copy since it is easy to use and safe enough. Next, we will show users detailed steps.


How to Make a Copy for USB Flash Drive with MiniTool Drive Copy


Firstly, we need to launch the program to get its starting interface like this:
minitool-drive-copy-starting-interface
There are 2 modules in total, so we need to choose an appropriate one. If you want to clone the USB flash drive to another USB drive, choose “Disk to Disk”, but all data on the second device will be erased. If you only want to copy it to a certain partition, choose “Partition to Partition”. Here, we take the second module for example. Choose this module and the free drive clone software will list all recognized devices as well as their partitions:
make-a-copy-for-usb-flash-drive-select-partition-of-usb-drive
Here, please select the partition of USB (rather than the USB flash drive itself) and click “Next>”.


Then, choose an unallocated space to save the copy of the USB flash drive and click “Next>”. If there is no space, shrink an existing partition to get.


Next, change the size and location for the partition which will save the copy of USB flash drive and click “Finish”.


At last, click “Yes” and the free drive clone software will clone the USB flash drive automatically.


These are all steps to make a copy for USB flash drive by using MiniTool Drive Copy. Actually, this solution can also be applied to clone other portable devices, like SD card, CF card, and memory card. However, if you want to copy either local hard disk or external hard disk, try using MiniTool Partition Wizard. For detailed information, please see Copy Disk.

Image Windows 7 to new disk

Question: there is less than 1GB free space left in the partition which saves Windows 7, and the entire hard disk is nearly running out of space. Therefore, I plan to image Windows 7 to a newly bought hard disk so as to allocate more space to Windows partition. Who can recommend me an easy solution?


If users have the same question, here is a good solution. Professional system migrating software is capable of imaging Windows 7 or other Windows OS from one disk to another disk on the same PC and making it bootable. Note: if you want to migrate Windows OS to another PC, the migrated OS may be unbootable since you did not register and activate Windows in this machine. Well then, which system migrating program can be chosen?


For people who are using Windows XP, Windows 7, Windows 8, or other non-server Windows OS, we suggest using MiniTool Partition Wizard Free edition, which is free. For server support, please purchase MiniTool Partition Wizard Server edition. Next, we will show users detailed steps to image Windows 7 from an old disk to a new disk by using this system migrating software.


Note: if you have multiple operating systems, please start the one which needs imaging, because Partition Wizard only migrates the one which is loaded.


How to Image Windows 7 to New Disk


Step 1: run MiniTool Partition Wizard Free to get its starting interface and choose “Launch Application” to get the main window below:
minitool-partition-wizard-main-interface
Step 2: directly choose “Migrate OS to SSD/HD Wizard” from the left side.
image-windows-7-to-new-computer-select-new-disk-to-save-the-image
Step 3: select the new disk to save the image of Windows 7 and click “Next>”.
image-windows-7-to-new-computer-edit-partition-size-and-location
Step 4: edit the size and location for Windows system partition and boot partition. Note: since Windows Vista, there will be a system reserved partition (either 100MB or 300MB) and a boot partition if you install Windows on a never used disk. The former saves Windows boot files while the latter installs Windows system files.
image-windows-7-to-new-computer-boot-note
Step 5: read the boot note and click “Finish”, which shows how to boot from the new disk.
image-windows-7-to-new-computer-apply-change
Now we can see Windows 7 has been imaged to the new disk, but this is only a preview effect, so we need to make the next step.
Step 6: click “Apply” button to make all changes performed. After this click, MiniTool Partition Wizard will ask us to restart computer since the Windows OS we are migrating is loaded. Confirm operation and then the system migrating software will do all changes in boot mode.


If you also need to migrate Windows from one disk to another disk (from small disk to large disk, from HDD to SSD, etc), this may be a useful solution.

Free USB flash drive cloning software

When our USB flash drive saves a lot of vital files, like contracts, product reports, or precious photos, it is very necessary to make a backup for this drive in case of accidental data loss. Nowadays, our mistaken operation, virus attack, or hardware damage may cause important files lost. To do this kind of backup, users need a professional tool. Considering costs, we suggest using MiniTool Drive Copy which is a free USB flash drive cloning software for all Windows home users.


It is able to copy a USB flash drive to another USB drive or to computers in few minutes (if there are a huge number of files, it may tcost more time), and files saved on the cloned drive can be used without doing any decoding and editing.


Actually, this free drive cloning software supports cloning other removable devices apart from USB flash drive, including SD card, memory card, memory stick, CF card, MMC, and so on. And it works well under Windows XP, Windows Vista, Windows 7, and Windows 8. To use it on server, please purchase MiniTool Partition Wizard Server edition. Next, let’s see detailed steps.


How to Copy USB Flash Drive with MiniTool Drive Copy


First of all, launch the free USB flash drive cloning software to get its starting interface:
minitool-drive-copy-starting-interface
Then choose “Disk to Disk” module if you are planning to clone it to another USB drive. However, if you need to clone it to computer, choose “Partition to Partition”. Here, we take the latter for example. Choose this module and we can see the window below:
copy-usb-flash-drive-select-source-drive
Here please select the partition of USB flash drive to clone and click “Next>”.
copy-usb-flash-drive-mark-a-position-to-save-the-copy
In the window above, please choose an unallocated space to save the copy of the USB flash drive. However, if there is no such unallocated space, you can shrink an existing partition to create. Of course, if there is partition saving no data or saving useless files, just choose it to save the copy. Then, click “Next>” to continue.


Next, edit partition size and location and click “Finish”.


At last, click “Yes” button, and the free USB flash drive cloning software will make all changes automatically.


If you also want to copy a USB flash drive or other removable devices for better data protection, try MiniTool Drive Copy out. It brings no damage to data.

Clone hard disk to new computer

After buying a new laptop or PC, users may ask the question how to transfer files and programs from old computer to new computer so as to go on using them on new machine. Generally, if you need to migrate files from one PC to another PC, just connect the old disk with new computer and use it as a data disk. However, if you want to go on using the disk on old computer or the new PC does not support interface of the old disk, the fastest way is to clone old hard disk to new computer. Moreover, if you are transferring data from PC to laptop or vice versa or laptop to laptop, the best way is also to clone hard disk rather than copy and paste files, because the former will save a lot of time. If you do not believe what I said, you could have a try.


However, to make such a disk clone, users should prepare an external USB disk or interface converter. If you have an external USB disk, connect it with the computer whose disk needs cloning (almost all computers support USB interface), and then copy the source disk to the USB disk. Next, clone the USB disk to the new computer. This solution seems relatively complex. However, if you have an interface converter, take out the old hard disk and connect it with the new computer via the converter. Then, clone the old hard disk to new computer. Note: the second solution is not suggested if you need to clone disk among 2 laptops since it is not easy for common users to take out hard disk of laptop.


Furthermore, cloning hard disk to new computer should be on the basis that there is a disk to save content on the source disk. If there is only one hard disk on the new computer with Windows OS installed, it is highly suggested that they clone partitions instead, because cloning disk to disk will erase all data on the target disk.


How to Clone Hard Disk to New Computer


Since I do not have interface converter, I will make use of the external USB disk. Firstly, start the old computer and download a piece of disk clone software from the internet. Here, the freeware MiniTool Partition Wizard Free is recommended for Windows home users. For server support, please purchase the server edition. After installing the program, please launch it to get the main interface below:
clone-hard-disk-to-new-computer-select-source-disk
At this time please select the disk which needs cloning and choose “Copy Disk” from the left side.

Then, select the external USB disk to save the copy of the source disk and click “Next>”.
Next, choose one of copying methods and click “Next>”.
Click “Finish” to continue.
Click “Apply” button on the top to perform all changes.


After all operations are completed, we need to safely take out the USB disk and connect it with the new computer. Then, clone the external USB hard disk to new computer by using the same disk clone software. However, if you only need to clone a single or some partitions, please see Copy Partition to get details.

Clone hard drive to PC

At the beginning of time you may purchase a laptop and play games on it. However, after a period of time (maybe several months or server years) you may be troubled by the slow running speed especially when playing huge games. Under this situation, many people are planning to buy a PC with higher configurations. However, all game records saved on the laptop are valuable , so how can we transfer these records and other necessary programs to the new computer? The best way is to clone hard drive to PC or clone a single partition to PC, which is time-saving, easy to operate, and safe enough.


Suggestion: if the new PC has an extra hard drive to save content migrated from the laptop, you can clone the entire hard drive to PC. However, if there is only one hard drive on PC, copy the partition saving game records to PC only, because copying disk will overwrite files including Windows saved on the second disk.


To make a drive clone or partition clone, users need to download a piece of drive clone software. However, most cloning programs on the internet are not free, and some of them may bring damage to data. Considering this situation, we suggest using MiniTool Partition Wizard. If you are running Windows XP, Windows Vista, Windows 7, or Windows 8, it is free to use. Next, let’s take cloning a hard drive to PC for example.


Clone Hard Drive from Laptop to PC with MiniTool Partition Wizard


If we have interface converter, take out hard disk of PC and connect it with laptop via the converter. After that, we can make drive clone directly. However, if there is no such converter, an external hard disk is needed. We need to clone the disk of PC to external disk, and then copy the external disk to PC. Steps to clone a hard drive:
Firstly, launch the drive clone software and we can see this window:
minitool-partition-wizard-main-window
Then, select the source disk which needs cloning and choose “Copy Disk” feature from the left action panel.

Next, select the target disk that will save the copy of the source disk and click “Next>”. After these operations, users need to edit partitions on the target disk:
clone-hard-drive-to-pc-edit-partition-size
There are 3 options, and we suggest choosing the third one since it allows us to change both partition size and location in accordance with our demands. Then, click “Next>” to continue.


Next, click “Finish” button in a boot note Window to go back to the main interface:
clone-hard-drive-to-pc-apply-changes
At last, click “Apply” to make all changes applied. Note: if the disk saves Windows which is now running, please restart computer as the drive clone software prompts. Once all changes are made in boot mode, the computer will reboot, and to make a drive clone is done.


In addition, if you just clone the hard drive of laptop to an external drive, please run MiniTool Partition Wizard on the PC and clone the external hard drive to PC. Operations are the same. However, if you only need to clone a single partition, please see Copy Partition to get detailed steps.

Freeware to transfer Windows to SSD

Since advantages of installing Windows OS on solid state drive (SSD) are known by more and more users, many of them plan to purchase a SSD and install OS on it. If Windows has been installed, they may want to migrate Windows from HDD to SSD. If you are in the latter situation, a piece of system migrating software is needed. Nevertheless, considering costs, most users would like to download freeware, so which is the best freeware to transfer Windows to SSD?


Many users have met the problem that Windows OS migrated from HDD cannot boot from the SSD, which may be because boot files are damaged or lost during the process of migrating. That is to say not every program can help complete a successful system migration. If you have encountered or do not want to meet the same situations, we suggest using the freeware MiniTool Partition Wizard to transfer Windows to SSD, because it will update and fix boot information as well as boot parameters, not limited to clone boot files and system files. Moreover, it also allows users to edit partition size and location on SSD so as to make a reasonable disk layout.


Note: MiniTool Partition Wizard is free for Windows home users only, including Windows XP/Vista/7/8/10. If you are running a server, please purchase the server edition which provides a lot of amazing features. Moreover, it migrates the OS which is running, If you have more than 1 operating system, boot the one you want to transfer.


Migrate Windows OS to SSD with MiniTool Partition Wizard


Step 1: launch the application to get its main interface shown below:
minitool-partition-wizard-main-interface
Step 2: by using the freeware to transfer Windows to SSD, we need to choose the function “Migrate OS to SSD/HD Wizard” from the left side.
transfer-windows-to-ssd-select-ssd
Step 3: select the SSD Windows OS will be migrated to and click “Next>”. Note: all data on the SSD will be deleted after successful migration, so please backup needed ones in advance.
transfer-windows-to-ssd-edit-partition-size
Step 4: edit partition size by changing the length of the handle and edit partition location via changing the handle position. Then, click “Next>” to get the note below:
transfer-windows-to-ssd-boot-note
Step 5: this note should not be ignored if you want to boot Windows from SSD, because it shows where to set the SSD as the default boot disk. But here we only need to click “Finish” to continue.
transfer-windows-to-ssd-apply-pending-operations
Step 6: now we can see multiple pending operations on the left side, including initialize disk, copy partition, update boot configuration, and so on. At this time, please click “Apply” button to make all these pending operations really performed. In addition, since Windows is running, MiniTool Partition Wizard will ask us to restart computer, and then the freeware will transfer Windows to SSD in boot mode. When all changes are made, our computer will reboot. Please set the SSD as the default boot disk in BIOS during reboot.


Now try using the freeware MiniTool Partition Wizard to transfer Windows from HDD to SSD if you have such a need.

Clone hard disk of laptop

When a laptop (no matter HP, Toshiba, or Samsung) has been used for several years, many of us would want to obsolete it and purchase a new laptop or PC. Well then, how to deal with the deprecated laptop? The most economical way is to sell it. However, before selling, we have to transfer all important files out, and the fastest way is to clone the entire hard disk of laptop. After transmission, we should erase all private information in case of privacy leakage rather than do simple deletion or formatting.


To do disk clone, we need a piece of disk clone software. If you are running Windows XP, Windows Vista, Windows 7, or Windows 8, we suggest using MiniTool Partition Wizard Free Edition since it is a freeware and can help erase all private information easily and thoroughly. However, if you are a server user, you may need to purchase the server edition which is much cheaper and provides a lot of other useful functions compared with other similar programs. For more information, please see Compare Main Features.


Before cloning hard disk of laptop, we need to do the following 2 preparations:
1. Download and install the disk clone software to laptop.
2. Connect the target hard disk (the disk that will save the disk copy) with laptop.


How to Clone Hard Disk of Laptop with MiniTool Partition Wizard


Firstly, launch the disk clone software and we can see its main interface shown below:
minitool-partition-wizard-main-window
Then, select the disk we want to clone and choose “Copy Disk” feature from the left action panel. After that, all hard disks recognized by laptop will be listed like this:
clone-hard-disk-of-laptop-choose-target-disk-to-save-copy
Here, please choose a target hard disk to save the copy of the source disk and click “Next>”.
clone-hard-disk-of-laptop-edit-partition-size
Then, edit partition size and location in accordance with actual demands and click “Next>”. After this step, a boot note will appear, which shows how to boot from the target disk. Please ignore the note since we just clone hard disk of laptop rather than migrate OS. Then, click “Finish” to go back to the main interface:
clone-hard-disk-of-laptop-apply-changes
Now we can see disk 1 has been cloned to disk 2, including all partitions and files, so we need to click “Apply” button on the top to perform all changes. However, if the source disk contains Windows OS which is running, the disk clone software will ask us to restart computer. Please do it reliably, because this will not bring any damage to data. When all changes are made in boot mode, our laptop will reboot as usual. Then, we need to take out the target disk, and wipe the source disk by using MiniTool Partition Wizard to avoid privacy leakage. For detailed steps, please see Wipe Disk. However, if you only want to wipe some partitions since Windows should be reserved, see Wipe Partition to get details.


If you are planning to sell old computer, transfer all important files out via cloning the hard disk of laptop or PC, and then erase all private information to prevent privacy leakage from happening.