Author Archives: zxl123

Replace small disk with larger disk

If your computer (either PC or laptop) was purchased several years ago, its hard disk might be small in capacity, like 500GB. Now, you might want to replace the very small hard disk with a much larger one (may be several TB). Well then, how can you transfer all useful data from small disk to large disk in a fast way?


Most users know to copy and paste files is a quite time-wasting solution and they would like to employ a third party program since this will save them much time. And currently users can find a lot of cloning programs to do the disk replacement. But disappointingly, most programs should be paid, and freeware is always with poor quality.


Fortunately, there is a piece of good news for Windows home users: MiniTool Partition Wizard can help clone a small disk to larger disk without bringing any damage to data and system, and it is a freeware. Moreover, even inexperienced users can master this program with ease. If you do not believe it, just see the following demonstration.


Tip: MiniTool Partition Wizard provides users with functions to migrate Windows OS from one disk to another disk, and it can also copy a single partition rather than the entire hard disk to another hard disk. Therefore, users can choose the most appropriate function in accordance with actual demands.


Replace Small Disk with Larger Disk in MiniTool Partition Wizard


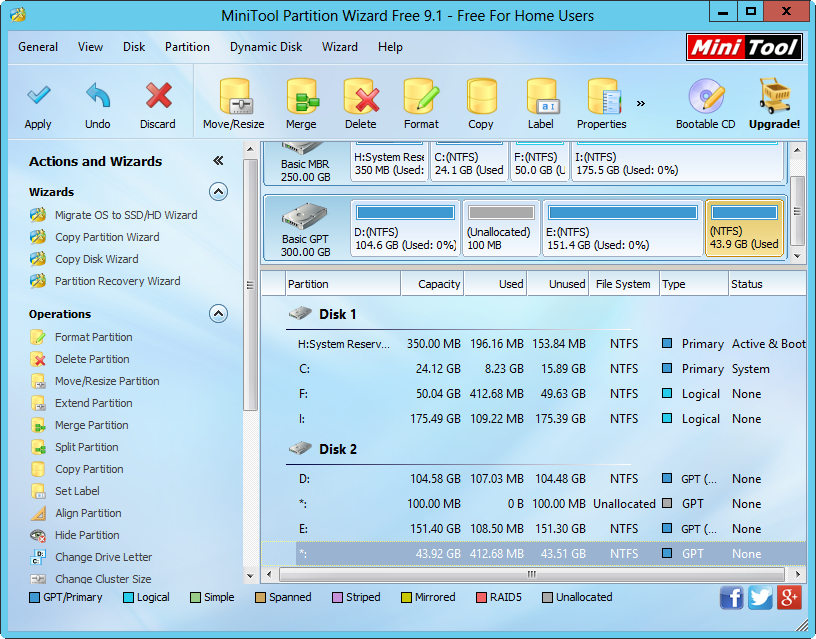
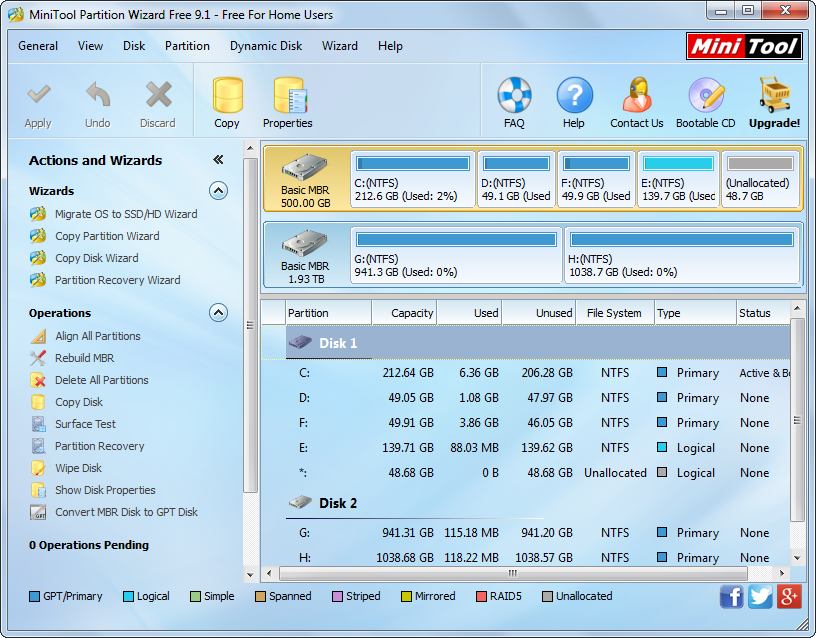
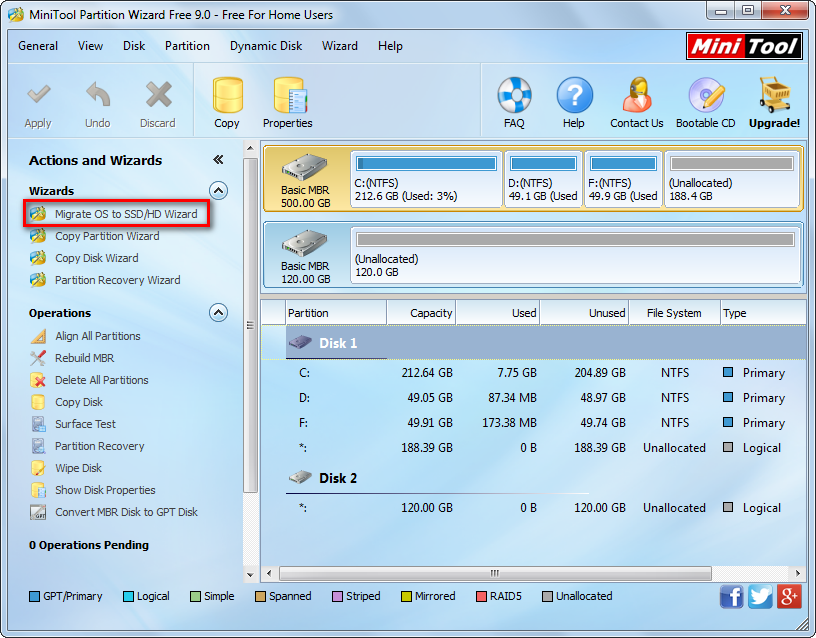
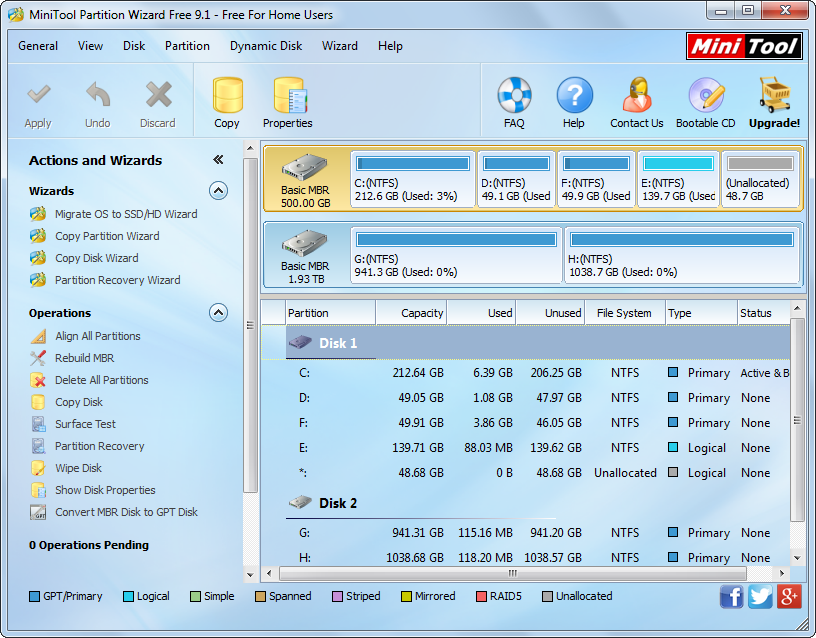
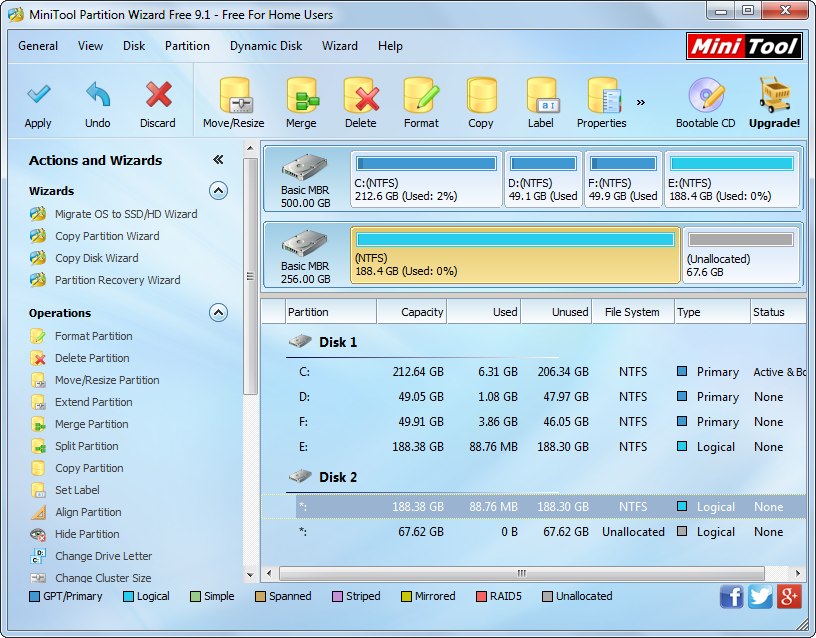
After the drive clone freeware has been installed, users need to run and launch it to get the main interface shown below:
minitool-partition-wizard-main-interface
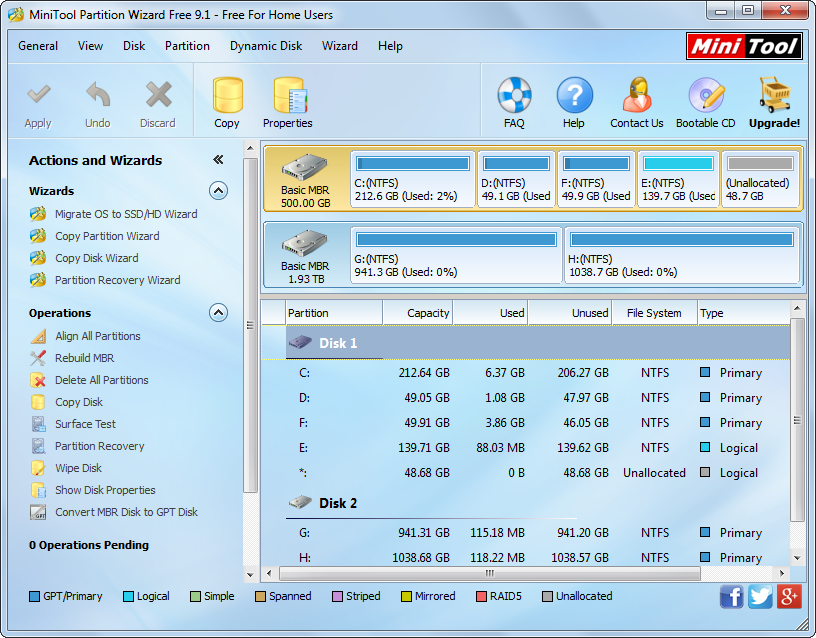
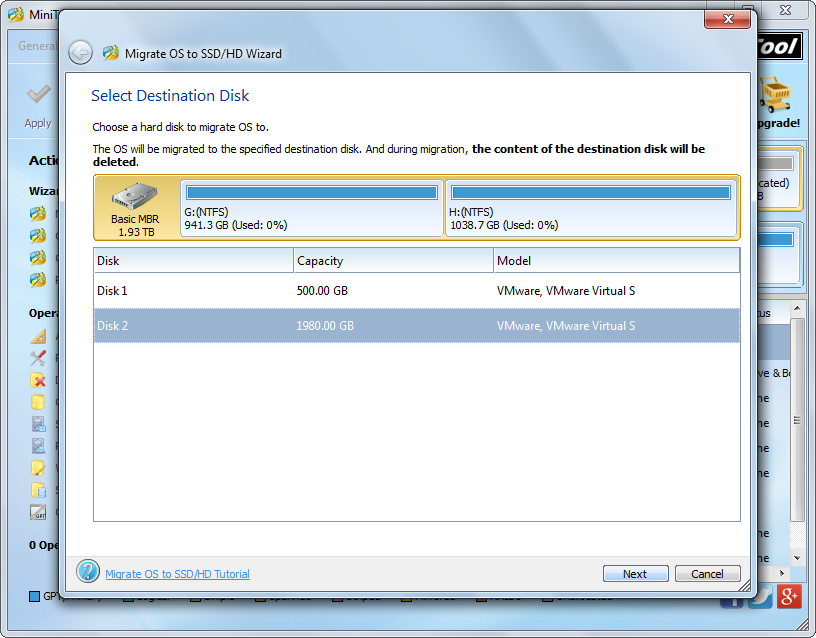
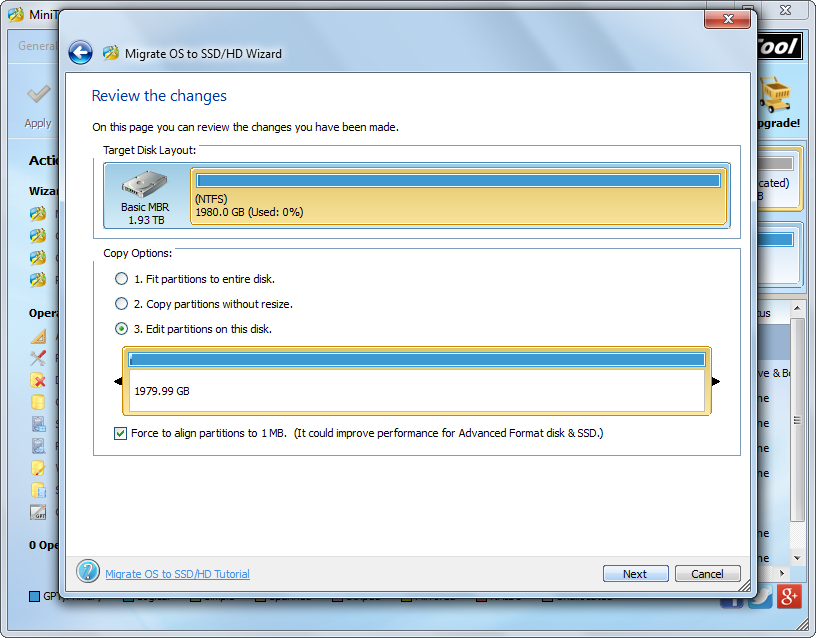
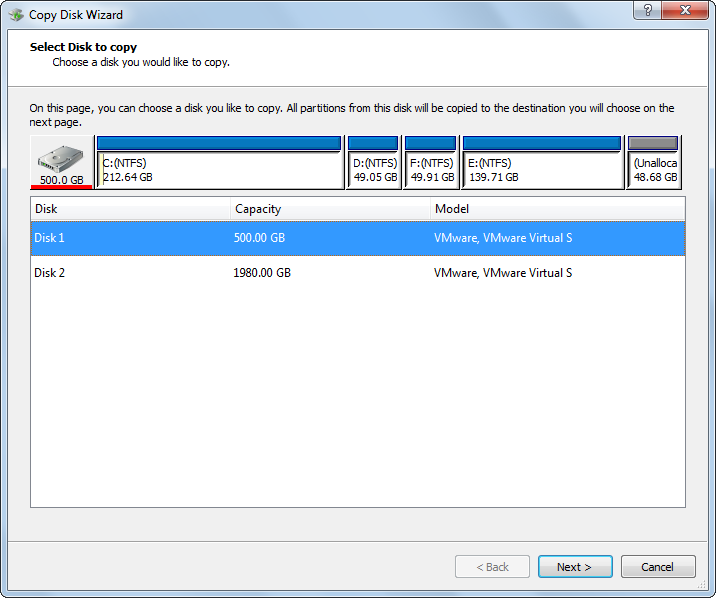
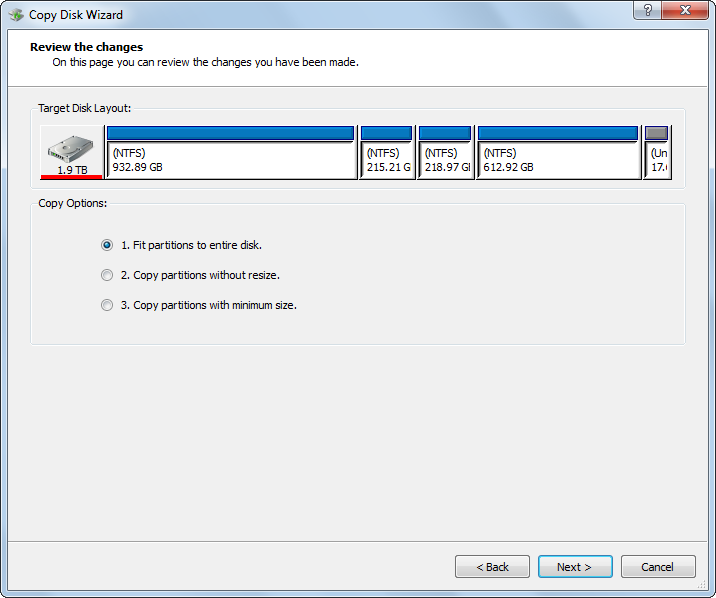
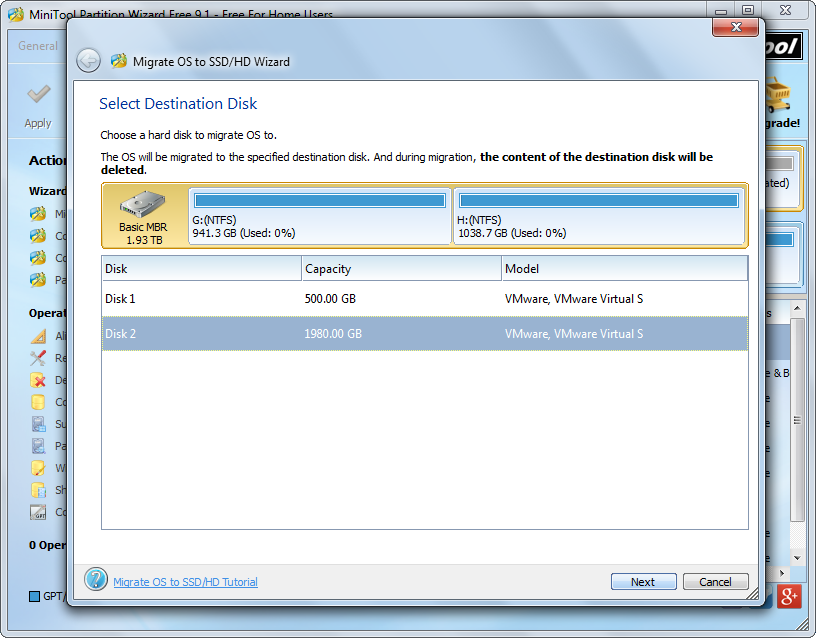
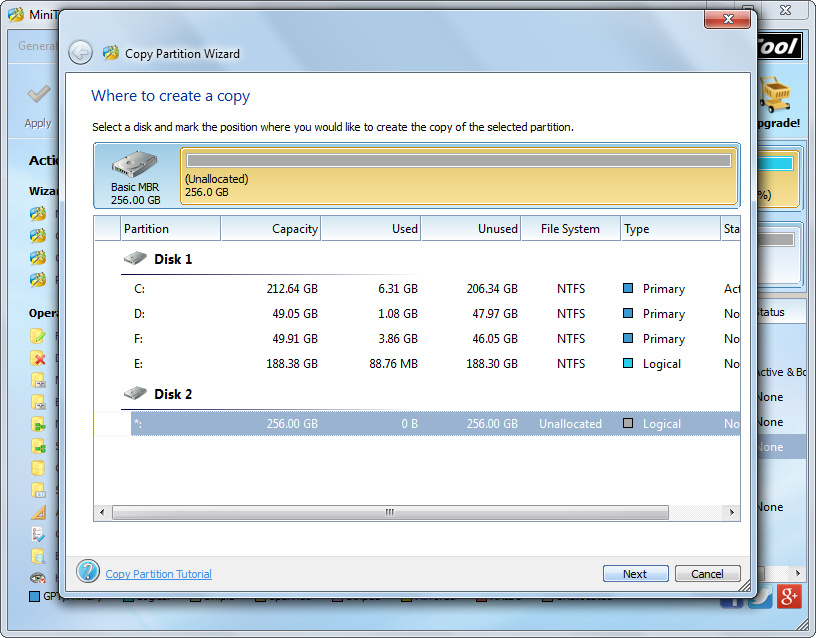
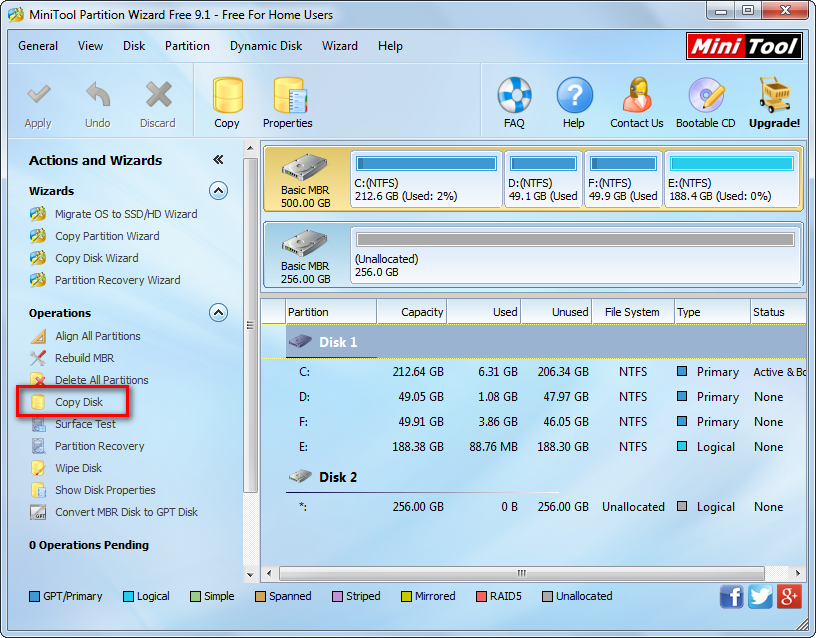
Then, select the small disk and click “Copy Disk”. Next, select the large disk and click “Next>”. After these steps, users are given chance to change partition size on the large disk so as to make full use of disk space.
replace-small-disk-with-larger-disk-resize-partition
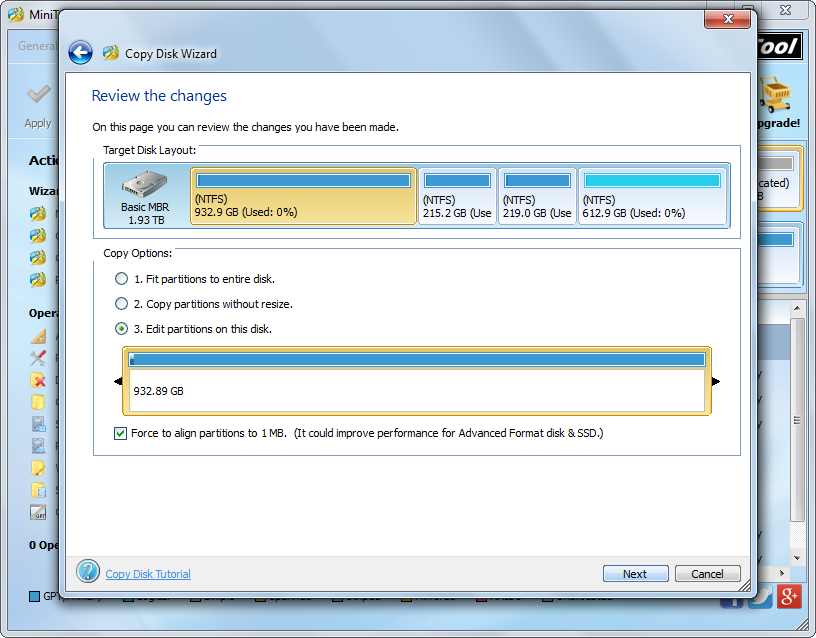
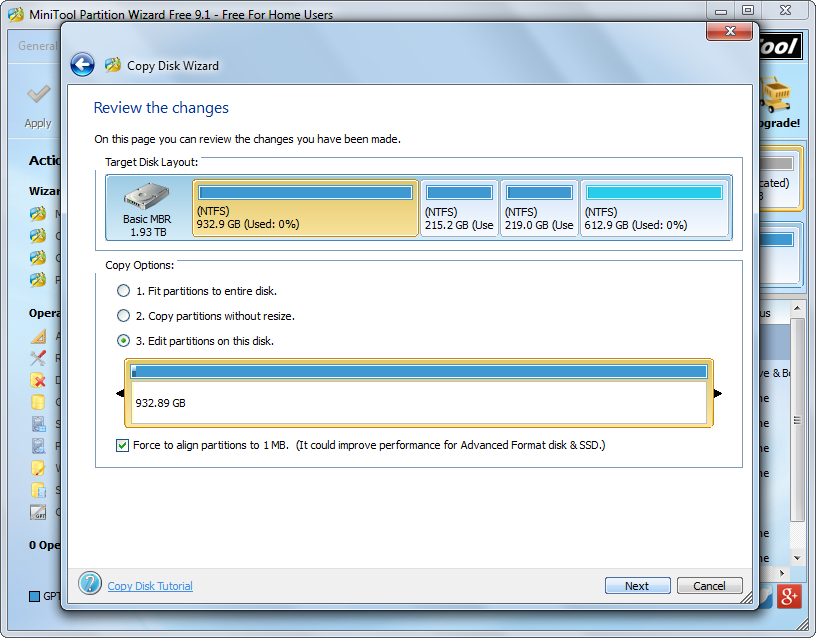
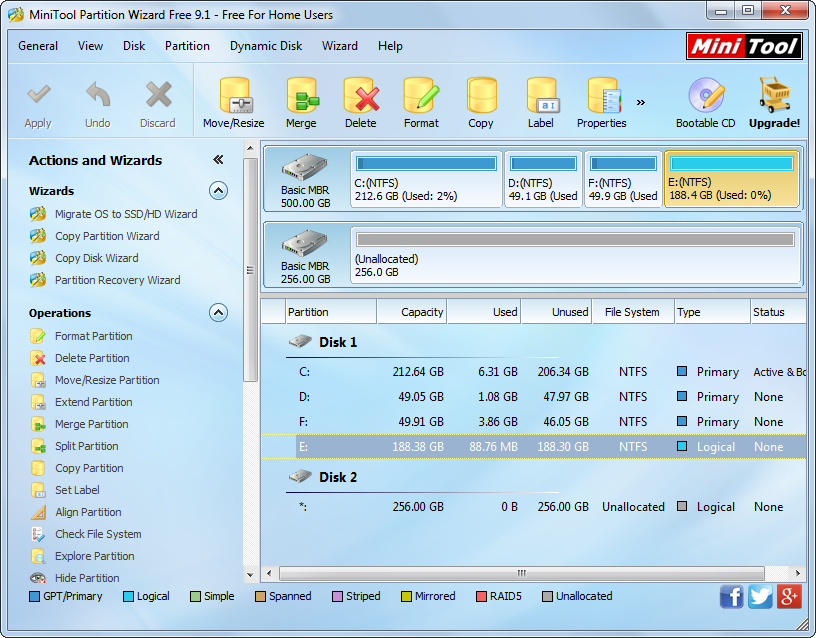
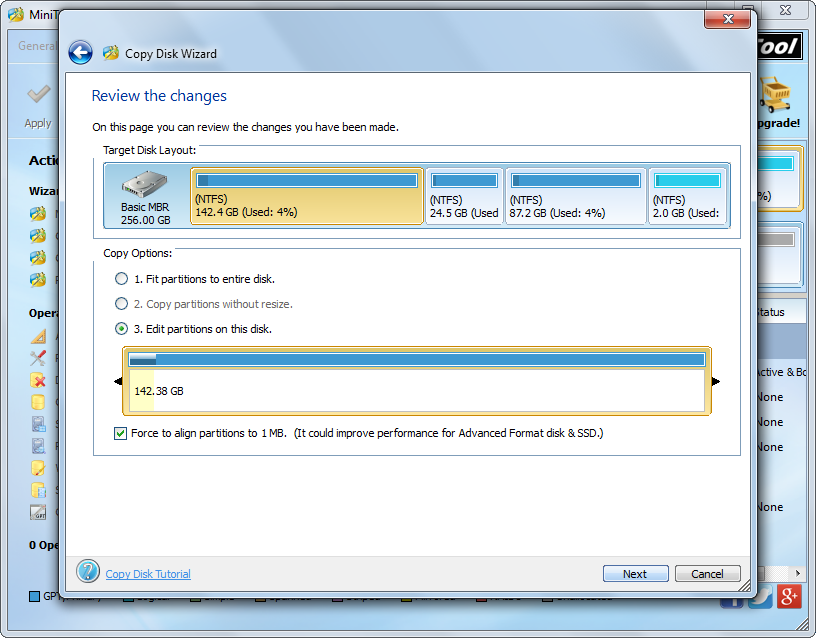
There are 3 options, and users are suggested choosing the last one since this allows them to resize partition in accordance with actual demands. After choosing the third option and selecting a partition, users are able to resize partition by changing the length of the partition handle. Then, click “Next>” to get a boot note. If you are going to boot computer from the large disk and using the Legacy BIOS + MBR boot, set the large disk as the default boot disk in BIOS when rebooting, but here users only need to click “Finish” to go on operating.
replace-small-disk-with-larger-disk-apply-changes
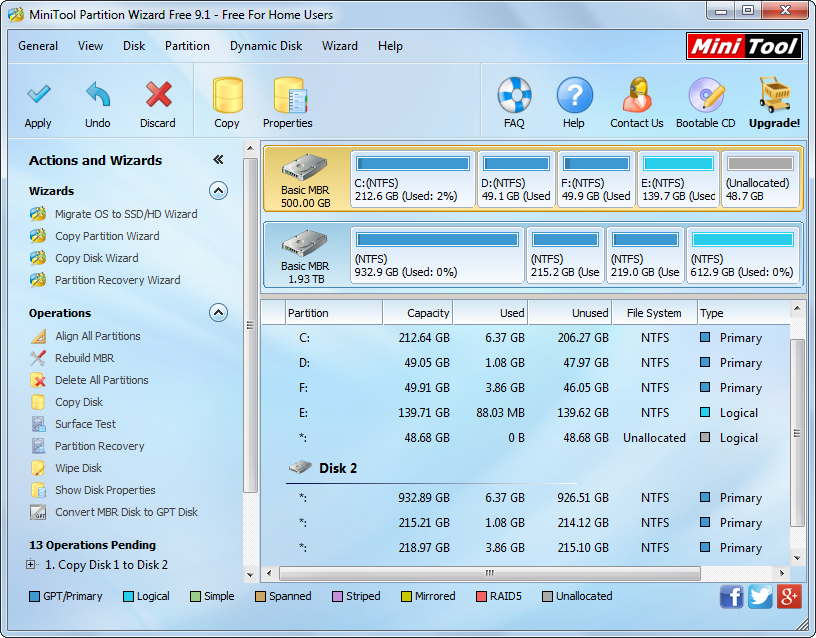
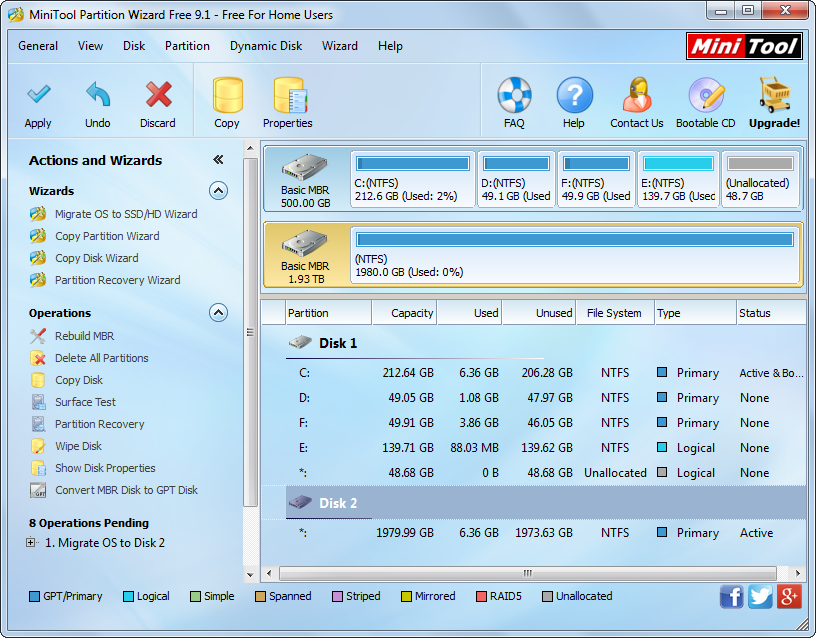
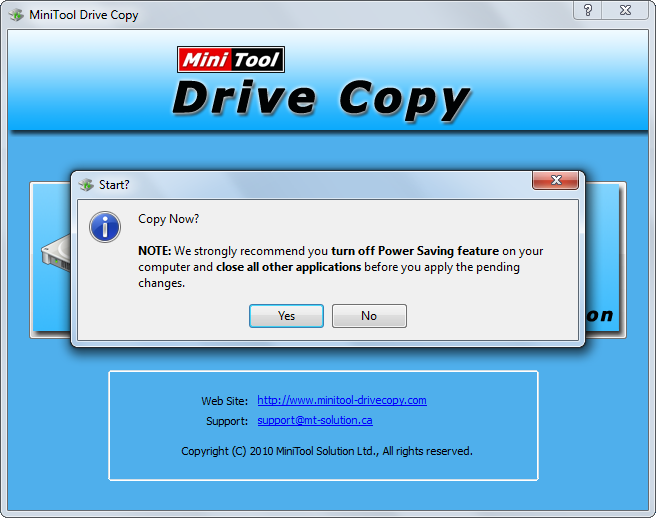
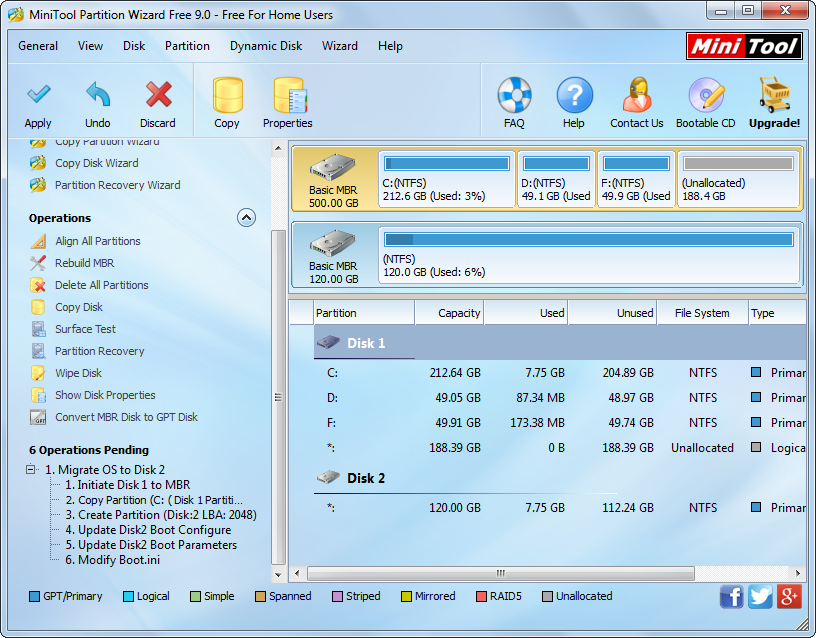
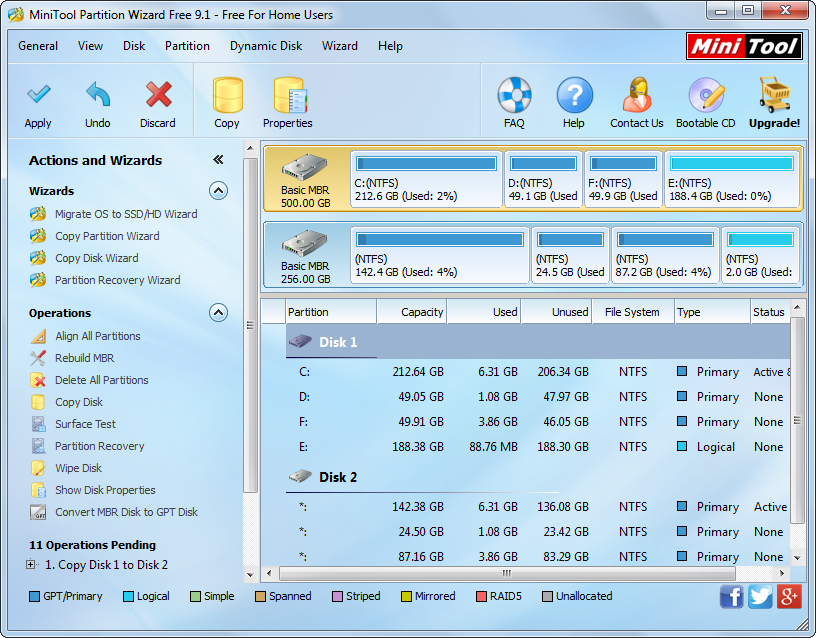
At last, click “Apply” button to make all these changes applied.


Once all changes are made, our work to replace small disk with larger disk is done.

Transfer partition from one disk to another

Question: I have an old laptop which is with a 250GB hard disk. The hard disk was partitioned to 3 blocks (3 partitions), and one of them is now nearly full. Therefore, I want to transfer all files saved in this partition to one of my external hard disks so as to free up local disk space. And someone suggested transferring the partition from one disk to another since this will save me much time. But unfortunately, I have no idea of doing this, because I am totally a newbie. Can anyone give me further assistance?


To transfer partition from one disk to another, users can turn to a third party drive clone freeware, but a lot of users may doubt performance of freeware since they think freebies are always with bad quality. It can not be denied that most free apps may bring damage to either user data and system, but there is exception. Here, we suggest using MiniTool Partition Wizard to clone partition from one disk to another disk, because it has been proved to be easy to use and safe enough by millions of users.


Tip: MiniTool Partition Wizard is free for Windows non-server users only. If you need to run this program on a server computer, please purchase the server edition or more advanced editions.


Steps to Transfer Partition from One Disk to Another


After launching the drive clone freeware successfully, we can see its main interface where all disks and partitions are listed:
minitool-partition-wizard-main-interface
Tip: there must be an unallocated space on the second hard disk to hold all content saved on the source partition. If there is no such space, please shrink an existing partition to get. Then, select the partition we want to migrate and click “Copy Partition” function from the left side.
transfer-partition-from-one-disk-to-another-mark-space-to-save-the-source-partition
Next, select the unallocated space and click “Next>” to continue. Then, users are able to edit partition size and location. Just change the length of the partition handle to resize partition or change the location of the handle to move partition position. After that, click “Finish” button to go back to the main interface:
transfer-partition-from-one-disk-to-another-apply-changes
At last, click “Apply” to make all changes performed if the given preview effect is satisfying.


Undoubtedly, transferring partition from one disk to another is a quite time-saving solution to migrating files, and you can try it when it is necessary.

Transfer just Windows to SSD

Compared with mechanical hard disk, solid state drive (SSD) is much more expensive in gigabyte so that most users purchase small SSD and plan to make the disk for Windows only. Well then, how can we transfer just Windows to new SSD?


Currently, most cloning programs only allow users to clone certain partition or entire hard disk and do not give an option to migrate Windows OS to SSD. Even if you are lucky enough to find a program supporting system migration, it may be quite expensive or brings damage to Windows, making the cloned system unbootable. Aiming at this situation, we suggest using MiniTool Partition Wizard.


This is a quite excellent partitioning program having more than 16,000,000 downloads, and the built-in system migration function can help you transfer Windows OS from old HDD to new SSD in easy operations and without data loss. More importantly, it provides strong data protections to make both common data and system safe enough. And the migrated Windows will be bootable since the program will fix and update boot information on the SSD. If you do not know how to make such a system migration, please look at the following example.


Transfer just Windows to New SSD with MiniTool Partition Wizard


Step 1: please download and install the system migration software on computer.
Step 2: start and launch the program to get its main interface:
minitool-partition-wizard-main-interface
Step 3: choose the function “Migrate OS to SSD/HD Wizard” from the left side.
transfer-just-windows-to-ssd-select-ssd
Step 4: select the SSD to migrate Windows to and click “Next>”.
transfer-just-windows-to-ssd-move-resize-partition
Step 5: edition partition size by changing the length of the partition handle and move partition location by changing the position of the partition handle. Then, click “Next>” to get a boot note. If you are going to boot Windows from the SSD and employ Legacy BIOS, please do as the note tells when rebooting computer. And here you just need to click “Finish” to go back to the main interface:
transfer-just-windows-to-ssd-apply-changes
Step 6: click “Apply” and “Restart Now” successively to make all changes performed in boot mode.


Step 7 (this step is for Legacy BIOS users): enter BIOS when the computer reboots, and then set the SSD as the default boot disk.


Now, all work to transfer Windows to new SSD has been done. You can also have a try when necessary. However, if you hope to clone the entire hard disk rather than Windows only, please see Copy Disk to get details.

Copy SATA hard disk to USB disk

Question: I have a 500GB SATA hard disk (internal) with saving about 460GB data. In order to free up local disk space, I’m going to transfer all these data to an external USB hard disk. However, since there are 460GB files to migrate, I don’t want to copy and paste them, which is so troublesome, but hope to copy SATA hard disk to external USB hard disk. Is there any good idea?


We believe many Windows users have such a question. To do this kind of clone, users had better employ a third party program. Of course, free but professional program is much more welcomed. Here, we recommend the free drive clone software MiniTool Partition Wizard for Windows home users.


It provides users with powerful function to clone hard disks no matter they are SATA, USB, IDE, or SCSI. Moreover, it even supports copying a large hard disk to small hard disk as long as the small disk can hold all data. Compared with copying files directly, cloning hard disk will save lots of time, and data security can be ensured even if the cloning process ends by accident. Next, let’s see how to make use of this program to clone a hard drive.


Copy SATA Hard Disk to USB Disk with MiniTool Partition Wizard


After the free drive clone software has been installed successfully, please start and launch it to get the main interface below:
minitool-partition-wizard-main-interface
Here all recognized hard disks are displayed. Please select the SATA disk you want to copy and choose “Copy Disk” function from the left action pane.
copy-sata-hard-disk-to-usb-disk-select-target-disk
Then, select the USB hard drive to clone the SATA hard disk to and click on “Next>” to continue.
copy-sata-hard-disk-to-usb-disk-edit-partition
Next, users are able to edit partition size in accordance with actual demands if they choose the third copying method. After getting needed value, please click “Next>” to get a boot note. Just click “Finish” to go back to the main interface:
copy-sata-hard-disk-to-usb-disk-apply-changes
Now we can see all partitions and data on the SATA disk have been copied to the external USB drive. At this time, users only need to click “Apply” to make all changes performed.


Do you want to make a clone for your hard disk or partition on Windows platform? MiniTool Partition Wizard undoubtedly will do you a great favor. For detailed steps to copy a partition, please see Copy Partition.

How to clone a hard disk in Windows 7

Hard disk is undoubtedly the most widely used storage device for both Windows computer and Macintosh, and we may save a huge number of important files such as business data, personal information, and study materials on it. Nevertheless, all these data are threatened by numerous factors like virus attack, our mistaken operation, and hardware failure, and any error may result in data loss. Therefore, it is very necessary to make a clone especially for the frequently used hard disk. Well then, how to clone a hard disk in Windows 7?


If you are troubled by this question, we highly suggest downloading a free drive clone software. However, freeware is always with poor quality so that most users hesitate to take such an operation. Actually, there is excellent disk clone freeware, and MiniTool Drive Copy is worth trying since it brings no damage to data. If you do not believe me, please look at the following demonstration.


How to Clone Hard Disk with MiniTool Drive Copy in Windows 7


First of all, we need to prepare a target hard disk that is used to save the copy of the source disk. At this time, some users may ask what capacity the target hard disk should be. Should it be no less than that of the source hard disk? Actually, as long as the target disk has enough space to hold all data saved on the source disk, it’s ok.


Then, launch the free drive clone software to get its startup interface shown below:
minitool-drive-copy-startup-interface
There are 2 functional modules here. Please select “Disk to Disk” module since it aims at cloning the entire hard disk while “Partition to Partition” only copies certain partition.
how-to-clone-a-hard-disk-in-windows-7-select-source-disk
Then, select the source disk and click “Next>”. After that, please select the target disk to clone the source hard disk to and click “Next>” to get the interface where users can move and resize partition:
how-to-clone-a-hard-disk-in-windows-7-edit-partition
After getting needed partition size and location, please click “Next>” to get a boot note. Read the note carefully and click “Finish” to get a confirmation message:
how-to-clone-a-hard-disk-in-windows-7-confirm-operations
Now just click “Yes” to perform all changes. However, if the source disk installs Windows which is running, MiniTool Drive Copy will ask users to restart computer, which is to protect system. Please restart computer as told. Once all operations are performed, our computer will reboot as usual.


Now most of you would know how to clone a hard disk in Windows 7. If you also want to make a clone for the disk saving significant files or replace old hard disk without losing data, try this solution. For more information about hard disk clone, please see Copy Disk.

Copy OS files to another hard drive

Question: since the old system disk where Windows is installed has little free space left, I bought a new 2TB hard disk and plan to transfer Windows to the new drive. I don’t want to make reinstallation, because there is no installation disc. So how can I copy OS files from one drive to another hard drive in an easy way?


You may ask the same question when hoping to transfer Windows, but we have to say copying OS files may make the migrated Windows unbootable, because system migration is not the pure data transferring and the boot information on the new disk should be updated or fixed simultaneously. Therefore, if users want to migrate Windows OS to another hard drive and make it bootable, they had better employ a professional system migration software.


For users who are running Windows XP, Windows Vista, Windows 7, Windows 8, or Windows 10, we suggest using MiniTool Partition Wizard Free Edition, which is free for those users. For server or more advanced users, they may need to purchase corresponding editions. For detailed information about each edition, please see Compare Main Features. Next, let’s see an example to transfer Windows to new hard drive.


Migrate Windows OS to another Drive with MiniTool Partition Wizard


Firstly, start and launch the free system migration software to get its main interface shown below:
migrate-Windows-os-to-new-drive-choose-the-correct-function
Then, choose the function “Migrate OS to SSD/HD Wizard” to get the window below:

migrate-Windows-os-to-new-drive-select-the-new-drive
Next, select the new hard drive to transfer Windows to and click “Next>”. Then, edit partition size and location on the new disk and click “Next>”. After these steps, users will receive a boot note. Read the note carefully and click “Finish” to go back to the main interface:
transfer-Windows-od-to-new-drive-apply-changes
Now we can see 6 pending operations on the left side, including initialize disk 1, copy partition C, update Disk 2 boot configuration, and so on, not limited to copy OS files to another hard drive. At last, click “Apply” button on the top to make all changes applied. Tip: users will be asked to restart computer since Windows they are operating is located now. Please do as told, and then all changes will be done safely in boot mode.


So far, to migrate Windows OS to another hard drive has been completed. If you also need to do system migration, try this solution.

Migrate Windows to SSD free

Question: I’m running Windows 7 Ultimate now, and I want to transfer the system to the newly bought 256GB solid state drive. Can anyone suggest a way to migrate Windows to SSD for free?


Such questions are frequently asked since more and more users plan to install Windows on SSD. Indeed, running Windows on SSD will largely quicken computer boot speed. One of my friends installs Windows 8 on SSD, and his computer always boots in 10 seconds. In addition, installing apps which require speed (like large games) on SSD will give users wonderful experience. Well then, how can we migrate Windows or transfer data to SSD for free? A piece of data transferring software is needed.


MiniTool Partition Wizard is a piece of free data migration software for Windows home users. It can help migrate both system and common data from HDD to SSD in quite simple operations and without data loss or system crash, because detailed prompts are shown in every step, and all data are protected perfectly. More importantly, boot information on the SSD will be updated and fixed automatically so as to keep the migrated system bootable. If you do not know how to operate this free data migration software, please look at the following example.


Free Migrate Windows to SSD with MiniTool Partition Wizard


Firstly, please start the Windows you want to migrate since Partition Wizard only transfers the loaded OS. Then, start and launch the freeware after it has been downloaded and installed on the computer.
minitool-partition-wizard-main-interface
Here, please choose the function “Migrate OS to SSD/HD Wizard” to get the following screen:
migrate-windows-to-ssd-free-select-the-ssd
Now, select the SSD to migrate Windows to and click “Next>” to continue.
migrate-windows-to-ssd-free-edit-partition
Then, change the size and location for Windows system partition and boot partition. Tip: if you install Windows 7 or later Windows OS on a never-used hard disk, the system reserved partition will be created, and this partition will be migrated at the same time since it plays an important role in booting Windows. After getting desired partition size and location, please click “Next>” to get a boot note. Read the note carefully and click “Finish” to go back to the main interface:
migrate-windows-to-ssd-free-apply-changes
Now we can see Windows 7 has been migrated to the SSD, so please click “Apply” to make all these changes applied.


In so simple operations we transfer Windows to SSD successfully. If you also need to do system migration or clone a certain partition to SSD, the free data migration software MiniTool Partition Wizard would be useful for you.

Transfer data from old disk to new disk

When a hard disk has been used for a long time, it is easy to get damaged or corrupted. If you have such a hard disk, it’s time to transfer all important data out. If not, you may lose all valuable data once the hard disk is physically damaged. Well then, how to transfer data from old disk to new disk?


Considering costs, many users choose to copy and paste files directly. Actually, this is a quite time-consuming solution. If there are more than 100GB files to migrate, several hours may be required. Actually, users can turn to a piece of free drive clone software, with which about half of the time can be saved. Nevertheless, it may be difficult for some users to find such a kind of programs since they are unfamiliar with this area. Considering this situation, we suggest using MiniTool Partition Wizard. But note: this program is free for Windows non-server users only. For server support, please purchase the serer edition.


MiniTool Partition Wizard provides users with 2 functions to transfer data from old disk to new disk: clone the entire old disk to new disk or copy certain partition to new disk. Just choose the most appropriate one in accordance with actual demands. Moreover, data protections will be offered during the entire cloning process. Next, let’s see detailed steps.


Transfer Data from Old Disk to New Disk with MiniTool Partition Wizard


Once the free drive clone software has been installed, please run and launch it to get the main interface:
transfer-data-from-old-disk-to-new-disk-select-source-partition
To clone the whole old hard disk, please select the source disk and click “Copy Disk” from the left side. However, if you plan to transfer data saved in one partition to new disk, please choose the source partition and click “Copy Partition” feature. Here, we take the latter for example. To clone a partition, we should confirm there is an unallocated space on the new hard disk to hold content of the source partition. If there is no such unallocated space, please shrink a large partition to create. For details, please see Move/Resize Partition.
transfer-data-from-old-disk-to-new-disk-select-unalloated-space-to-clone-partition-to
Then, select the unallocated space on new disk and click “Next>”. After that, users will be given chance to change size and location for the cloned partition, and then click “Finish” to go back to the main interface:
transfer-data-from-old-disk-to-new-disk-apply-changes
At last, click “Apply” button and MiniTool Partition Wizard will perform all changes automatically.


Now, we succeeded in transferring data from old disk to new disk, and you can download such a free drive clone software to do data migration.

Clone boot drive to smaller drive

Question: I currently have a 1TB hard drive which is with Windows OS and some data, and I also have a 256GB SSD that is empty. Now I’m wondering whether there is a way to clone the boot drive to the smaller SSD drive so that my computer can boot from the SSD. Any good idea?


Such a kind of questions are asked frequently on the internet since SSD is always much smaller than HDD in capacity. To do disk clone, most users prefer to use a third party drive clone software since this will simplify operations and give protections to data, but disappointingly most of these programs require that the target drive should be no less than the source drive in capacity. Under this situation what should users do? Fortunately, MiniTool Partition Wizard can help deal with this issue.


By using this free drive clone software, users do not need to consider the capacity of target disk but the amount of data. To be specific, as long as the target disk has enough space to hold all data saved on source disk, disk clone is possible. For example, you can clone a 1TB hard disk saving 200GB data to a 256GB hard drive. More importantly, Windows OS saved on the cloned drive will be bootable.


Clone Boot Drive to Smaller Drive with MiniTool Partition Wizard


Step 1: run and launch the free drive clone software to get its main window below:
minitool-partition-wizard-main-interface
Step 2: select the source disk to clone and choose “Copy Disk” feature from the left pane.
copy-boot-drive-to-smaller-drive-select-the-smaller-drive
Step 3: select the target smaller drive to clone boot drive to and click “Next>”. Then, edit partition size and location on the smaller drive and click “Next>” to get a note:
copy-boot-drive-to-smaller-drive-boot-note
Step 4: read the note carefully since it shows how to boot from the smaller disk, and then click “Finish” to go back to the main interface.
copy-boot-drive-to-smaller-drive-apply-all-changes
Step 5: click “Apply” button to perform all changes if they are satisfying. Note: since the boot drive saves Windows OS which is loaded now, considering system security, MiniTool Partition Wizard will ask users to restart computer. Then, all changes will be performed in boot mode.


Now, download this free drive clone software to clone your boot drive to smaller drive, which would give you great surprise.

Free disk clone app for Windows 7

Undoubtedly, Windows 7 is still the mainstream operating system though Windows 8 and even Windows 10 have been released. For all Windows 7 users, disk clone is a quite common operation to backup important data, and now there are a great number of drive cloning programs available. Nevertheless, it cannot be denied that most apps are chargeable, and some of them are pretty expensive. But today we are going to introduce a powerful but free disk clone app for Windows 7 users. Of course, it can be used to other Windows non-server operating systems, like Windows XP, Windows Vista, Windows 8, and Windows 10. It is MiniTool Partition Wizard.


Why Use MiniTool Partition Wizard to Clone Hard Disk


This drive clone freeware offers lots of amazing features for drive clone:
1. It is a freeware for all Windows non-server users.
2. Capable of copying both hard disk and certain partition.
3. Make it possible to change partition size and location during the process of clone.
4. Provide great protections to data.
5. Cloned system will be bootable, and the cloned data will work normally.
6. Only several steps are needed.


Now users would believe it is worth downloading the free disk clone app to clone disk drive in Windows. And next a demonstration will be given to show users how to operate the program.


Copy Hard Disk with MiniTool Partition Wizard in Windows 7


After the free disk clone app has been downloaded and installed for Windows 7 computer, please run and launch it to get the main interface:
minitool-partition-wizard-main-interface
Then, select the hard disk you want to clone and choose “Copy Disk” feature from the left side to get the following screen. Tip: if you hope to clone certain partition, just select the source partition and click “Copy Partition”.
copy-hard-disk-in-windows-7-select-target-disk
Next, select the target disk to clone the source disk to and click “Next>”. After this step, the drive clone freeware offers a chance to edit partition size and location:
copy-hard-disk-in-windows-7-edit-partition-size-and-location
Please change the length of partition handle to resize partition and move the position of the handle to move partition. Then, click “Next>” to get a boot note. Read this note and click “Finish” to go back to the main interface:
copy-hard-disk-in-windows-7-apply-changes
At last, click “Apply” button which is located on the top left corner to make all changes performed.


Now, the work to clone hard disk in Windows 7 has been completed. And you can try using this free disk clone app to copy hard disk or partition in Windows XP/Vista/7/8/10.