Author Archives: zxl123

Copy complete disk partitions free

Physical damages like bad sector are more likely to emerge after a hard disk has been used for a very lone time. At this time, if the old disk saves very significant files, we believe most users would hope to replace it with new larger ones. Well then, how to complete the replacement without losing any data? The best way is to copy complete disk partitions free from old disk to new disk.


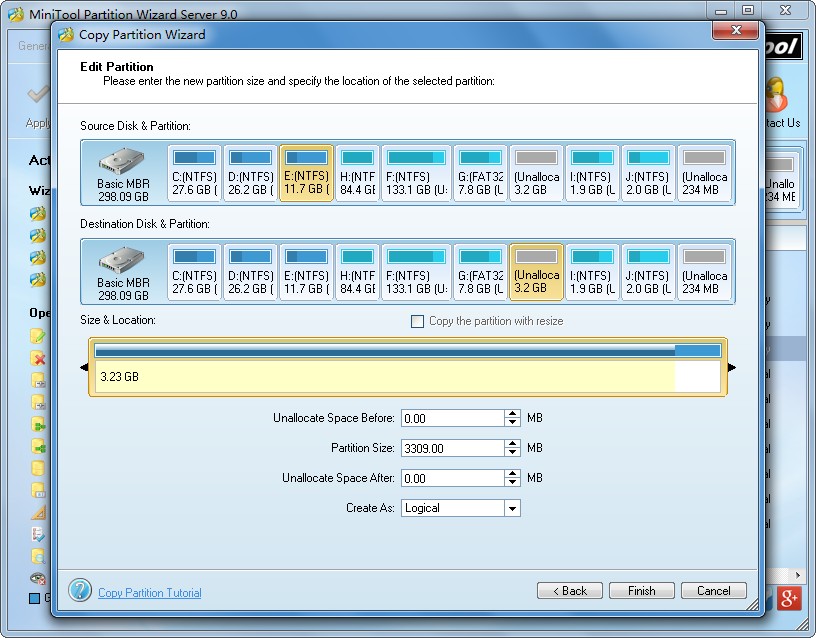
Nevertheless, Windows does not provide users with good solutions to cloning the entire hard disk, and they have to ask third party disk clone tools for help. Actually, the key to copying complete disk partitions for free is to download a piece of excellent disk clone freeware, but most cloning tools on the internet are chargeable and most of them are even quite expensive. Aiming at these situations, we suggest using MiniTool Drive Copy which supports imaging both hard disk and a single partition.


Note: MiniTool Drive Copy works only on non-servers, like Windows XP, Windows Vista, Windows 7, and Windows 8. To clone disk of server, you may need to download MiniTool Partition Wizard Server Edition.


Free Copy Complete Disk Partitions with MiniTool Drive Copy


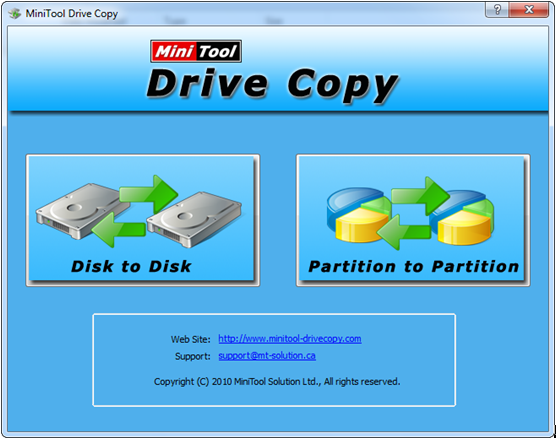
Firstly, please launch the disk clone freeware to get the starting interface shown below:
minitool-drive-copy-starting-interface
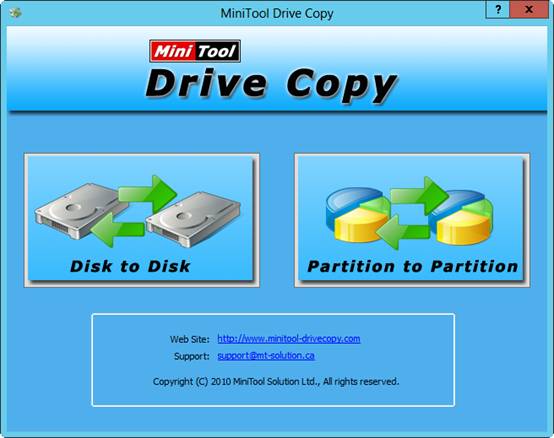
Then, choose “Disk to Disk” module since it clones the entire hard disk, including all partitions. After that, the following window will pop up:
copy-complete-disk-partitions-select-source-disk
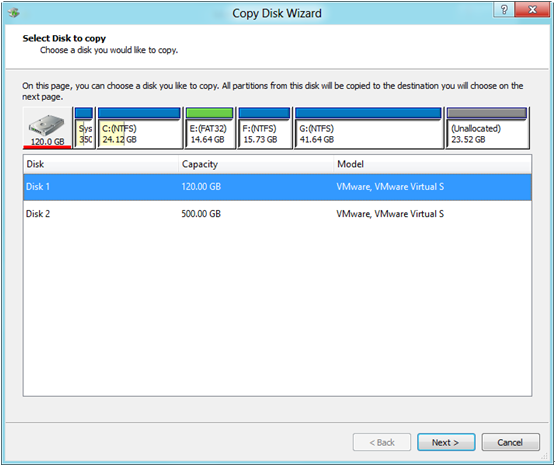
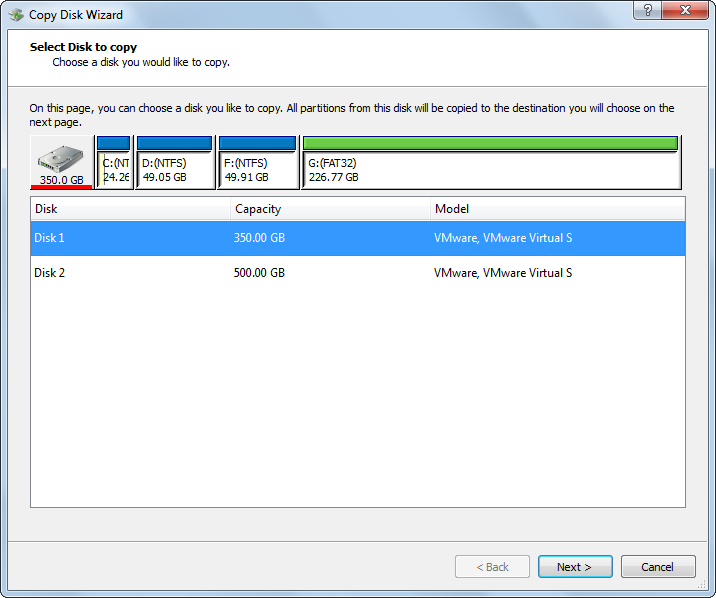
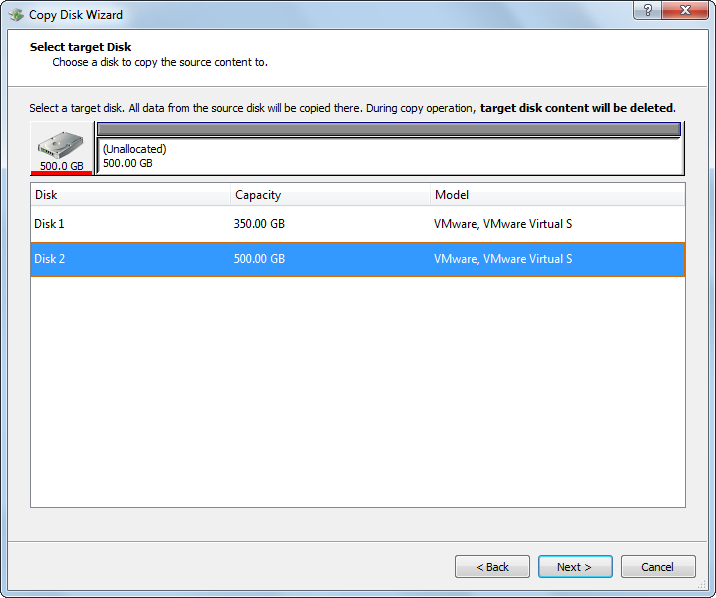
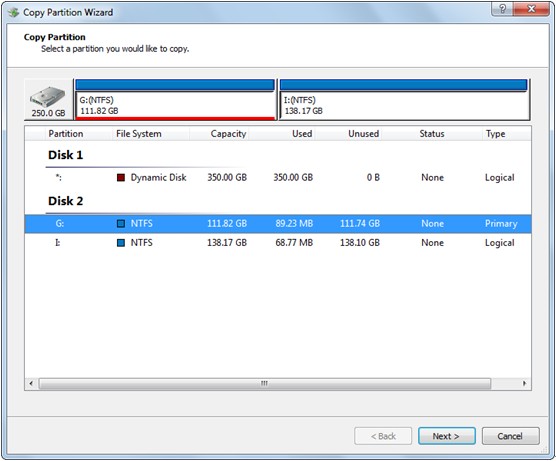
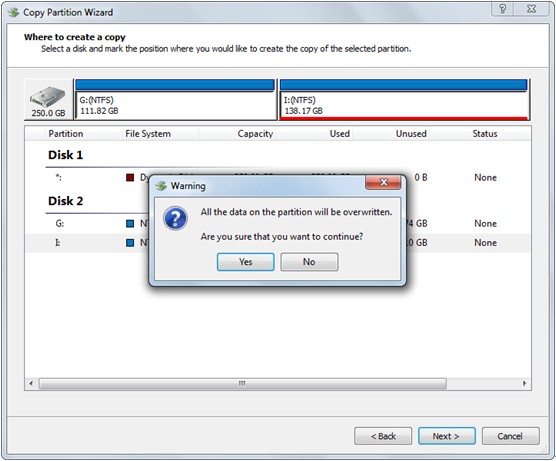
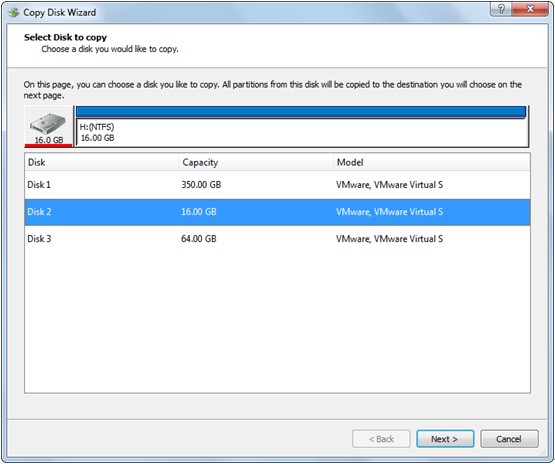
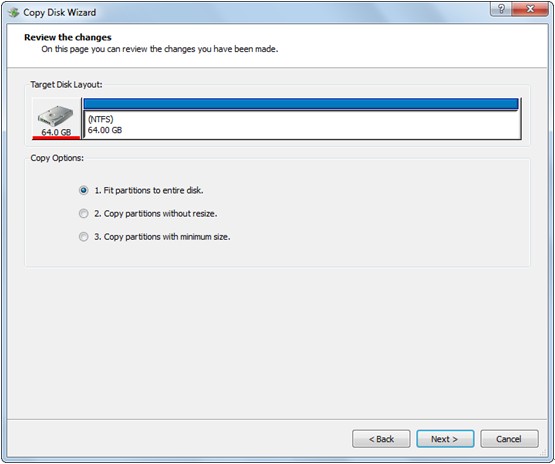
Here all disks are listed. Please select the source disk to copy and click “Next>”. Then, choose a target disk to save the copy of the source disk and click “Next>” to continue. After these operations, users will be asked to select a copying mode:
copy-complete-disk-partitions-choose-copying-mode
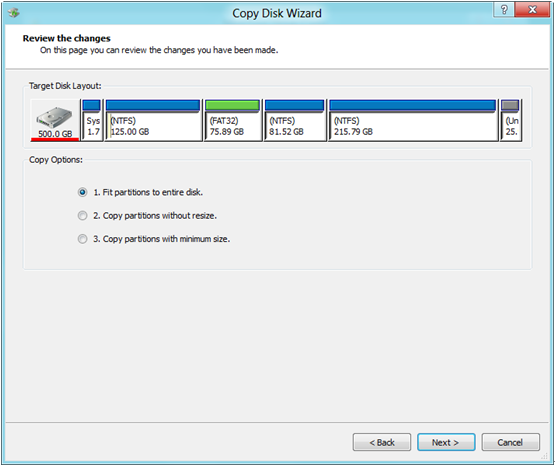
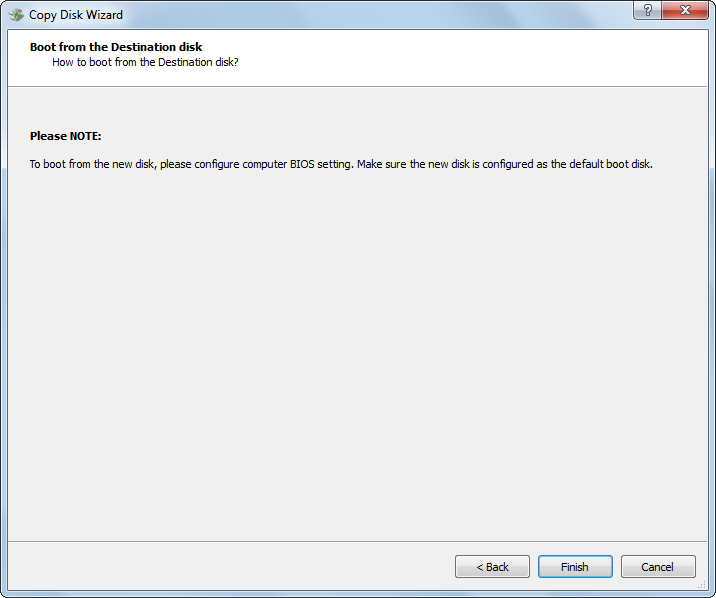
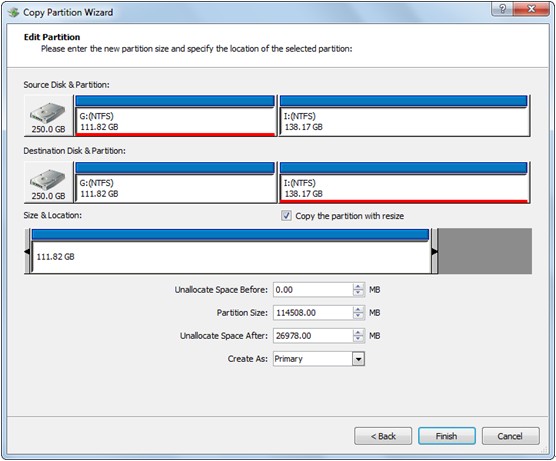
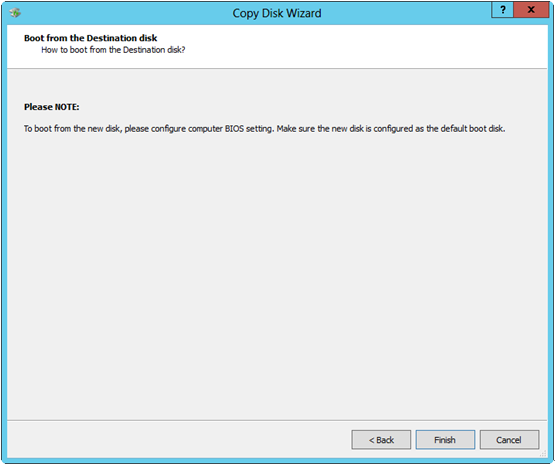
Please choose the best one to determine the layout of target disk and click “Next>”. Then, a boot note will emerge:
copy-complete-disk-partitions-boot-note
It tells how to boot from the target disk. Read it carefully and click “Finish” button.


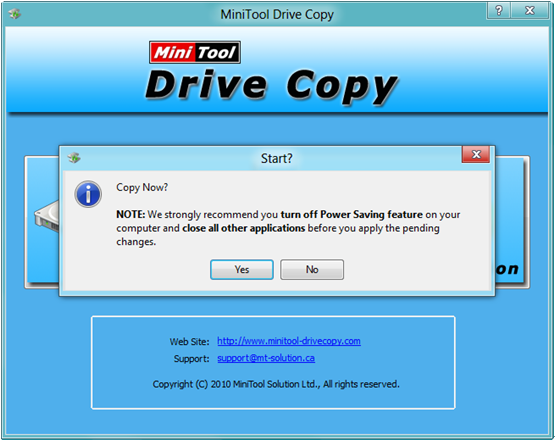
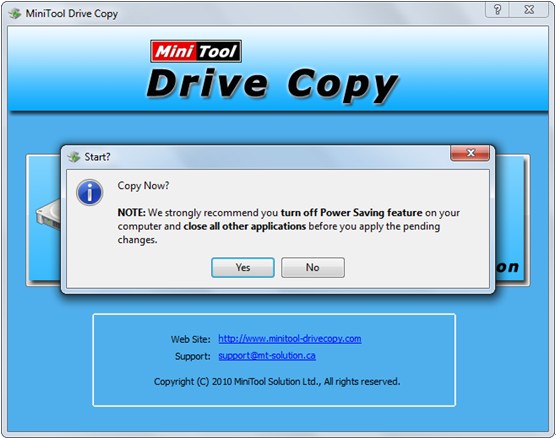
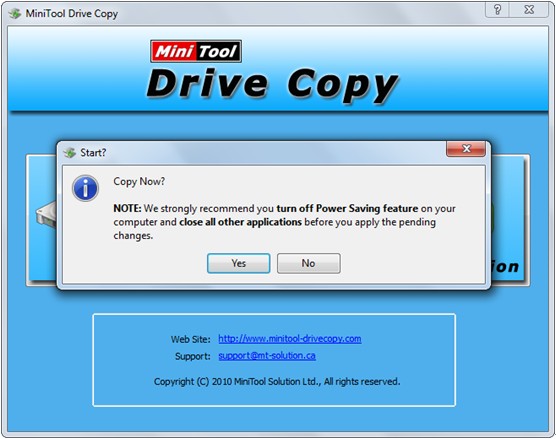
At last, click “Yes” and MiniTool Drive Copy will start free copying complete disk partitions. If the source disk saves Windows which is running, users will be required to restart computer. For data protection, please do as the disk clone freeware told.


After these operations, to clone entire hard disk is completed.

How to clone dynamic volume

Since dynamic volumes, such as mirrored volume, spanned volume, and striped volume, function better than common partitions on basic disk, more and more Windows users convert their basic disk to dynamic especially when there are 2 or more disks configured. Nevertheless, among all types of dynamic volumes, simple volume, spanned volume, and striped volume do not have fault tolerance. Therefore, it is very necessary to make a backup for the volume which saves important files. Well then, how to clone dynamic volume in Windows OS?


Some users think of downloading disk clone software from the internet, but disappointingly most programs do not support dynamic disk but work on basic disks, MiniTool Drive Copy, for example. Aiming at this situation, we suggest using MiniTool Partition Wizard since it works well on both dynamic disk and basic disk and supports simple, striped, spanned, mirrored, and RAID 5 volume. During the process of cloning, all data will be protected to the largest extent. Moreover, specific prompts will be provided in every step so that mistaken operation can be avoided largely. Next, let’s see how to clone dynamic volume with the recommended disk clone software.


Note: MiniTool Partition Wizard Free edition does not support dynamic disk, so users need to purchase professional or more advanced editions for this support.


How to Clone Dynamic Volume with MiniTool Partition Wizard


Firstly, launch the program to get its main interface below:

minitool-partition-wizard-main-interface

Then, select the volume which needs cloning and choose “Copy Volume” from the left pane or choose “Copy” from toolbar.
how-to-clone-dynamic-volume-select-target-volume-to-save-copy
In the interface above, the disk clone software shows all partitions and volumes. Please select a target dynamic volume to save the copy of source volume and click “Next>”.


Note: the target volume should be large enough to save all content on source volume. If not, users may encounter copy failure. Moreover, all data originally saved on target volume will be destroyed, so users need to backup important ones in advance.
how-to-clone-dynamic-volume-move-resize-volume
Then, specify the size and location for the new partition and click “Finish” to go back to the main interface:
how-to-clone-dynamic-volume-apply-change
Now volume H has been cloned to volume I, but it is just for preview. Therefore, users need to click “Apply” button on the top to apply the change. Moreover, to copy dynamic volume will ask users to reboot computer, which is to protect data.


After all operations are completed in boot mode, the problem how to clone dynamic volume will be solved. When users want to create a backup for basic partitions in non-servers, try using MiniTool Drive Copy. If they plan to backup dynamic volumes, resorting to the disk clone software MiniTool Partition Wizard would be a good choice. For more information about cloning volume, please see Copy Volume.

Free image Windows 7 system disk

After installing Windows 7 and all other necessary programs, users requiring high security are always hoping to free image the Windows 7 system disk so as to create a recovery disk. Well, what is the best way to complete this kind of image? Here, we suggest asking free disk copy software for help, and MiniTool Drive Copy is a good choice.


Reasons for Recommending MiniTool Drive Copy


Firstly, it is free for both 32 bit and 64 bit Windows 7 users (it can be used in Windows XP, Windows Vista, Windows 8, and Windows 10 Technical Preview, too).
Secondly, it supports imaging Windows 7 system disk as well as a single partition for free, and the copy (both OS and data) can be used without users decoding or doing something else.
Thirdly, operating prompts are given in every step so that wrong operation can be avoided thoroughly.
At last, all data will be protected even if power outage or hardware damage appears in the process of imaging.


Maybe, some users do not regard it as the best way to clone system disk, so we will give a demonstration in the following content.


Free Image Windows 7 System Disk with MiniTool Drive Copy


Step 1: download and install the free disk copy software to Windows 7, and then launch it to get the starting interface:

minitool-drive-copy-main-interface

Step 2: choose the module “Disk to Disk” since it is used to clone the entire disk while “Partition to Partition” only images a single partition.

image-windows-system-disk-select-source-disk

Step 3: select the source disk to copy and click “Next>”.

image-windows-system-disk-select-target-disk-to-save-copy

Step 4: select the target disk to save the copy of source disk and click “Next>”.

image-windows-7-system-disk-choose-copy-mode

Step 5: choose a copying mode from 3 and click “Next>” to get the following interface:

copy-disk-note

This is a note showing how to boot from the new disk. Since we are just creating a backup for system disk, ignore it and click “Finish”.

image-windows-7-system-disk-start-imaging

At last, click “Yes” button, and then the free disk copy software MiniTool Drive Copy will start cloning the entire system disk.


If users are planning to free image Windows 7 system disk for recovery disk, try taking this method or copy disk with MiniTool Partition Wizard. Both are easy and safe enough.

Backup partition Windows server

As a free backup program, MiniTool Drive Copy helps create an image for partitions or disks which save important files. Nevertheless, it works only on non-servers such as Windows XP, Windows 7, and Windows 8, so how to backup partition or disk on Windows server? There are 2 solutions.


Backup Partition of Windows Server with MiniTool Drive Copy


Though this program can not be used on server, we still have chance to complete the backup with it, but a non-server computer is needed. Please take out the disk of server and make it the slave of the non-server computer. Note: can not boot Windows from the original server disk. Then, backup the server partition by using MiniTool Drive Copy. See Windows Copy Partition to get detailed operations. After the clone is completed, take out the server disk and connect it with the server to boot computer.


Backup Partition of Windows Server with MiniTool Partition Wizard


If there is no other computer available, please make use of MiniTool Partition Wizard Server Edition. It not only can clone a partition or disk on server but supports performing other operations, such as extend partition, merge partition, align partition, and wipe partition. Next, let’s see detailed steps to image a single partition.


Firstly, launch the program to get its main interface:
minitool-partition-wizard-main-interface
Then, select the partition which needs copying and choose the feature “Copy Partition” from the left action panel to get the interface below:
backup-partition-windows-server-select-unallocated-space-to-save-the-copy
Next, choose an unallocated space to save the copy and click “Next>” to continue. Note: the unallocated space should be large enough to save all the content on source partition.
backup-partition-windows-server-move-resize-new-partition
Next, change the size and location for the new partition and click “Finish”.
backup-partition-windows-server-apply-change
Now we can see the selected partition has been cloned to a partition which does not have drive letter. At this time, users can appoint the partition with a drive letter via the function “Change Drive Letter”. At last, click “Apply” on the top and then MiniTool Partition Wizard will perform all changes automatically.


Now users would know how to backup partition of Windows server. Please choose one of solutions in accordance with practical situations.

Create a backup for system reserved partition

After users cleanly install Windows 7, Windows 8 or more recent Windows OS, a 100MB or 350MB system reserved partition will be created automatically. It is the partition saving Windows startup files. Once this partition gets lost or damaged, the entire Windows will be unbootable. Therefore, it is quite necessary to create a backup for system reserved partition. Well then, how to complete this kind of clone with ease?


Best Way to Create a Backup for System Reserved Partition


It is highly suggested that users download a piece of free drive clone software to do this operation, but the downloaded program should be easy to use and safe enough. Here, MiniTool Drive Copy is recommended. Firstly, it can be used on all non-servers for free. Secondly, all data will be under great protection. At last, detailed prompts will be given in every step.


Create a Backup for System Reserved Partition in MiniTool Drive Copy


First of all, launch the free drive clone software to get its starting interface like this:

minitool-drive-copy-main-interface
Here, please choose “Partition to Partition” to backup system partition. Note: users had better not use this module to migrate Windows OS, because the copy may be unbootable. For Windows OS migration, please see Migrate OS to SSD/HD. After choosing this module, users will see the following interface:

create-a-backup-for-system-reserved-partition-select-source-partition
Please select the system reserved partition to copy and click “Next>”. Then, choose an unallocated space or existing partition to save the backup and click “Next>”. After these operations, users need to change the location and size for the new partition:
create-a-backup-for-system-reserved-partition-move-resize-partition
In the interface above please change the length of partition handle to resize partition and adjust the location of partition handle to move partition, and then click “Finish”.


At last, click “Yes” and then MiniTool Drive Copy will perform all changes. Just wait for a moment.


When all operations are completed, we can say the copy of system reserved partition has been created. Try doing this kind of backup by using this free drive clone software and then you can restore it to the source disk when the source system reserved partition can not work normally. See Restore Active Partition with its Backup to get more information.

Clone active hard drive free

A system drive (the drive saving Windows startup files) must be set active if users want to start the corresponding Windows successfully. Once this active partition gets damaged or crashed, BIOS will be unable to find Windows boot files. As a result, the entire Windows will be unbootable. Therefore, it is very necessary to make a backup for this drive. Well then, how to clone active hard drive for free? Next, we will give a suggestion.


To complete this work, users can make use of a third party drive clone tool, and a lot of such programs can be found from the internet. Nevertheless, some are chargeable and some are unsafe. Considering this situation, we suggest using MiniTool Drive Copy, which is free for Windows 2000/XP/Vista/7/8 users and safe enough to ensure data security. Moreover, to free clone active hard drive just requires several simple operations.


Note: this free drive clone tool is for non-server use only. If users want to image hard drive on server, please resort to professional server partition manager.


How to Free Clone Active Hard Drive via MiniTool Drive Copy


Firstly, launch the application to get its starting interface shown below:
minitool-drive-copy-main-interface
Here, please select the “Partition to Partition” module to clone a single partition. After that, the following interface will appear:
clone-active-hard-drive-select-active-partition
Please select the active partition to clone and click “Next>”. Then, choose an unallocated space or existing partition either from the same disk or from another disk to save the copy of the active partition and click “Next>”. After these operations, users will be able to change size and location for the partition which saves the copy:
clone-active-hard-drive-move-resize-prtition
Please drag the border of partition handle to resize partition and drag the entire handle to move partition location. Then, click “Finish” to get the interface below:
copy-active-hard-drive-start-copying
At this time, users just need to click “Yes” to start cloning the source partition to target partition. When all operations are completed, users are successful to clone active hard drive for free.


Try using the suggested drive clone tool to image a partition or hard disk when users want to backup something.

Copy primary partition to logical partition

Question: I have a primary partition which saves very important files, so I want to make an image for it. Is it possible to copy primary partition to logical partition since I have a nearly empty logical drive to save the copy? Do I need to format the logical partition to be primary? Furthermore, please show me a safe enough method, because I am unwilling to bear data loss.


As a matter of fact, it is possible and can be easy to copy primary partition (even system partition and boot partition) to logical partition, and users do not need to format it to be primary in advance. The free drive copy software MiniTool Drive Copy can help complete this kind of clone with ease. More importantly, all data information will be under great protection so that data loss can be avoided to the largest extent. Next, we will show users specific operations.


Copy Primary Partition to Logical Partition in MiniTool Drive Copy


Firstly, launch the free drive copy software to get its main interface shown below:
minitool-drive-copy-main-window
Here, 2 functional modules are listed, namely “Disk to Disk” and “Partition to Partition”. To copy a single partition, please choose “Partition to Partition” module to get the following interface:
copy-primary-partition-to-logical-partition-select-primary-partition

Now all disks and partitions are listed. Please select the primary partition which needs copying and click “Next>”. Then, select the logical partition that will save the copy of the primary partition and click “Next>”. After this operation users will receive the following message:
copy-primary-partition-to-logical-partition-copy-note
As the message shows, all data on the logical partition will be overwritten. If needed files are saved, please backup them in advance. After confirming to copy partition, users need to click “Yes” to continue.
copy-primary-partition-to-logical-partition-move-resize-partition
Here, users can change the size and location for the target partition, and then click “Finish” button to get the interface below:
copy-primary-partition-to-logical-partition-start-copying
At this time users just need to click “Yes”, and then the free drive copy software will start copying primary partition to logical partition. After all operations are completed, users will find the target partition becomes primary from logical, and all data are cloned at the same time.


From the demonstration above we can see it is possible to copy primary partition to logical partition, and MiniTool Drive Copy can make this process easy and safe. For more information about cloning partition, please see Copy Partition.

Copy files hidden partition

In Windows, partitions like system reserved partition, recovery partition, EFI partition, and OEM partition are always hidden, which is for data and system protection. Well then, is it possible to copy files in hidden partition to make a recovery disk? Of course, there is, and users need to appoint the hidden partition with a drive letter in Windows Disk Management. Detailed steps are as follows: right click the “Computer” icon on the desktop, choose “Manage” from the popup menu, and select “Disk Management” under the “Storage” item to get the following interface:
change-drive-letter-in-disk-management
Then, right click the hidden partition, choose “Change Drive Letter and Paths…”, and appoint it with a drive letter. After that, users can open the unhidden partition to copy files. Nevertheless, sometimes users may find nothing in this partition, because all its files are hidden, too. Please unhide all files, including protected operating system files, in Folder Options, and then copy needed files.


From the introduction above we can see it is not wise to copy files from hidden partition to make a recovery disk since it requires troublesome operations. Here, we suggest cloning the entire hidden partition, which is much easier and safer. All files will be copied, including hidden files. And the free drive copy software MiniTool Drive Copy can help complete the operation perfectly.


How to Clone Hidden Partition with MiniTool Drive Copy


Firstly, launch the freeware to get its main interface below:
minitool-drive-copy-main-interface
Then, choose the functional module “Partition to Partition” since it is designed to clone a single partition.
copy-hidden-partition-select-source-partition
Next, choose the hidden partition which needs copying and click “Next>”. Then, choose an existing partition or unallocated space either from the same disk or from a different disk to save the copy of the hidden partition and click “Next>”. Note: all files on the existing partition will be erased, so users had better choose unallocated space or backup important data in advance.
copy-hidden-partition-move-resize-partition
Then, change partition size and location reasonably and click “Finish”.
copy-hidden-partition-start-copying
At last, click “Yes” and the free drive copy software will start copying. After all changes are completed, to clone hidden partition is done, and all files saved in it are imaged at the same time.


Now we can see the second method is indeed much easier than the first one. Therefore, it is highly suggest that users clone the hidden partition rather than copy files from hidden partition to make a recovery disk. For more information about cloning partitions, users can view Copy Partition.

Image Windows disk to new disk

If users want to upgrade old system disk without losing OS and other installed programs, the best solution is to image Windows disk to new disk. Nevertheless, imaging disk (especially system disk) is not a piece of easy work, and users had better ask professional disk clone software for help, because inferior software always brings damage to data or even to the computer.


Professional Disk Cloning Software Recommendation


Since there are so many cloning tools on the internet, most users do not know which one to choose before they use it. Therefore, we suggest MiniTool Drive Copy in this post. Reasons are as follows:
1. It is free for Windows 2000, Windows XP, Windows Vista, Windows 7, and Windows 8 users to use.
2. All images created by it can be used directly and normally. For example, users can boot Windows from the disk image directly and successfully.
3. Detailed prompts will be given in every step to guide users.


Therefore, it is worth downloading the free disk clone software to image Windows disk to new disk. Specific operations will be shown below. Note: users had better shut down all running programs before launching the program.


How to Image Windows Disk to New Disk with MiniTool Drive Copy


First of all, run this free disk clone software to get its starting interface shown below:
minitool-drive-copy-starting-interface
Then, select the module which is specially designed to clone the entire disk, namely “Disk to Disk” module. After that, the following interface will appear:
image-windows-disk-to-new-disk-select-source-disk
In the interface above please choose the source disk to image and click “Next>”. Then, choose the target disk to save all content on source disk and click “Next>”.


Next, choose a copying method from 3 and click “Next>”. After this operation, a note will pop up:
image-windows-disk-to-new-disk-boot-note
It shows users where to set the new disk as the default boot disk. After reading the note carefully, please click “Finish” button to get the interface below:
image-windows-disk-to-new-disk-start-imaging
At last, click “Yes” button to apply all changes. Since we are cloning Windows disk, the free disk clone software will ask us to restart computer, which can further ensure data security. When all operations are completed in boot mode, the computer will reboot. Please enter BIOS and make the new disk as the default boot disk during booting time. After that, our computer will boot from the new disk.


This is the whole process of imaging Windows disk to new disk with MiniTool Drive Copy. For more information about disk cloning, please see Copy Disk.

Clone one flash drive to another

Problem: I have a 16GB flash drive which was bought 1 year ago and saves more than 10GB important files. For worrying about both logical and physical damage, now I want to image the old drive to the 64GB new flash drive since the latter was bought several days ago. How can I clone one flash drive to another in easy operations and without data loss? If third party tool is needed, I hope it is free.


Solution: free drive clone software is highly recommended. Of course, not every freeware is recommended, because some of them may bring damage to data. Here, we suggest using MiniTool Drive Copy since it provides all-sided data protecting solutions during the process of cloning one flash drive to another.


Actually, apart from flash drive, this freeware supports cloning other storage devices, including SD card, memory card, pen drive, hard disk, and so on. Moreover, operations are so simple that almost all computer users can master it with ease. If users do not believe what I said, please see the following example.


How to Clone One Flash Drive to Another with MiniTool Drive Copy


Step 1: launch the free drive clone software to get its main interface shown below:
minitool-drive-copy-main-interface
Step 2: choose “Disk to Disk” module to clone the entire flash drive.
clone-one-flash-drive-to-another-select-source-device
Step 3: select the flash drive which needs cloning and click “Next>”. Then, select the new flash drive and click “Next>”.
clone-one-flash-drive-to-another-choose-copying-method
Step 4: choose a copying method from 3 and click “Next>”. After that, a boot note will appear, and users just ignore it and click “Finish”.
clone-one-flash-drive-to-another-start-cloning
Step 5: click “Yes” to start cloning flash drive.


When MiniTool Drive Copy shows it is successful to copy disk or partition, to clone one flash drive to another drive is completed. If users also need to backup your device, try this free drive clone software now. For more information about drive copy, please see Copy Disk.